How to prepare SVGs for cutting in Design Space
Although SVG files are ready to cut, sometimes some manipulations are needed in order for them to cut properly. In this guide, we will be taking a look at the need to ‘Attach’ files. Not all files will require attaching, but many will. We will use this Mother/Grandmother design to demonstrate. The design is uploaded to the Design Space library and then added to the canvas to begin working with. Looking at the Layers panel on the right-hand side, you can see that there is a large drop-down of pieces that are part of the design. The letters are all shown individually because they are all separate parts.
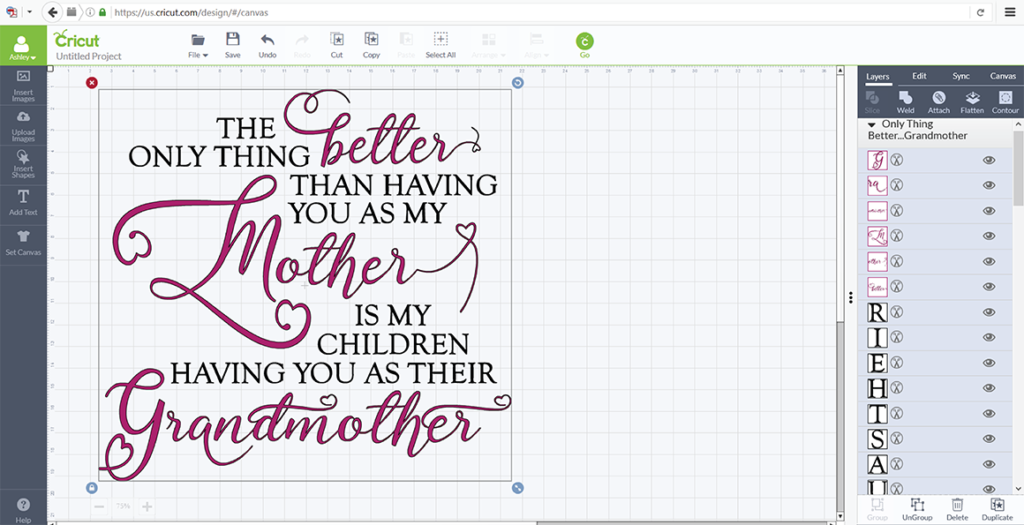
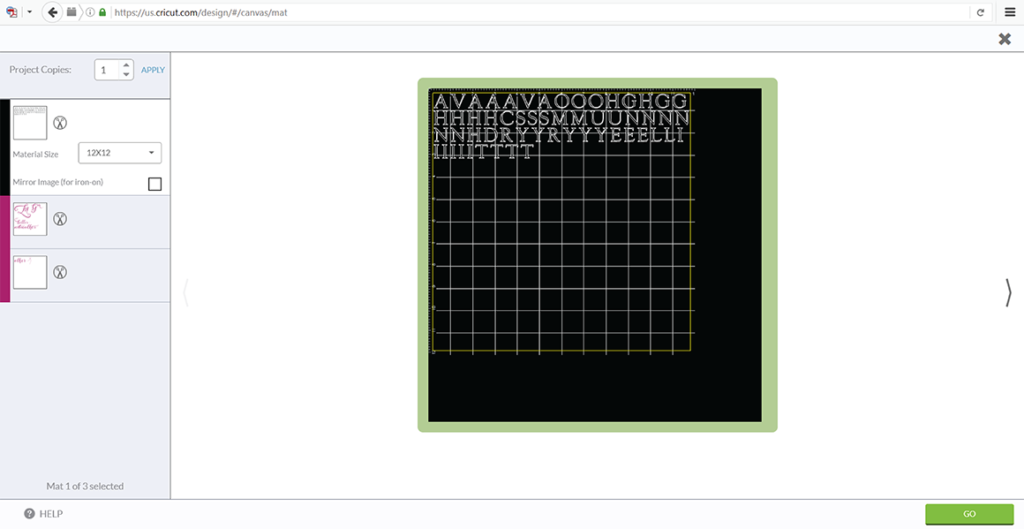
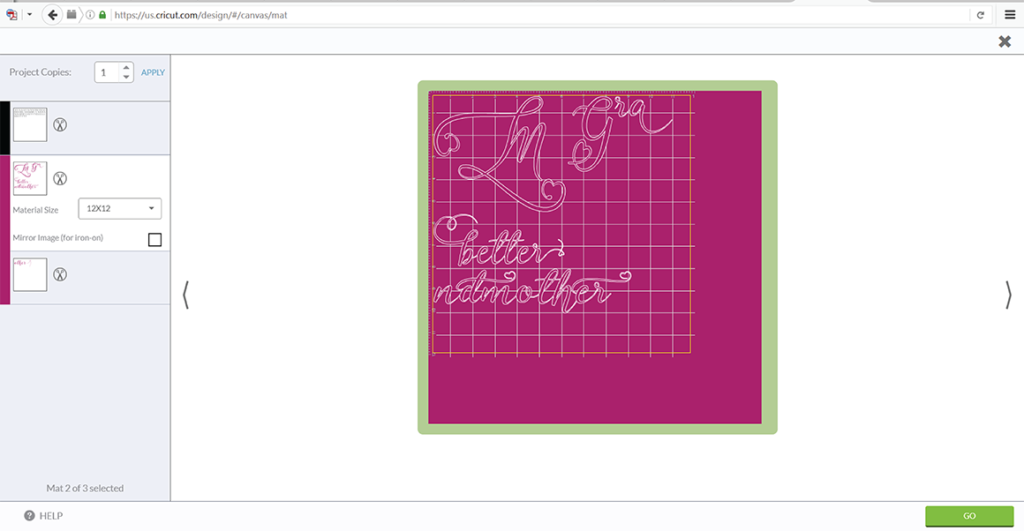
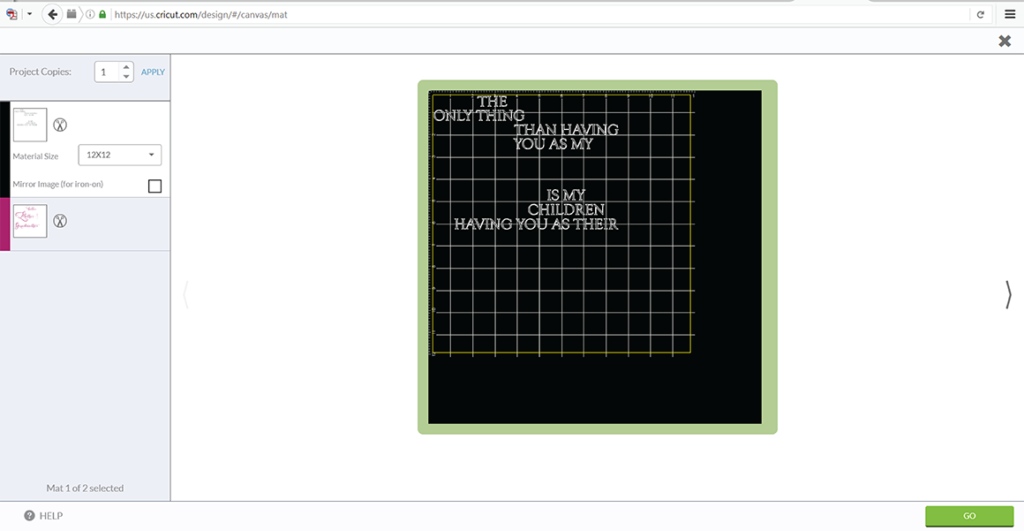
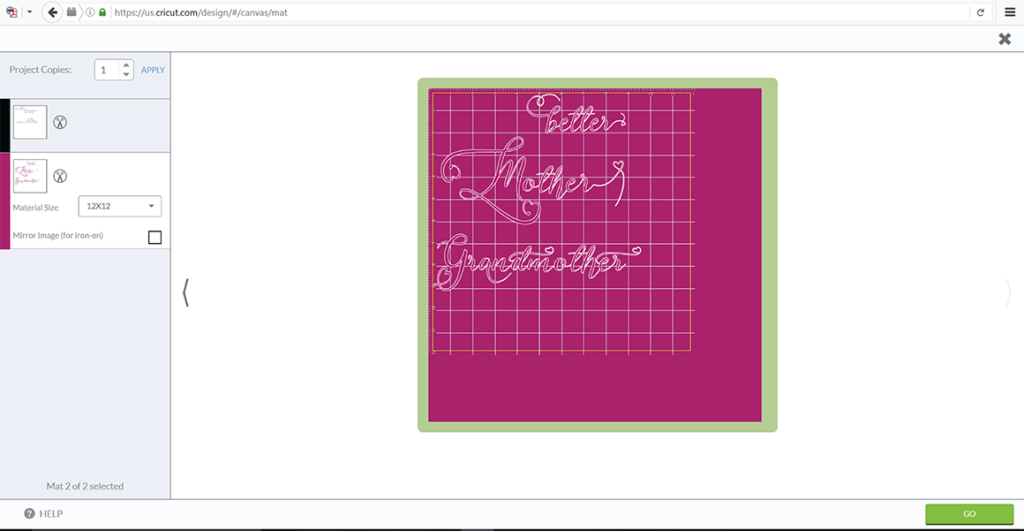
Clicking on ‘Go’ will help us visualize exactly what the difficulty would be here if we were to send this design to our cutter as is. On the first mat, all of the letters that are black in our original design are lined up so space is not wasted. But just think of how long that would take to apply each of those letters to your project individually! Clearly, we need to make an edit somewhere.
The second mat shows all of our pink letters, but they are definitely not laid out to make things easy for us to apply to our project either.
Let’s exit out of those screens and go back and make some edits to our design so they are laid out on our cutting mat exactly as they are laid out on our screen. Since we will be cutting our vinyl in two colors, we will need to create two attached layers. Starting with the pink layer, we need to attach all of those pieces to make them one big piece. Looking at the top word ‘better,’ you can see that is already one piece. If we were to move it off the mat, the whole word would move as one. It is a welded piece, so it is already attached. But looking at the next pink word ‘Mother,’ you can see two pieces, the ‘M’ and then ‘other.’ These two need to be attached as one, so select them both at the same time (hold down on the Shift key while selecting them), and in the right hand panel, simply select ‘Attach.’ They are now one piece that you can move freely around the mat. Repeat for ‘Grandmother.’
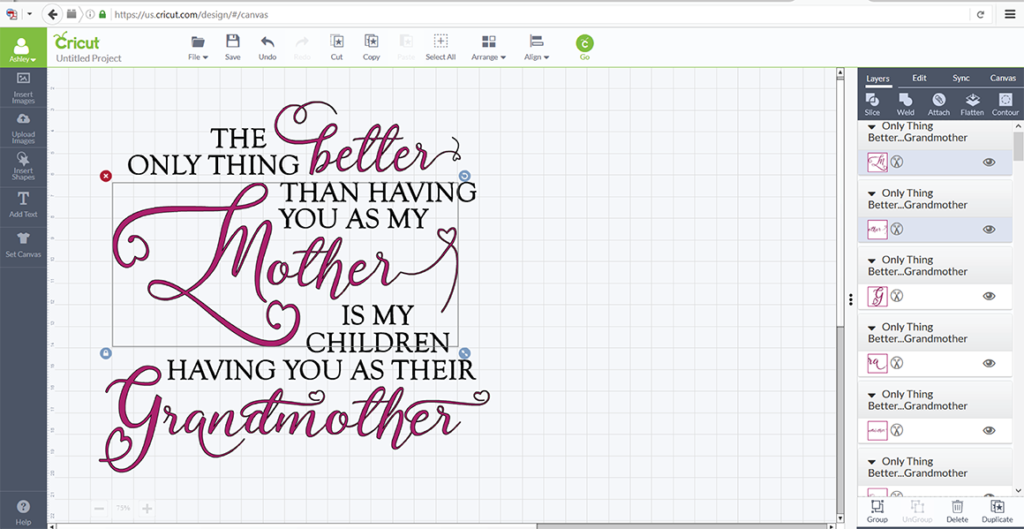
Now we should attach all three of those pieces to create an attached set. Select them all, then just hit the ‘Attach’ option to group them. If you wanted to, you could move this piece as one around the mat seen below. You can see in the Layers panel that these three words are now part of an attached set.
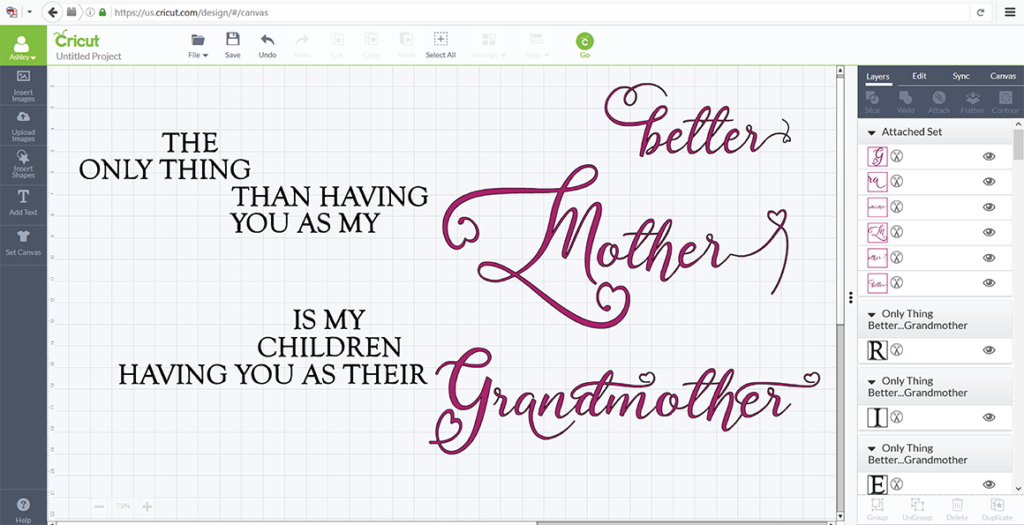
Next we need to attach all of the black letters as one piece. The easiest method to do this would be to utilize the little eyeballs that are to the right of each layer in the Layers panel. We would like to hide the pink layer from view, so we will press the eyeball next to each piece of the attached set until everything disappears. Now the only thing we can see on our mat are the black letters because the pink layer is hidden from view.
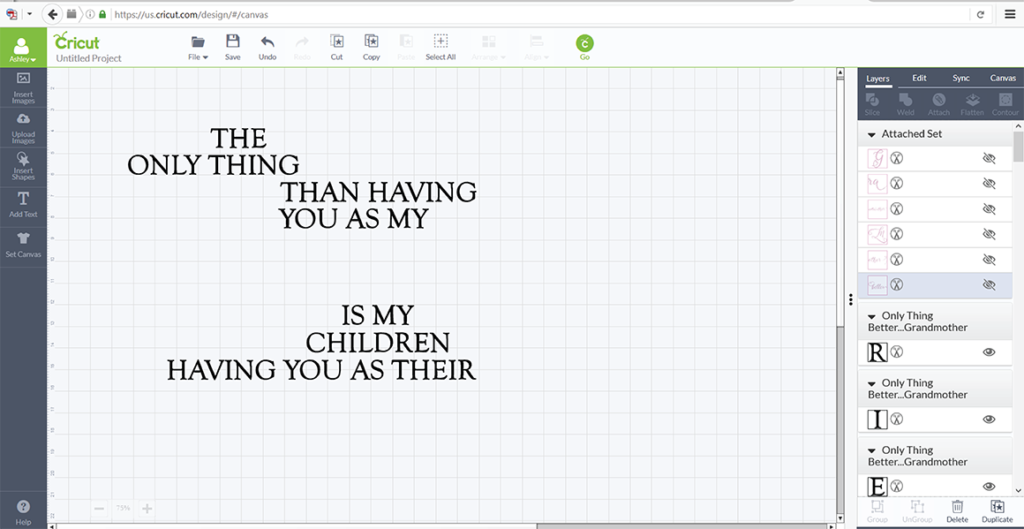
Draw a bounding box around all of the black letters to select them all, then select ‘Attach’ just like we did the pink letters.
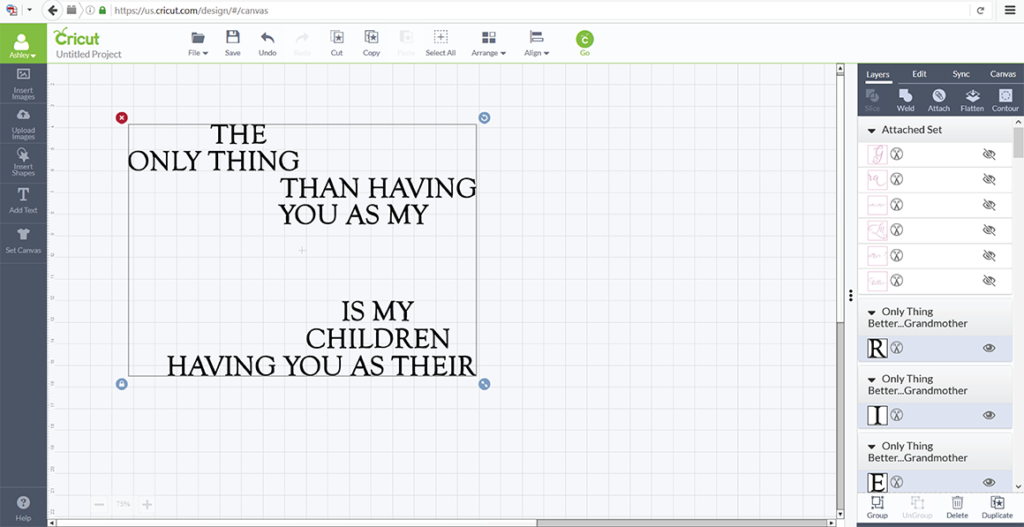
You will now see those letters as an attached set in the left hand Layers panel. You can move this piece as one if needed.
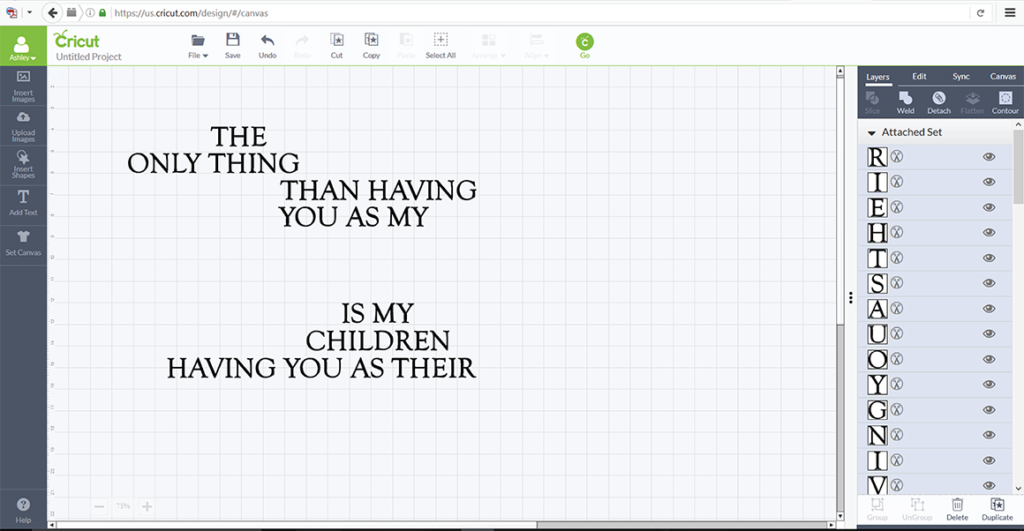
We are ready to bring that hidden layer back into view now, so we can go back to the pink attached set, and uncheck the eyeball for all those pieces.
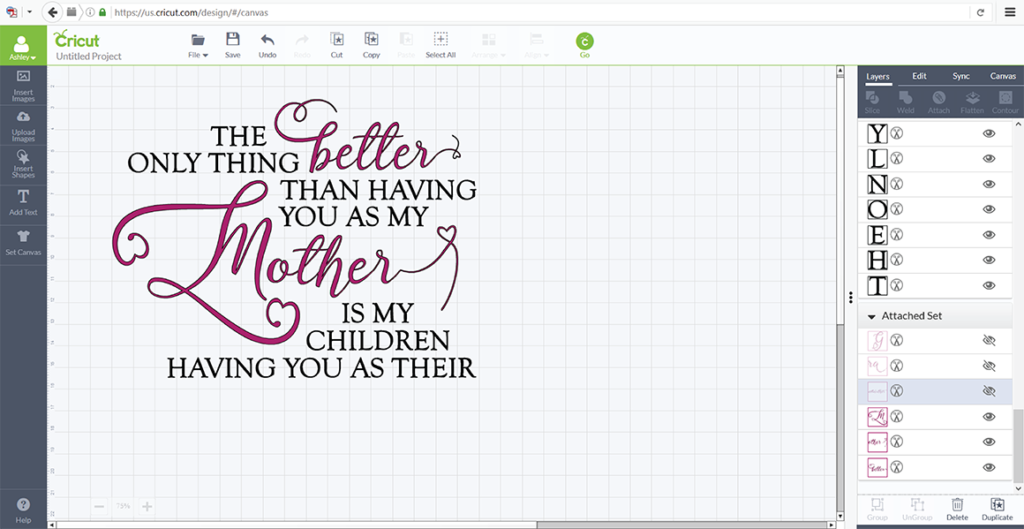
Now we are ready to cut! Just resize your design so it fits your project and send to your cutter. You will see two mats, one for each color, and all your pieces will be laid out appropriately for easy layering to your project.
Love this design as much as I do? You can purchase it from the designer here, with commercial use.
Crazy about that swirly heart font? I know I am! You can support the font creator and add this beauty to your collection here.
Cricut Help & FAQ
Need help using your fantastic new files with your Cricut machine? Then this help area is for you! Tailored Cricut questions will guide you through all steps, making you a whizz in no time.
Cut Files & Graphics
1. Why are my files Zipped and how do I Unzip them?
After you download your purchase, the first thing you need to do is unzip the files. You will not be able to proceed with using your files until you unzip them. In a nutshell, zipped (or compressed) files take up less storage space and can be downloaded more quickly than unzipped (or uncompressed) files. Since your Craft Bundles purchase likely includes hundreds of files, zipping them for download is the easiest and most efficient method for you to download them. Otherwise, you would be clicking a file to download hundreds upon hundreds of times! So, immediately upon downloading your purchase, you will want to unzip the files in preparation for their use. Do you use a PC or a MAC? See below for the proper method to unzip files for each.
Instructions for PC
After you download, look at the icon for the zip folder. Zipped folders have the appearance of a folder with a little zipper on it. Right click on the folder, and you will see an option to “Extract All.” Clicking this option will begin the unzipping process. You will then see a prompt asking you where you would like to save your newly unzipped folder. If the destination is the same destination as the zipped folder, you do not need to browse, and just click Extract to begin unzipping. If you would like to place the unzipped files in a new spot on your computer, then browse to locate this Folder, and then click on Extract. After the unzipping process is complete, you will be left with TWO folders of your files. One will be the files still in the zipped folder. This folder can be deleted if you prefer, as the files are not usable in their zipped format. The other folder will be the unzipped and completely ready to use files. Note: The size of the download will determine how long it takes to complete the process. Computer speeds vary.
A more in depth look at unzipping files can be found in our Unzipping Guide
2. I can’t find my downloaded files on my computer
Unfortunately this isn’t a question we can answer for you easily. If you have downloaded your files, you will need to remember where your computer downloaded them to. Everyone’s computer settings are different. You could set it up so your files are downloaded to your computer’s ‘Downloads’ folder, or you can opt for your computer to ask you where you would like your files to be downloaded to before downloading. Every internet browser has a default for downloaded files, so if you don’t like the default option, you should edit it so you can find your files when needed.
3. What formats are available for download?
At a minimum, you will receive SVG, DXF, and EPS cut files, as well as raster photo files (PNG, JPG, or PDF) for all designs in each bundle. The photo files are not cut files, but mainly used for reference, mock-ups, or Print and Cut projects with a quick trace. These 4 file types are the most common types for crafters with cutters and plotters. Note that not all of these file types will be usable in your software however, and you should verify your software accepts at least one of these file types before purchasing. Silhouette Basic Edition users can use DXF files, and Silhouette Designer Edition users can utilize either SVG or DXF files. If you use Cricut Design Space, you will want to use the SVG files. EPS files are typically reserved for more advanced software, so this file type will not be usable by most. Also, some designers will include additional formats, such as AI or PSD, but this is not common and completely dependent on each designer.
4. How do I open SVG Files in Design Space?
To import an SVG file to your Cricut Library, first open up Design Space in your internet browser. You do need an account with Cricut to use Design Space, but it is free to set up. Simply log in to your account and open up a new project to get started.
Next, click on the Upload Images icon on the left hand side. From there you will choose the image upload option on the left hand side and click on the blue icon to proceed with your upload. Browse for your file, select it, and click on Open. Once you have opened your file, a preview will appear in the box. You will then be prompted to change the image name if desired (it defaults to the file name from your computer).
You can also choose to add tags. Once you are satisfied with those edits, click on the green ‘Save’ icon to save your design to your library. On the next screen, you will see your library and any design you have uploaded. When you are ready to insert a design to your canvas, click on it (a green checkmark will indicate it is selected), and then select ‘Insert Images.’ Your design is now added to your canvas and is ready to edit and cut!
5. How come when I click on a file, it either doesn’t open or opens in a web browser?
When attempting to open a file from within the folder it is saved in, your computer needs to be told which program to use to open that file. SVG files often default to a web browser. To avoid this, open up the file from WITHIN your program. Just do an image upload in Design Space to use your design.
6. There are so many tiny pieces to each design that I am getting frustrated. Is there an easy way to group those pieces together?
Yes! First select any layers you don’t want to group together and select the little ‘eye’ icon next to it in the Layers panel. This will hide that layer from view. Then draw a bounding box around all the pieces you want to group together. Manually select any other piece you missed by holding down on the Shift key and selecting it. Once everything is selected, go back to the Layers panel and select Attach. This will group everything together. Now select the eye icon next to those hidden layers and they will reappear.
If you need a little more help on attaching, see our handy guide available here.
8. I purchased a set of designs, but they all come in one SVG file. How do I separate it so I can work with just the design I need for my project?
Upon downloading your purchase and importing the SVG file to Design Space, you discover that the designs are part of a grouped set of designs. There are two methods you can use to separate the designs. The first method just has you deleting the pieces you don’t need for your current project. If you do utilize this method, just make sure you have a copy of the grouped set of designs saved somewhere on your computer or in your library. Just utilize the ungroup and delete icons to clear out those unneeded pieces. The second method is to use a ‘hiding’ technique. Click on the layers you don’t need, and then simply click the little eyeball to the right of each layer in the Layers panel, and they will be hidden from view. Any layer that is hidden when you go to cut the design will not be cut.
