How to prepare SVGs for cutting in Design Space
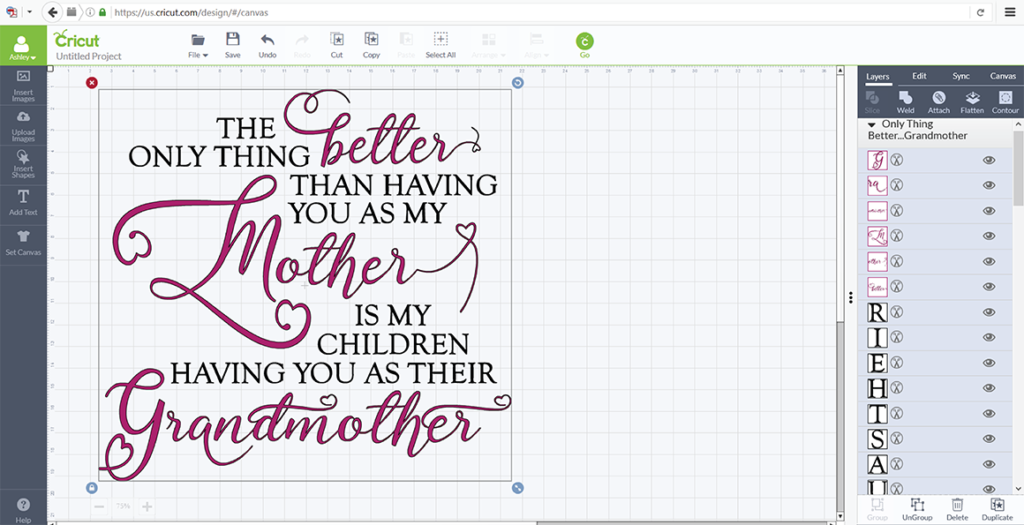
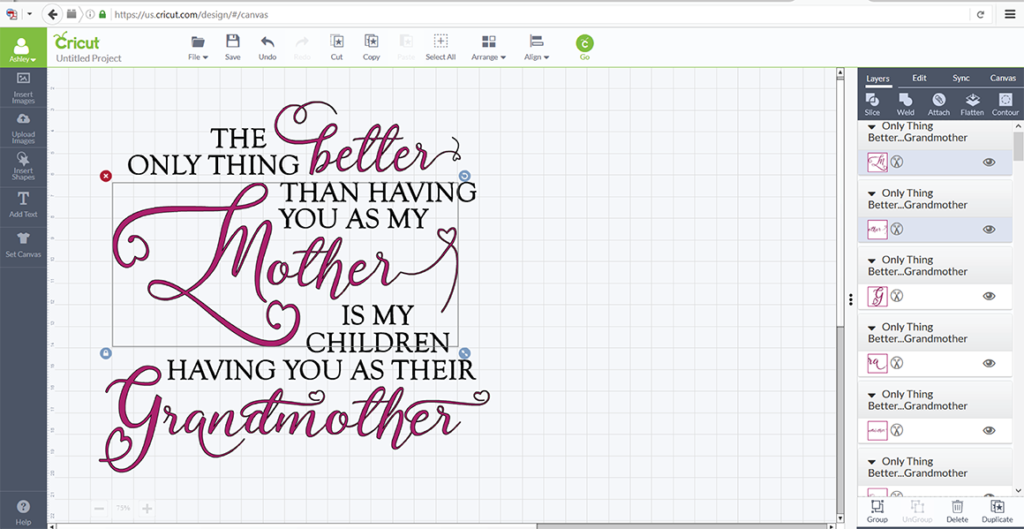
Although SVG files are ready to cut, sometimes some manipulations are needed in order for them to cut properly. In this guide, we will be taking a look at the need to ‘Attach’ files. Not all files will require attaching, but many will. We will use this Mother/Grandmother design to demonstrate. The design is uploaded to the Design Space library and then added to the canvas to begin working with. Looking at the Layers panel on the right-hand side, you can see that there is a large drop-down of pieces that are part of the design. The letters are all shown individually because they are all separate parts.
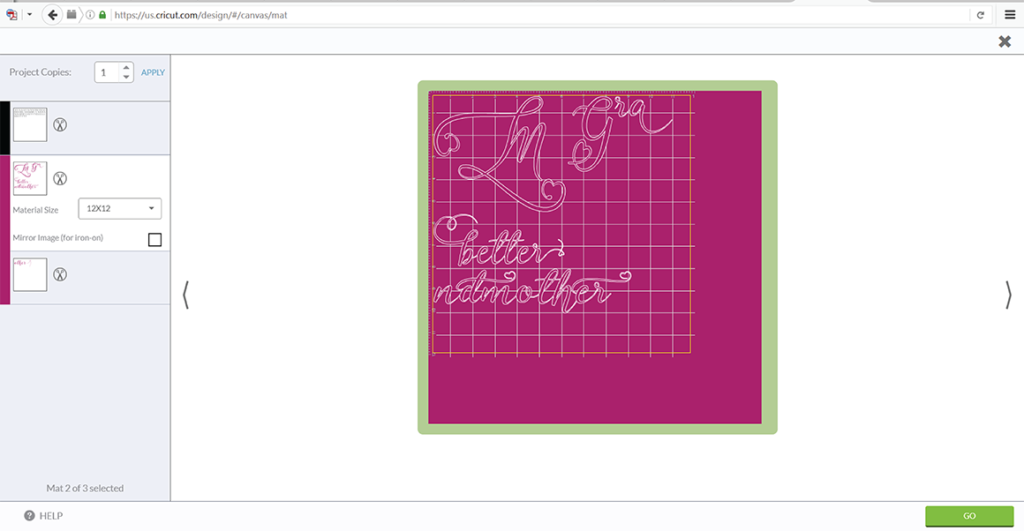
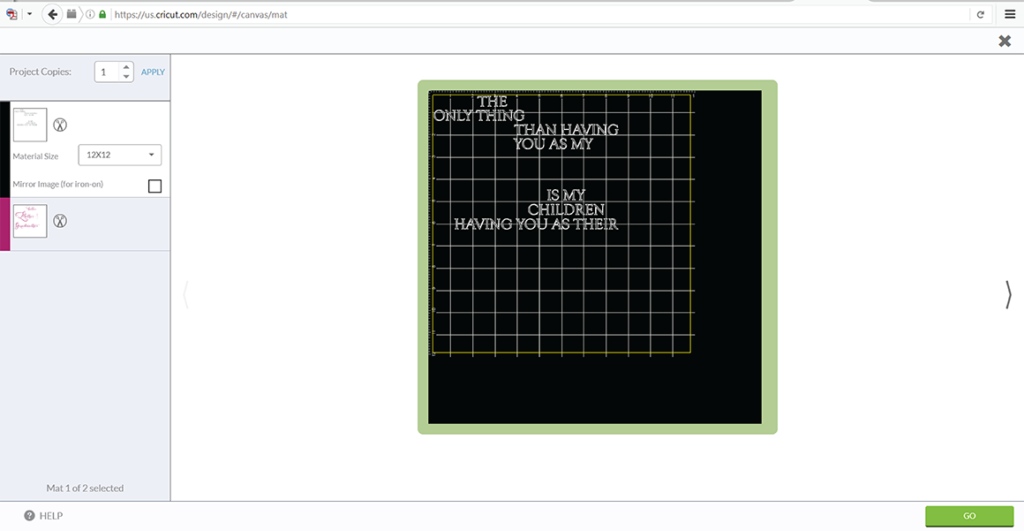
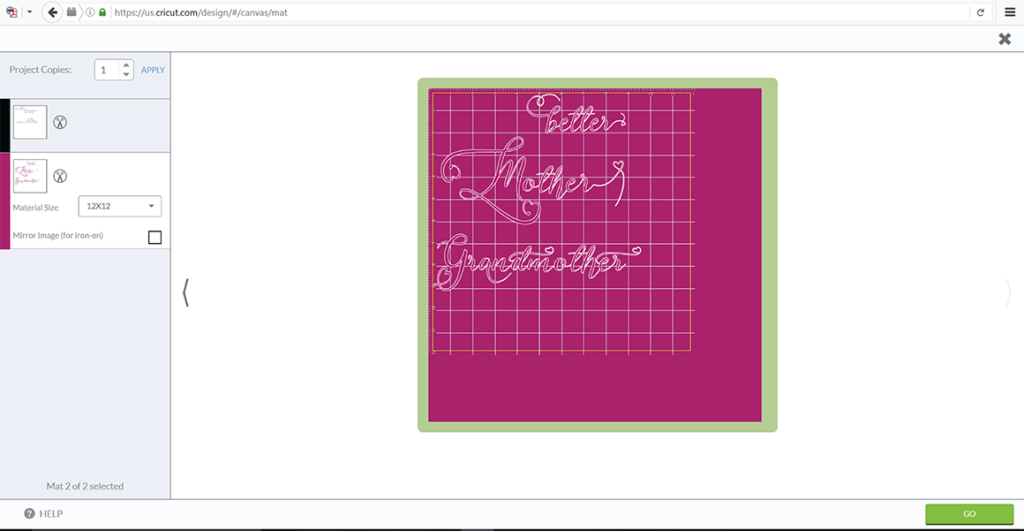
Clicking on ‘Go’ will help us visualize exactly what the difficulty would be here if we were to send this design to our cutter as is. On the first mat, all of the letters that are black in our original design are lined up so space is not wasted. But just think of how long that would take to apply each of those letters to your project individually! Clearly, we need to make an edit somewhere.
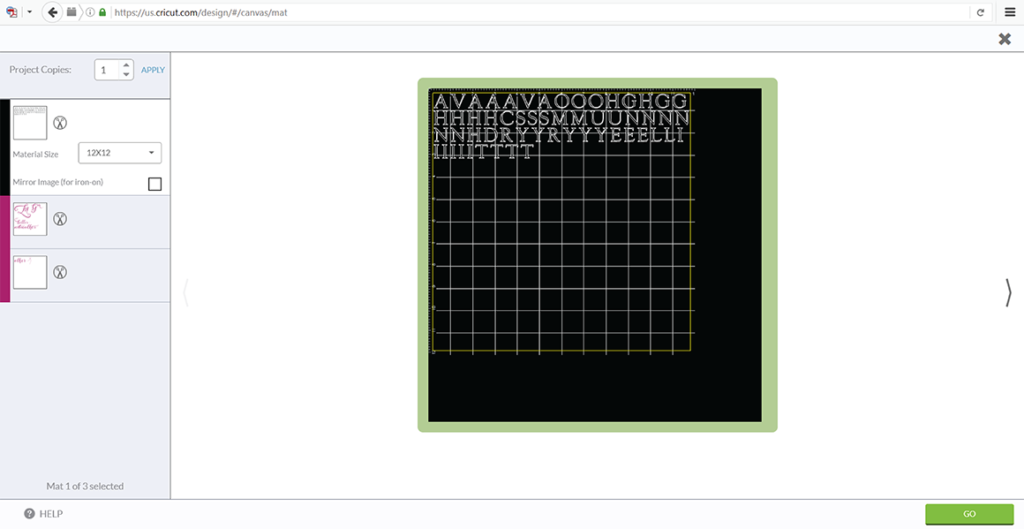
The second mat shows all of our pink letters, but they are definitely not laid out to make things easy for us to apply to our project either.
Let’s exit out of those screens and go back and make some edits to our design so they are laid out on our cutting mat exactly as they are laid out on our screen. Since we will be cutting our vinyl in two colors, we will need to create two attached layers. Starting with the pink layer, we need to attach all of those pieces to make them one big piece. Looking at the top word ‘better,’ you can see that is already one piece. If we were to move it off the mat, the whole word would move as one. It is a welded piece, so it is already attached. But looking at the next pink word ‘Mother,’ you can see two pieces, the ‘M’ and then ‘other.’ These two need to be attached as one, so select them both at the same time (hold down on the Shift key while selecting them), and in the right hand panel, simply select ‘Attach.’ They are now one piece that you can move freely around the mat. Repeat for ‘Grandmother.’
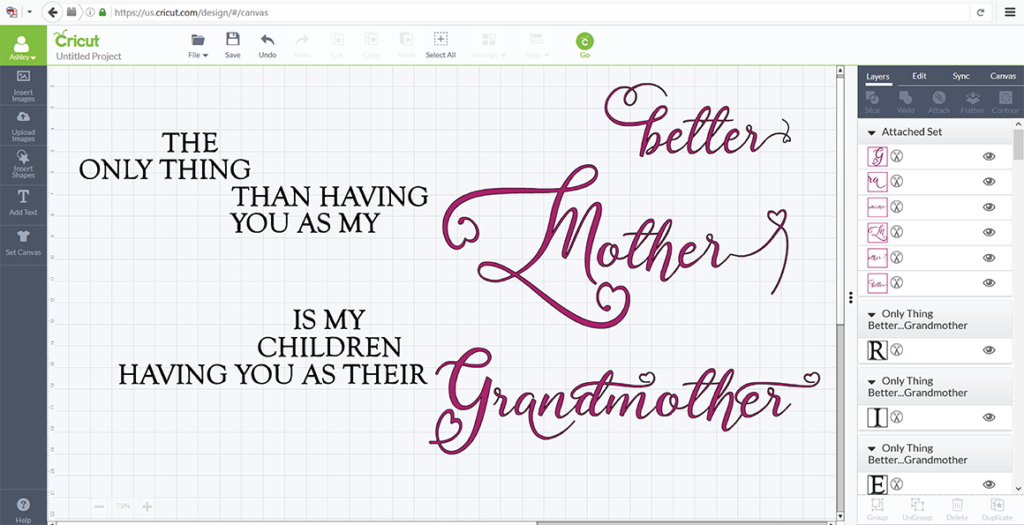
Now we should attach all three of those pieces to create an attached set. Select them all, then just hit the ‘Attach’ option to group them. If you wanted to, you could move this piece as one around the mat seen below. You can see in the Layers panel that these three words are now part of an attached set.
Next we need to attach all of the black letters as one piece. The easiest method to do this would be to utilize the little eyeballs that are to the right of each layer in the Layers panel. We would like to hide the pink layer from view, so we will press the eyeball next to each piece of the attached set until everything disappears. Now the only thing we can see on our mat are the black letters because the pink layer is hidden from view.
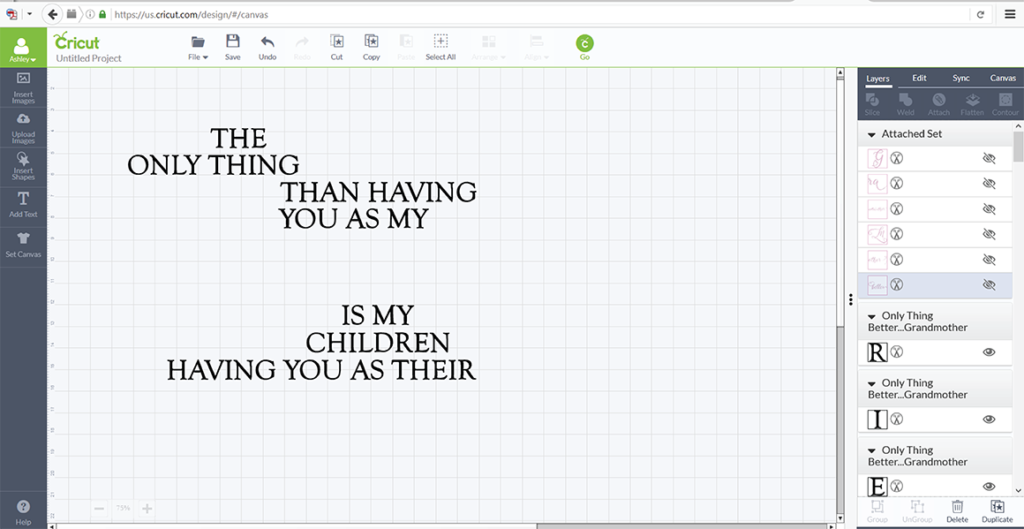
Draw a bounding box around all of the black letters to select them all, then select ‘Attach’ just like we did the pink letters.
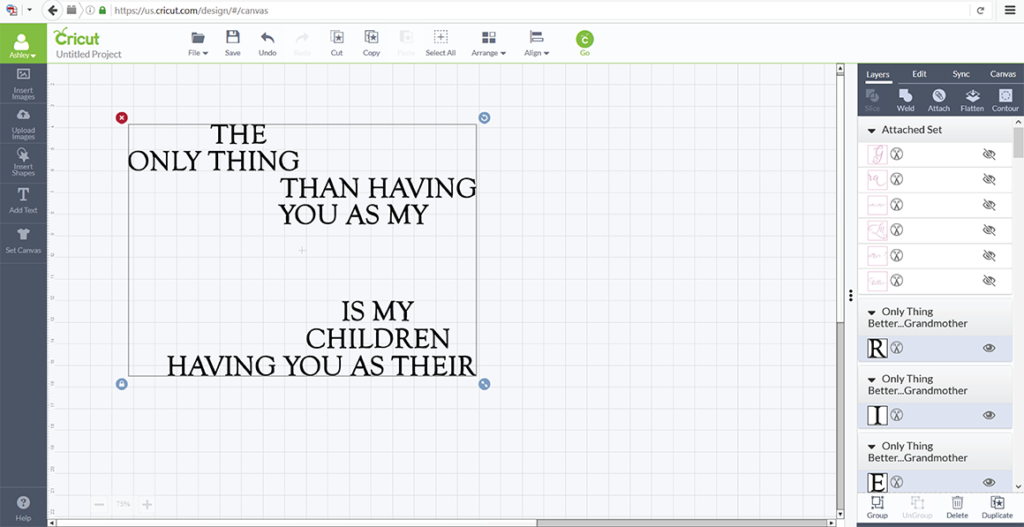
You will now see those letters as an attached set in the left hand Layers panel. You can move this piece as one if needed.
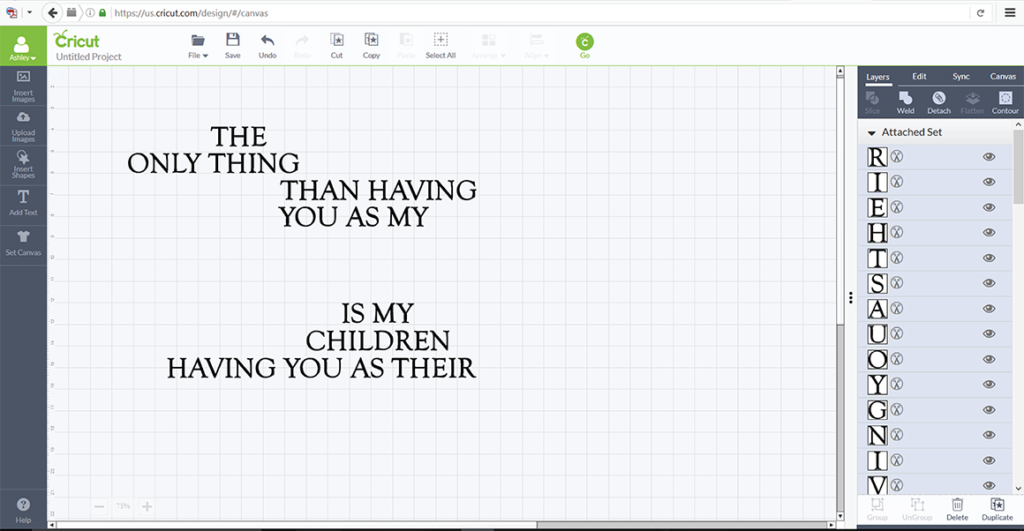
We are ready to bring that hidden layer back into view now, so we can go back to the pink attached set, and uncheck the eyeball for all those pieces.
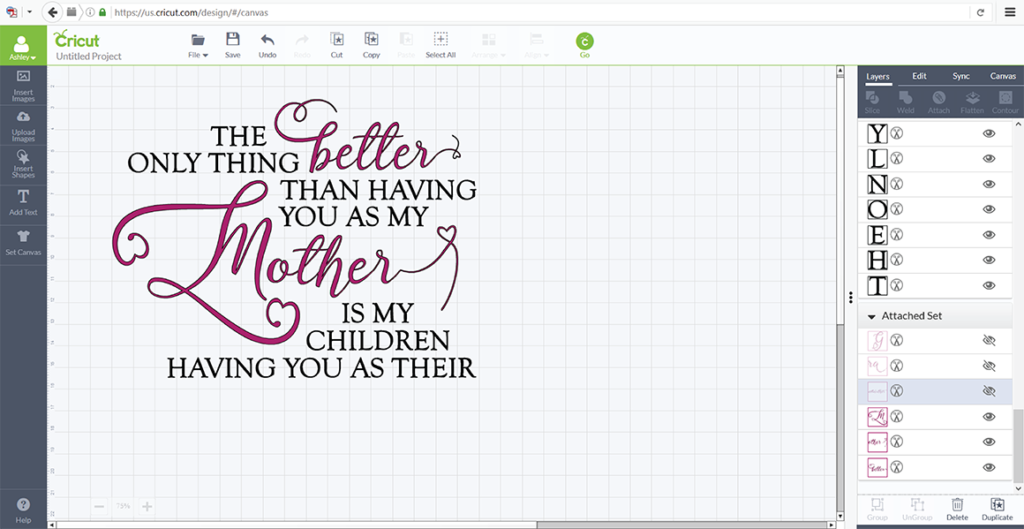
Now we are ready to cut! Just resize your design so it fits your project and send to your cutter. You will see two mats, one for each color, and all your pieces will be laid out appropriately for easy layering to your project.
Love this design as much as I do? You can purchase it from the designer here, with commercial use.
Crazy about that swirly heart font? I know I am! You can support the font creator and add this beauty to your collection here.
How to access alternate characters in fonts
I am addicted to fonts! I can’t stop purchasing them, and I likely won’t be stopping anytime soon. Playing with each font and discovering its capabilities is the best part! Many have extra characters, glyphs, and swashes that help add a little pizazz to any design. BUT, having the right program to work in may be necessary to utilize all of each font’s features. Because of the growing popularity of vinyl crafting and the like, many font designers now code their fonts specifically for us crafters. If you will be using only Silhouette or Design Space in your crafting, when purchasing any new font, always check to see if it is PUA-encoded. These fonts will work in crafting cutters with just a few extra steps.
In this guide, we will use the Flamingo font. It has lots of alternate characters. We will also be using Silhouette Studio to demonstrate, however if you use another program like Cricut Design Space, the process is the exact same. You are essentially utilizing a copy/paste method from one program into the other, so instead of pasting into Silhouette, you would just do so in Design Space. This will make more sense as you read, but just remember, the process is the same.
Open your program and use the Flamingo font to type out your text. The text typed will not be fancy with swashes yet, but we will change some of the letters to add those alternate characters in the following steps.
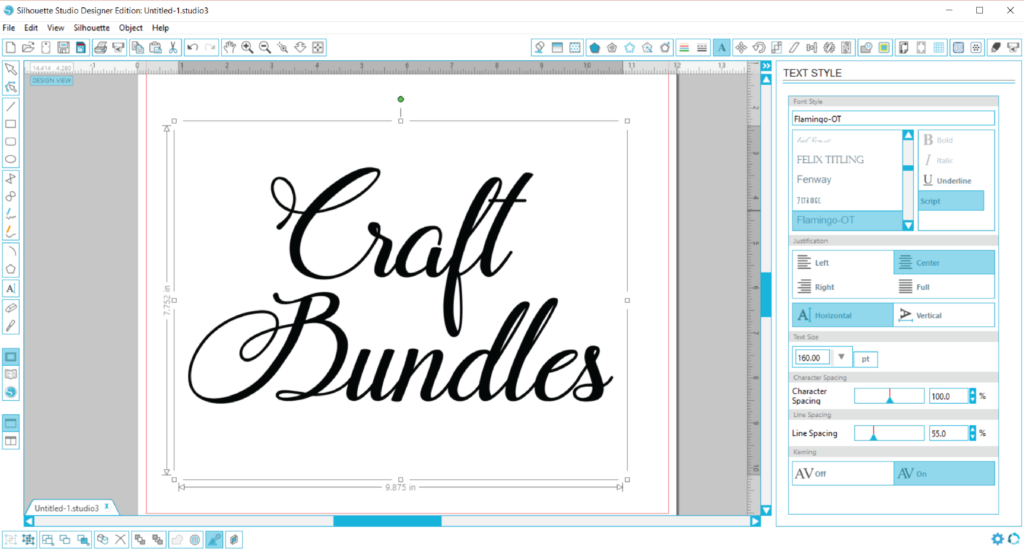
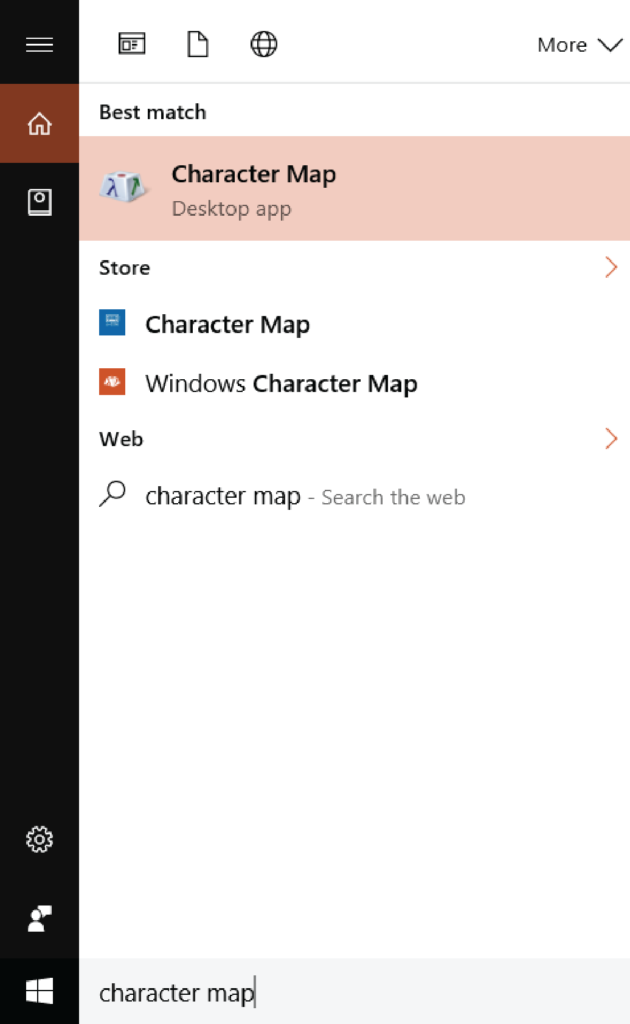
Now, in order to access the glyphs for each font, you need to utilize your computer’s character map. This is a pre-installed program on your computer, so you do not need to download anything. All you need to do is open it. Doing a quick search for the program will locate it without much work. Just open your computer’s search bar and type in “Character Map.” In Windows 10, it is shown as a desktop app when searching like the below photo. Just click on it to launch the program.
After opening, you will see a dropdown that includes all system fonts. Search for the font you need. In this example, we located the Flamingo font and selected it. Also, make sure the box for Advanced View is checked. Your computer may already have it checked by default.
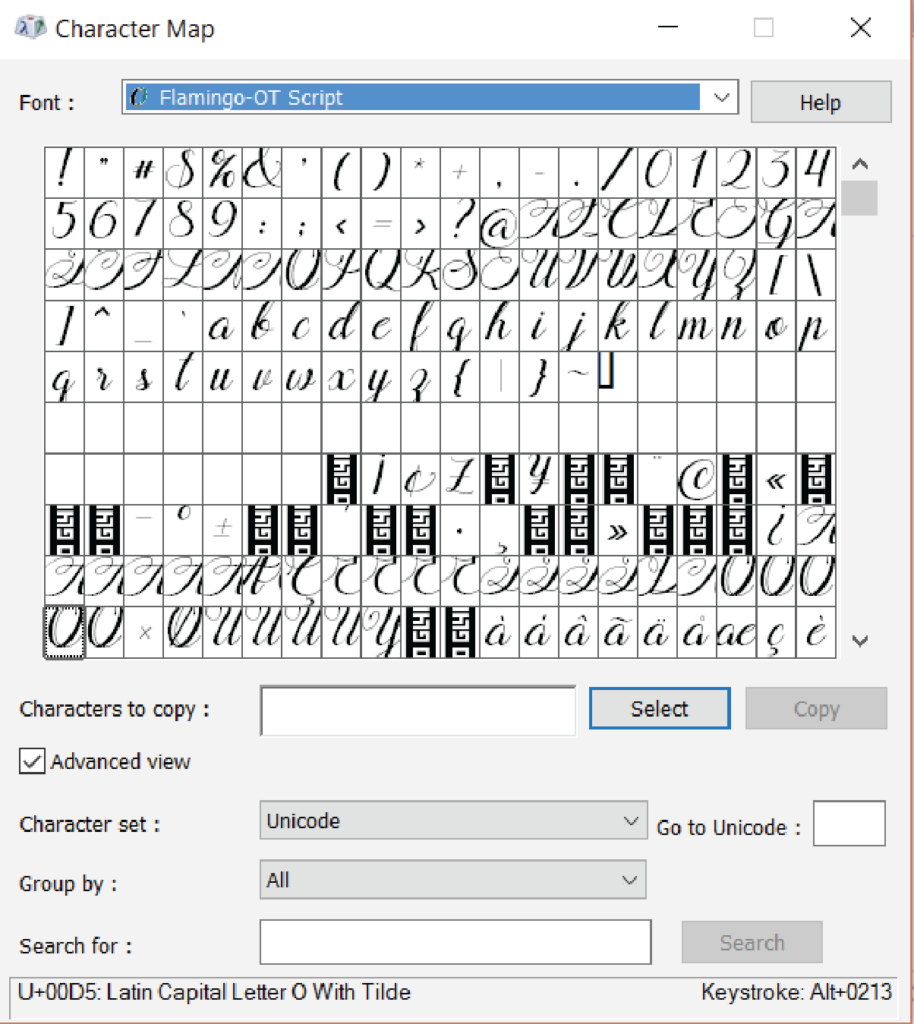
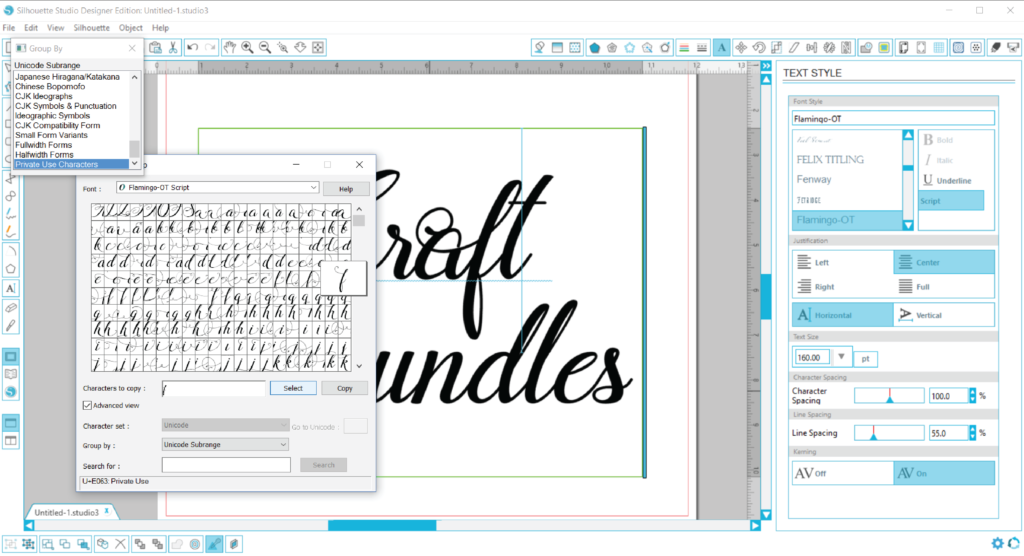
Next, in the Group By dropdown, scroll down until you find “Unicode Subrange” and select it.
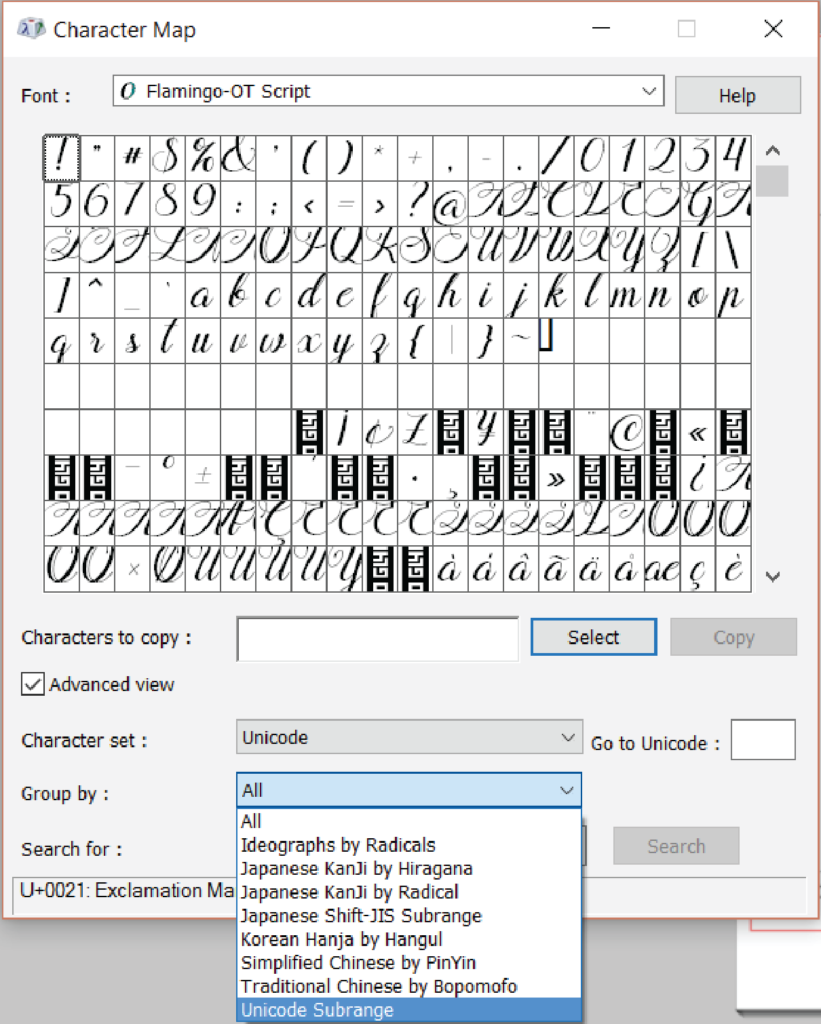
A new box will pop up for the Group By options. You will want to select Private Use Characters from that dropdown. You may need to scroll all the way to the bottom to locate this option. Once that is selected, you will notice all the font’s alternate characters will pop up. Exciting, but so many choices!
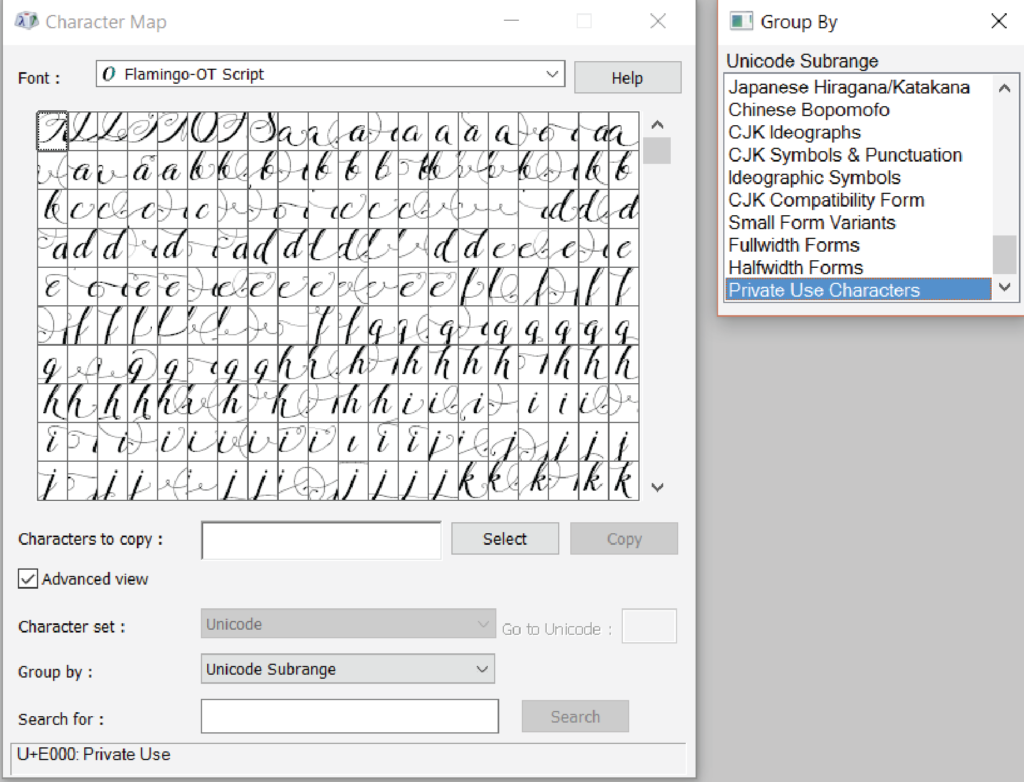
From here on out, it may be a trial and error quest for you until you find the character that looks best in your text. You can click each glyph and enlarge it slightly to see it a little better. In this case, I would like an alternate letter ‘f,’ so I locate one I believe may look well in my text.
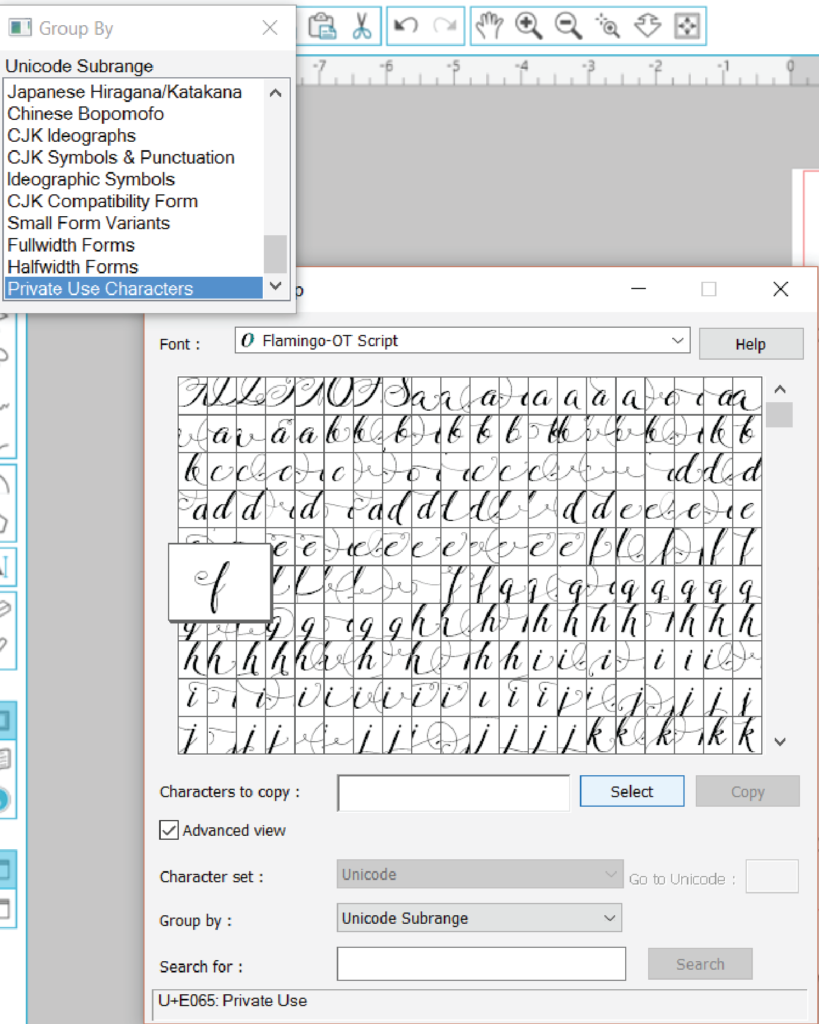
When you locate a glyph you want to try, make sure it is enlarged, and then click the Select button. This will add it to the Characters to Copy box. Then click Copy. Doing so will copy it and add it to your clipboard for pasting elsewhere.
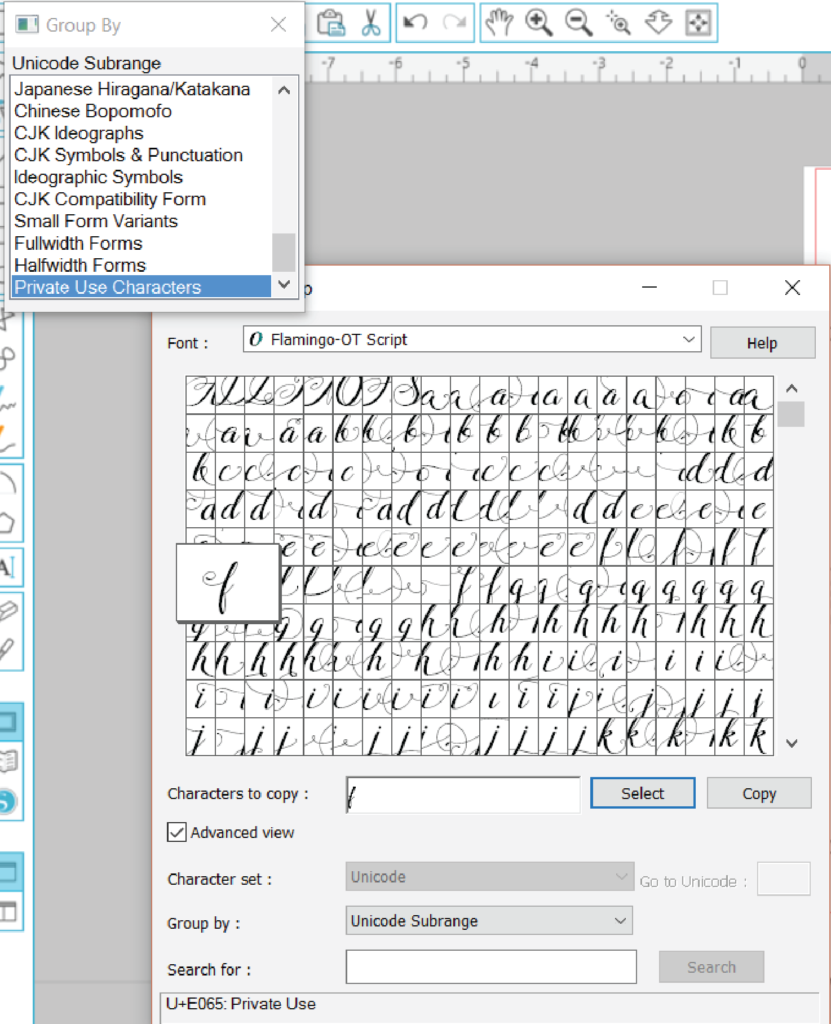
Open your program and locate the ‘f’ you want to change. Highlight the letter and then paste your new letter in its spot. Pasting can be done by right clicking and selecting Paste in Silhouette or simply using the keyboard shortcut Control + V. Remember, this process is the same in Cricut Design Space and many other programs.
In this case, this particular letter ‘f’ glyph we chose was probably not a good choice. There are other glyphs that would work better in this text.
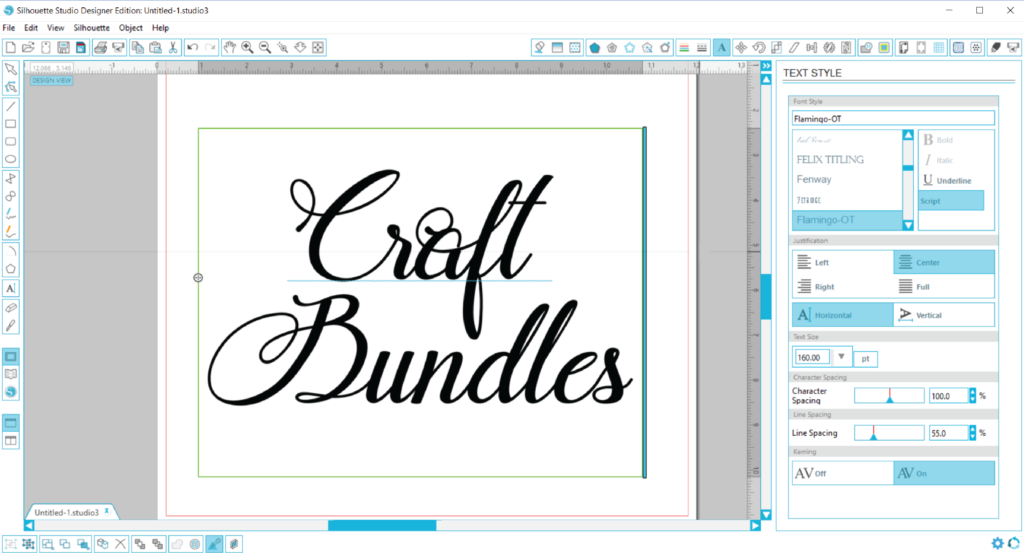
To try another letter choice, go back to the Character Map program and locate a second glyph and repeat the steps. Once you find one you like, click the Select button and then choose Copy.
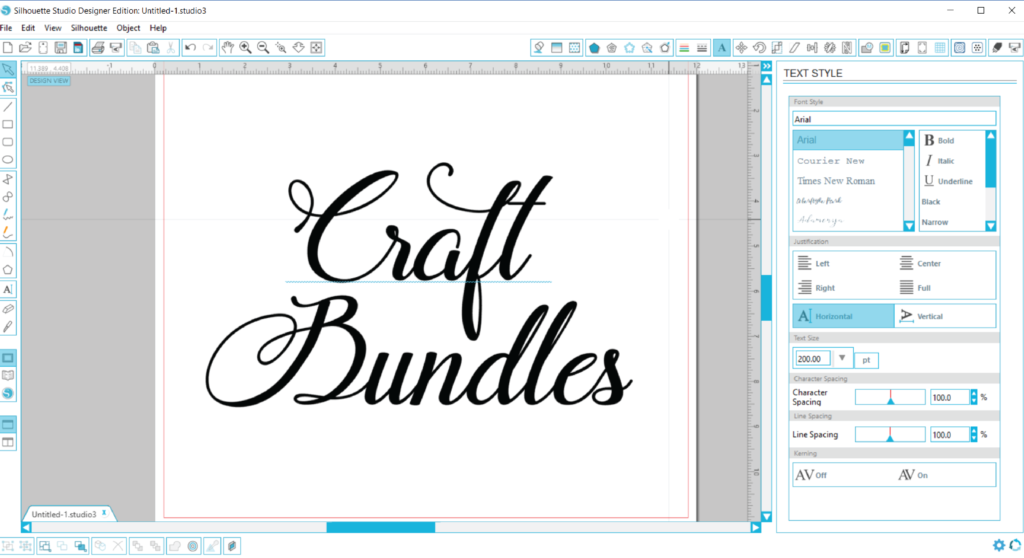
Go back to your design, highlight the letter you want to replace, and paste the new one in. Much better placement of the swirl!
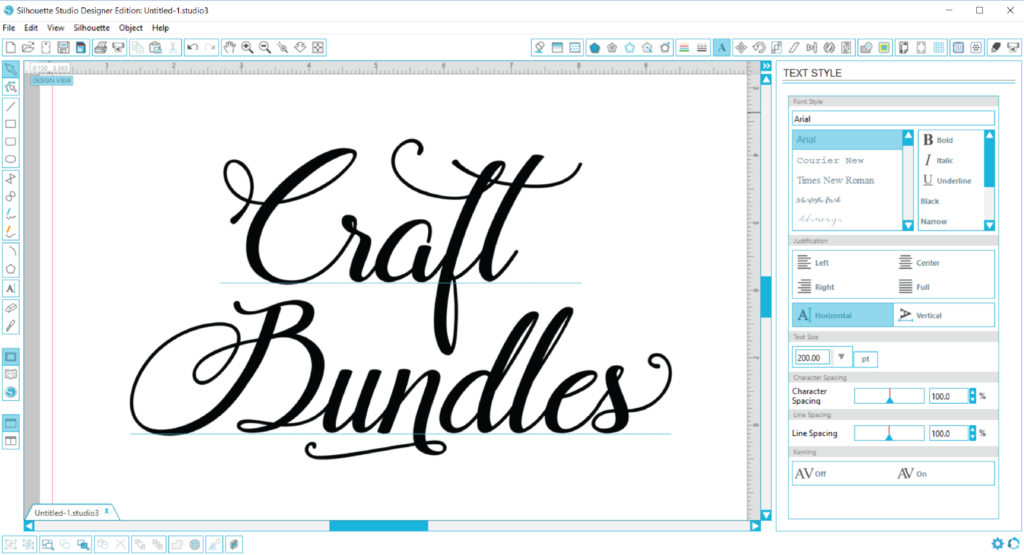
Now, just repeat as desired. Some fonts include dingbats and swashes. You can copy/paste many letters at once or just one at a time. Some have literally thousands of alternate characters. Just remember that the font must be PUA-encoded to be able to utilize the Character Map to access the font’s glyphs. Not all font designers code their fonts this way, but more and more these days are making their fonts crafter-friendly. Score for us!
How to bulk import in Silhouette Studio
Bulk importing your bundle can be an incredibly easy task. In just a few minutes, hundreds of designs can be added to your library for easy access. First, open up your Silhouette library using the icon on the lower left-hand side of Silhouette Studio.
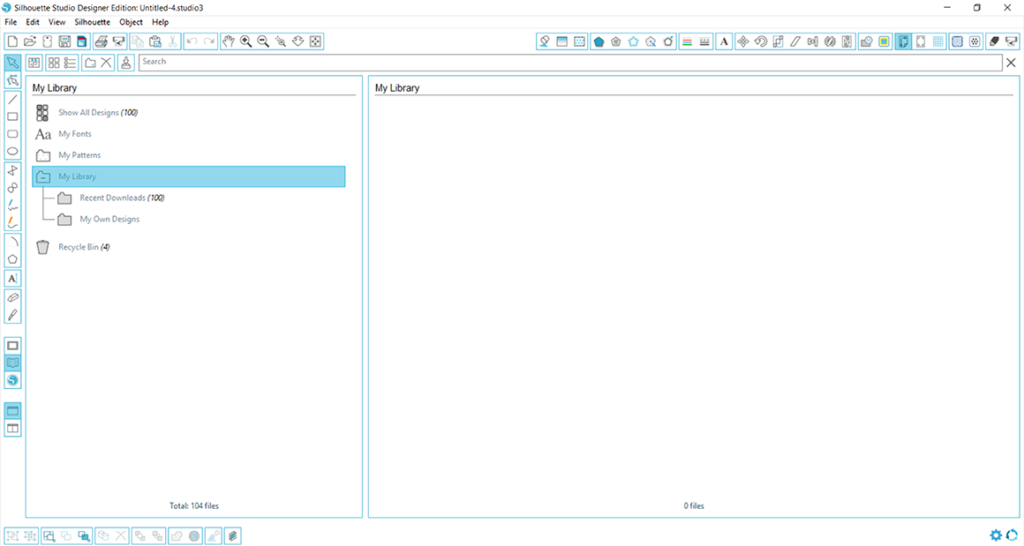
Next you will need to open the folder on your computer where you have your files saved. If you purchased a bundle from Craft Bundles, we have made it incredibly easy for you to bulk import your purchase. The first step would be to locate the Cut Files folder.
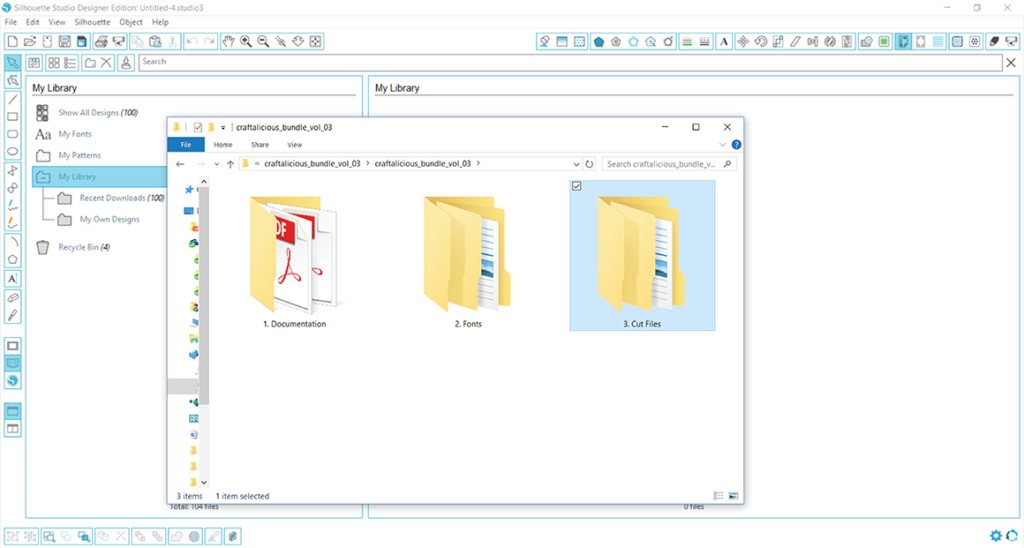
Next, click on the Compiled Graphics folder.
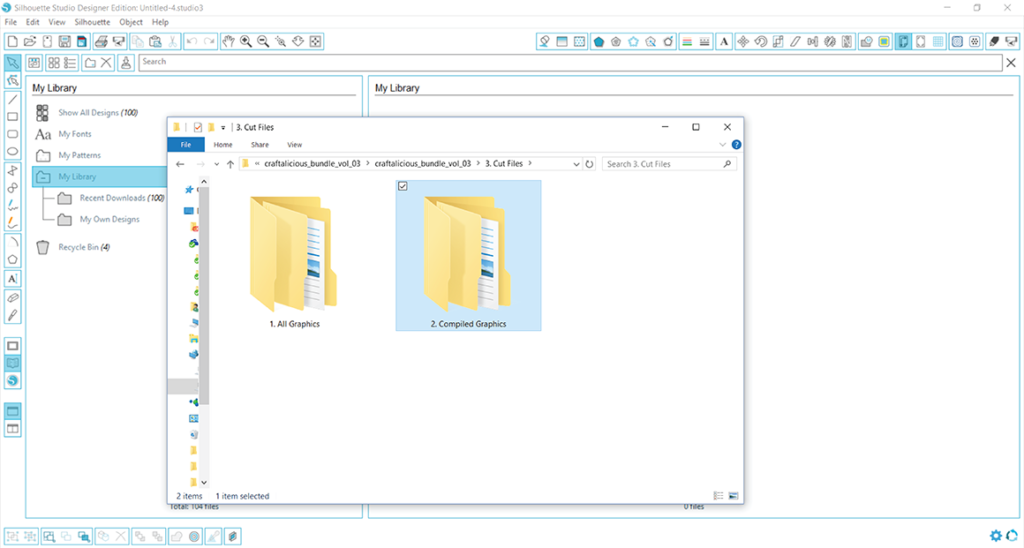
Finally choose either the DXF or SVG option based on the edition of Silhouette you have. Remember, DXF files can be opened in the basic edition, while both DXF and SVG files can be used in the Designer Edition upgrade.
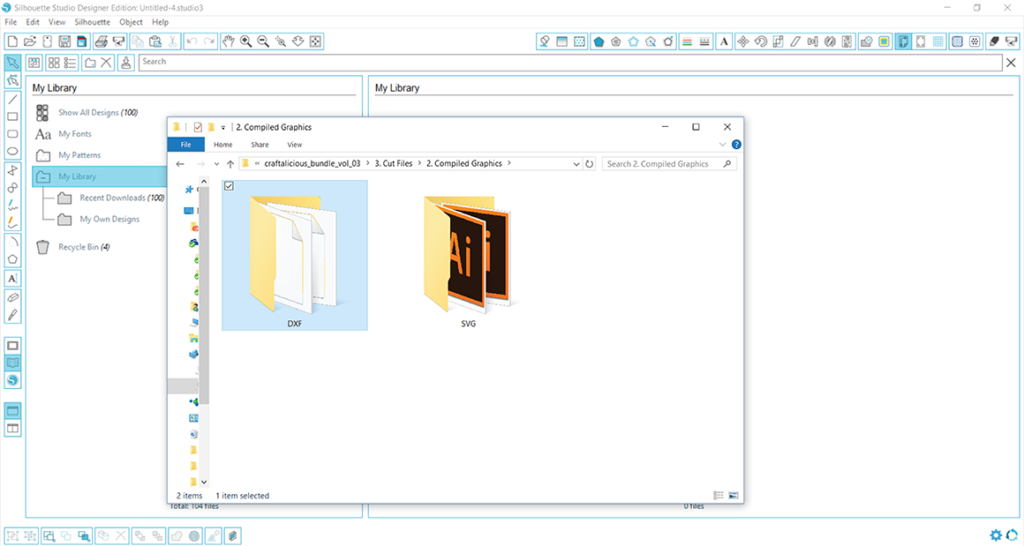
Choosing the DXF folder for this particular bundle, you would find 307 DXF files that are available for import. If you would like all of them to be added to your library, simply select them all, and drag and drop them into your library.
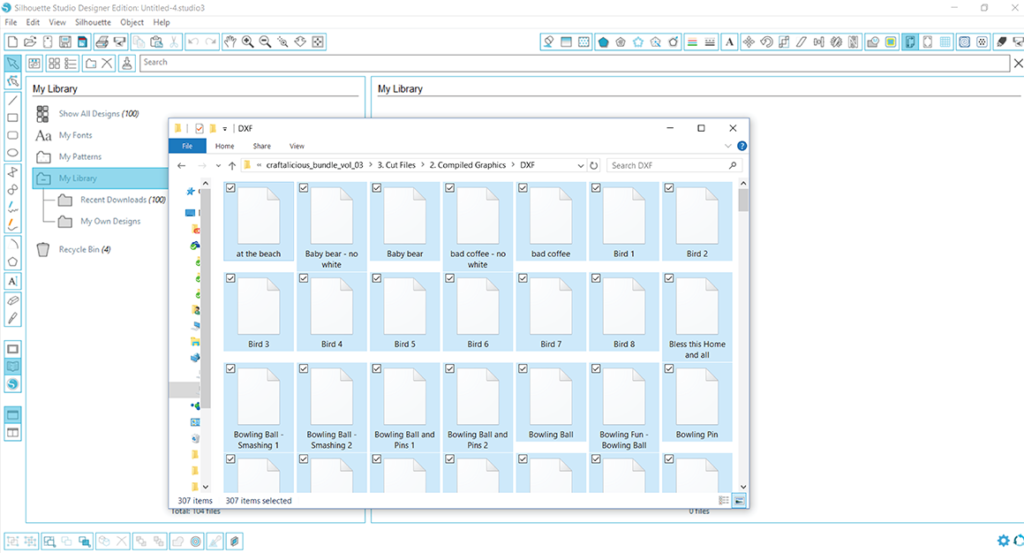
All 307 files will now import. This process may take some time depending on the number of files, so be patient. A status bar will show your progress.
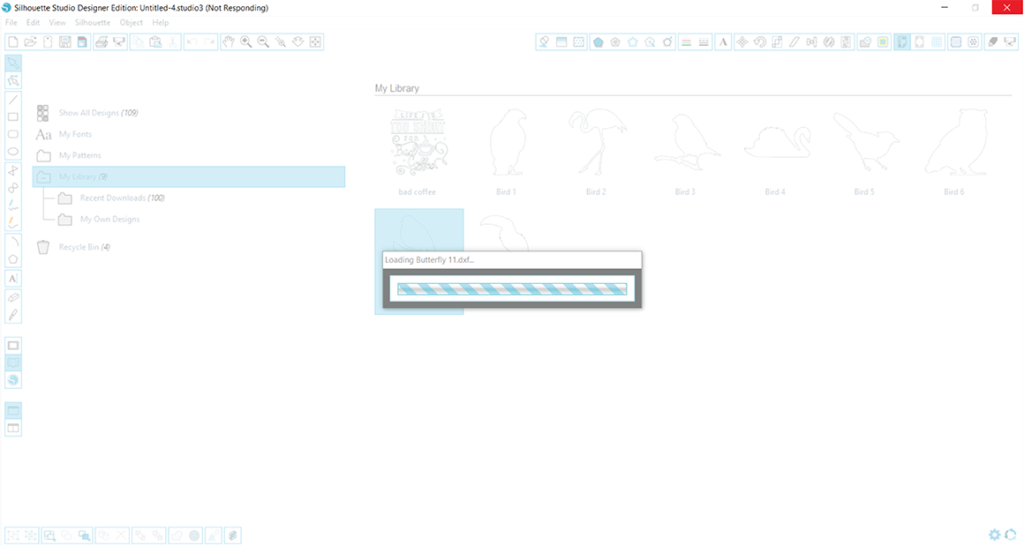
After the importing process has completed, you are free to use any of those designs in Studio!
Can’t ‘Ungroup’ in Silhouette Studio
After opening up an SVG file in the Silhouette software, you decide you would like to manipulate it slightly and change some colors, so you need the pieces ungrouped.
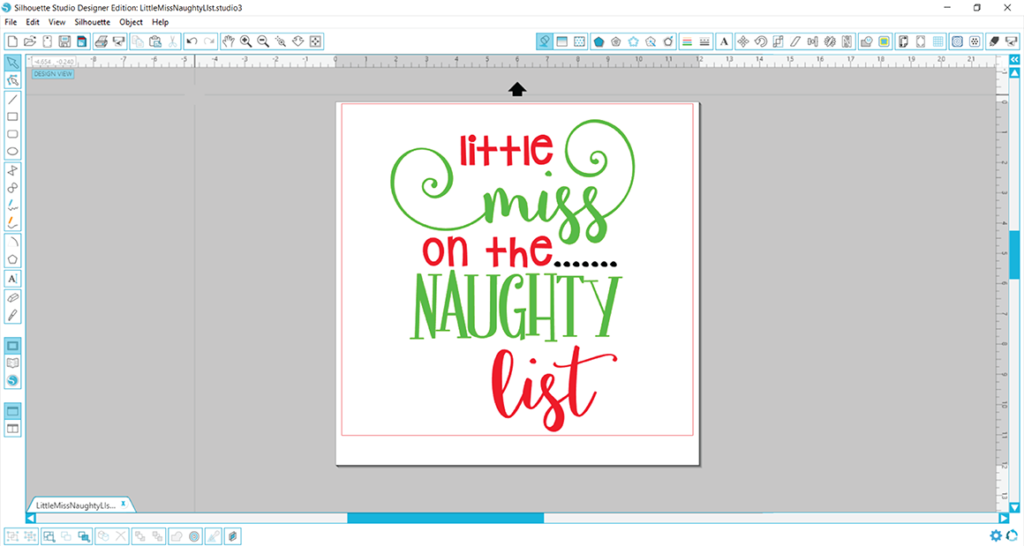
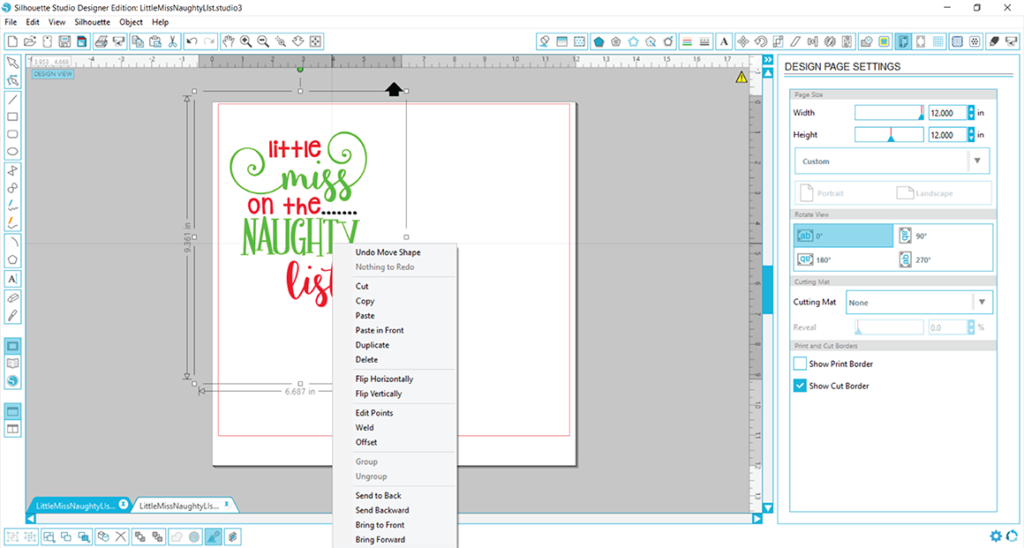
Unfortunately, when you select the piece you want to ungroup and right-click, then ‘Ungroup’ option is shaded out so it cannot be selected. What now?
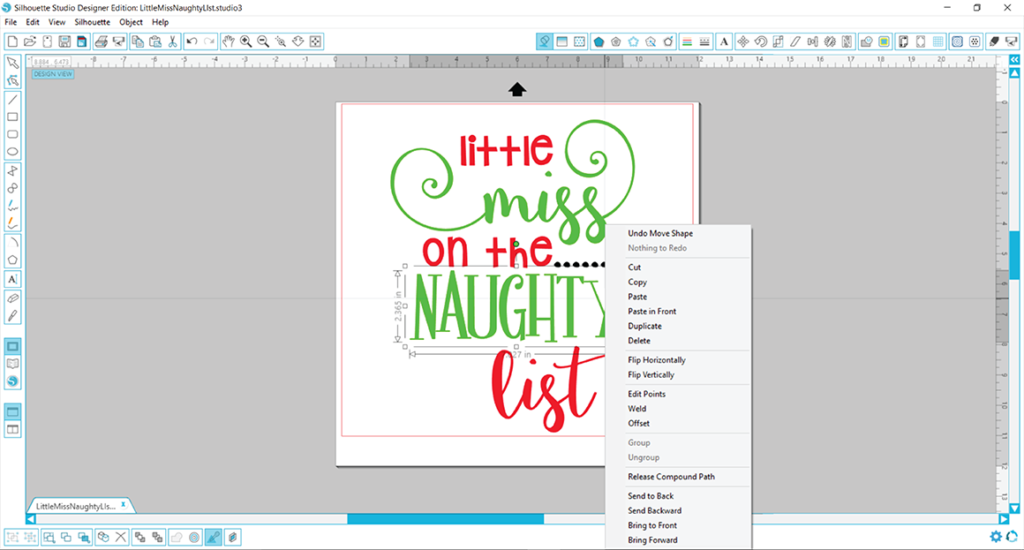
Using the Release Compound Path option instead will yield similar results, though a slight modification will be required afterwards.
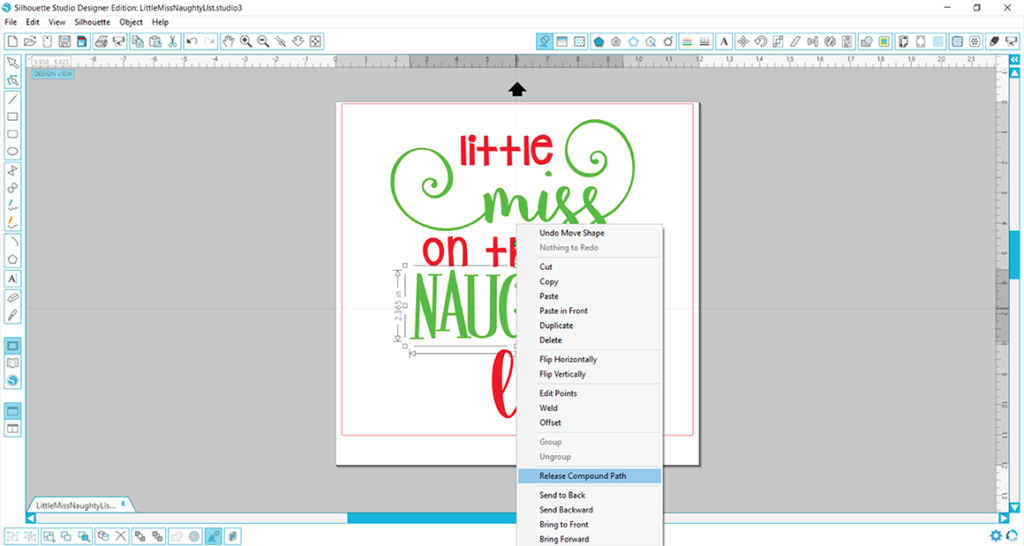
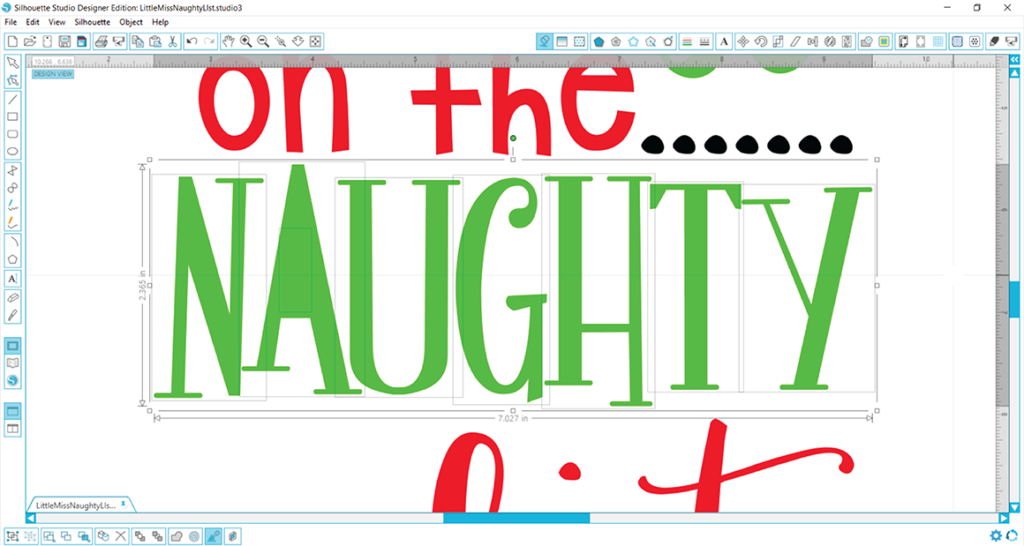
Notice the letter ‘A’ when zoomed in after compound paths are released. It appears as though the center hole that helps form the ‘A’ is missing.
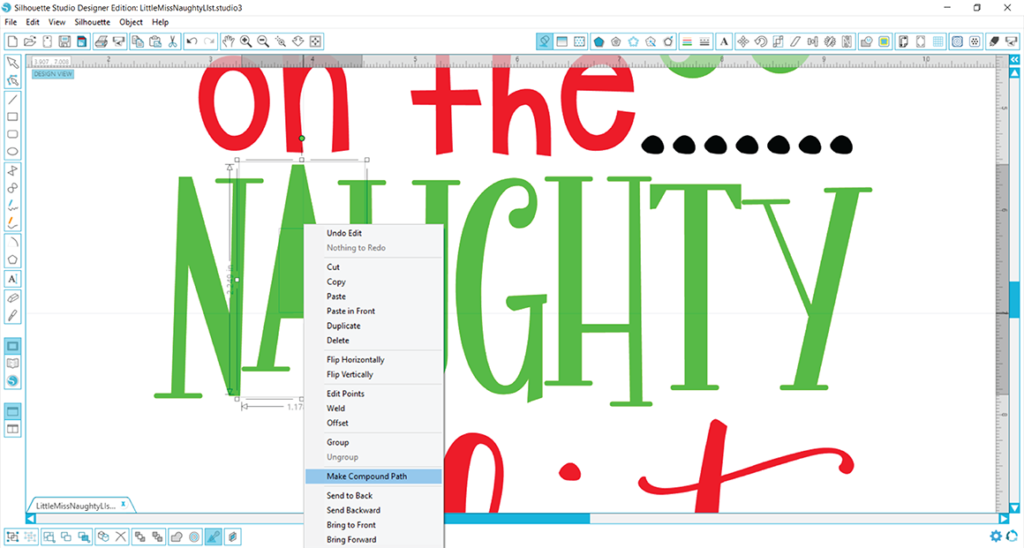
But, when you draw a bounding box around the letter, right click, and select ‘Make Compound Path,’ you will see that missing piece reappear. It never went anywhere, but since the paths were all released in order to ungroup the word, those paths now need to be created again. It is not necessary to do the other letters because there are no holes like there is in the letter ‘A.’
You have decided you would like the word ‘NAUGHTY’ to alternate colors with each letter (red and green alternating). Those letters can now be selected (in this case the A, G, and T) because we would like to change those to red. Using the fill color window, we would then select the eye dropper to grab the red color from another piece of the design so it matches.
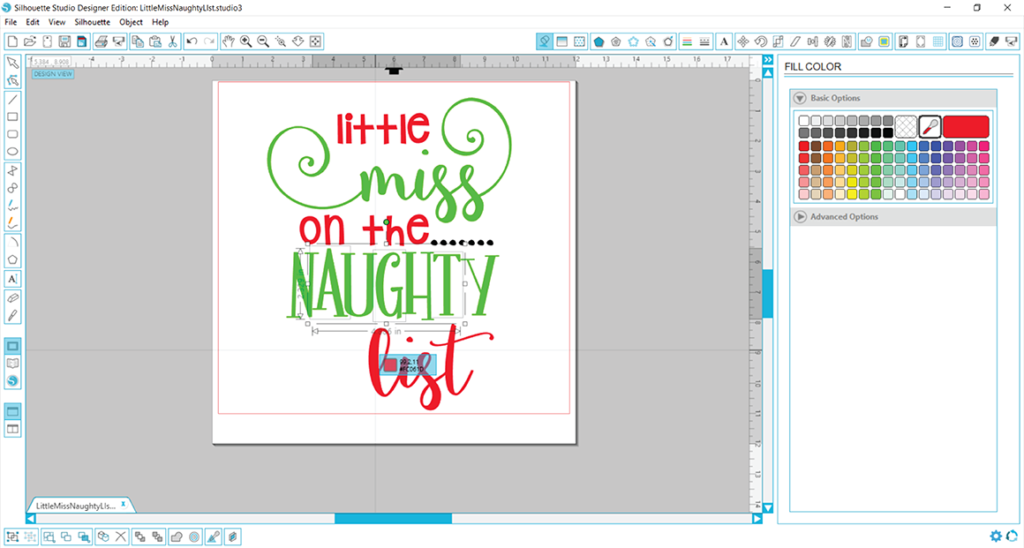
Our design is now altered and we can group like colors together to ready each layer for cutting.
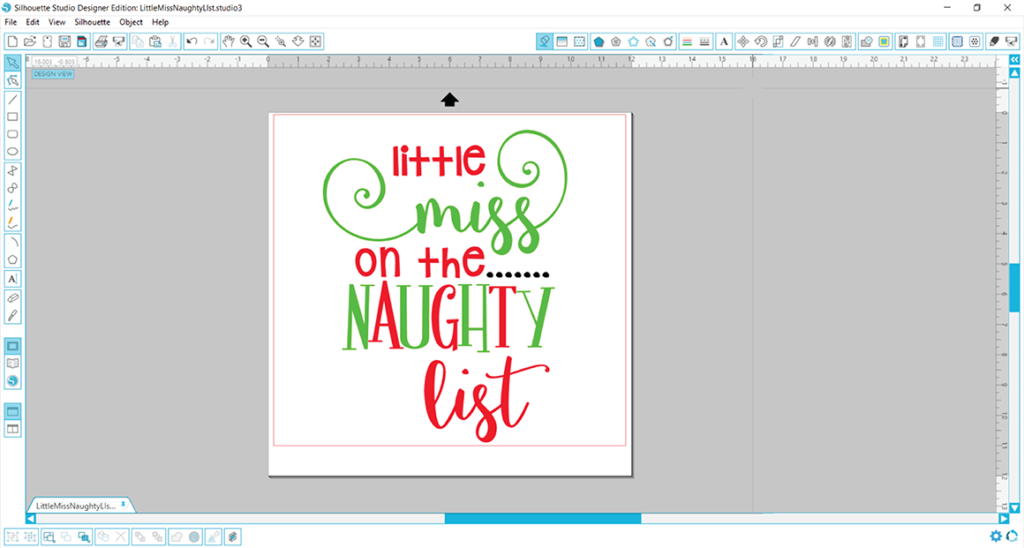
What if your design has the ‘Ungroup’ option shaded and there isn’t an option to make or release compound paths? This will never happen for a vector file like SVG or DXF, but it will be an option for raster files like PNG or JPG because raster files do not have cut lines; they are simply a photo of a design and no pieces can be manipulated in a photo. So just try closing out of the file and reopening the SVG file, and that should do that trick!
In love with this design? You can grab it here.
How to locate missing pieces in Silhouette
Upon opening your SVG design, you may notice that the design does not look like the sample photos. It is missing some pieces or you see a large black box. Sound familiar? This can be a common occurrence for Silhouette users, but it is not necessarily the fault of the designer. Follow along in the example below to see why this happens and for some easy fixes.
This split bunny is a very popular design in the springtime. It is simply adorable and can be used across many different projects. But upon opening it, you notice the nose is missing, along with the centerpieces of the ears and feet.
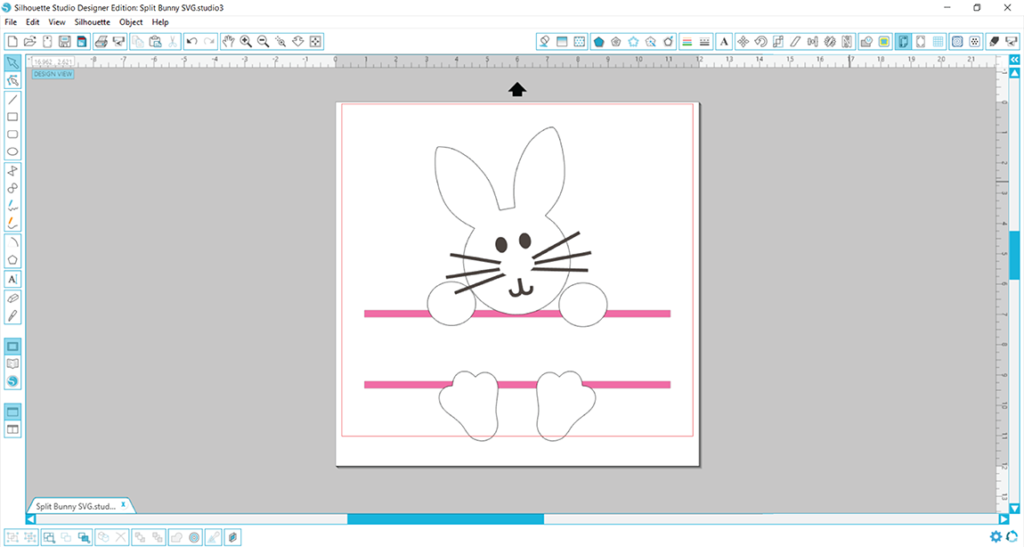
But let’s investigate the design further. When the pink layer that forms the split is selected, you can see the bounding box goes almost all the way to both the top and bottom of the design, rather than just surrounding the split in the center. This indicates there are some hidden pieces. Let’s find them! First, click the pink layer, right click, and select ungroup.
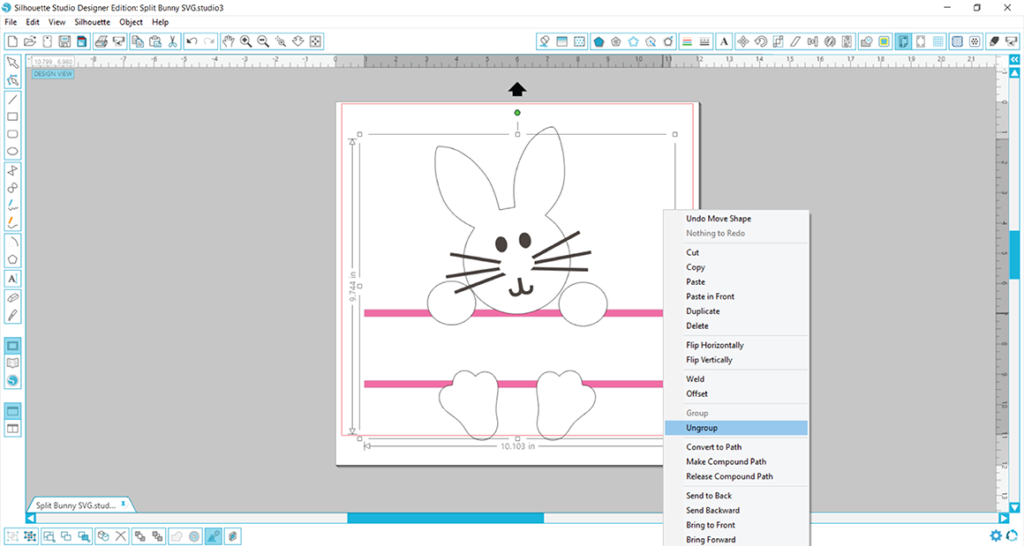
Upon ungrouping the pink layer, you will notice that one bounding box has now become two. Yes, there is definitely a layer hidden behind the body of the bunny. Let’s send the white layer of the bunny’s body to the back so we can reveal the hidden pink layer. To do that, just click the bunny’s body, right click, and select ‘Send to Back.’
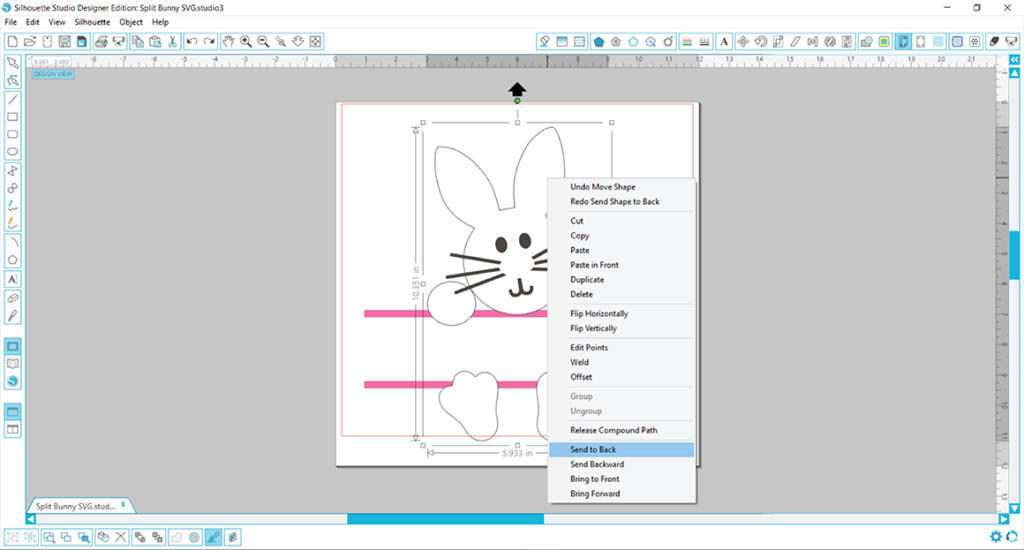
There it is!! The missing pieces have been found. But if you look closely again, something look’s off. The two pink lines that form the split are in front of the bunny.
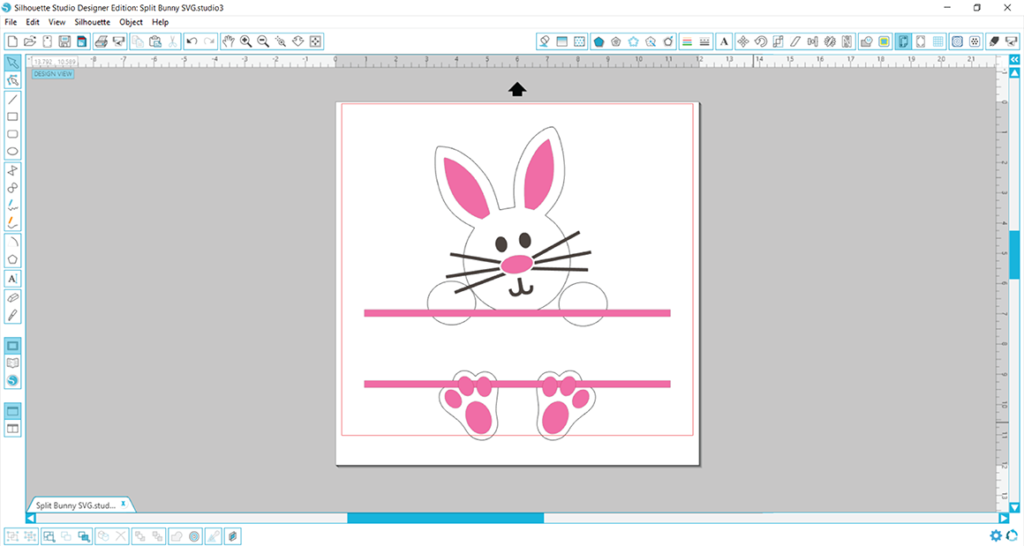
Those lines definitely need to be sent to the back, so select them, right click, and select “Send to back.”
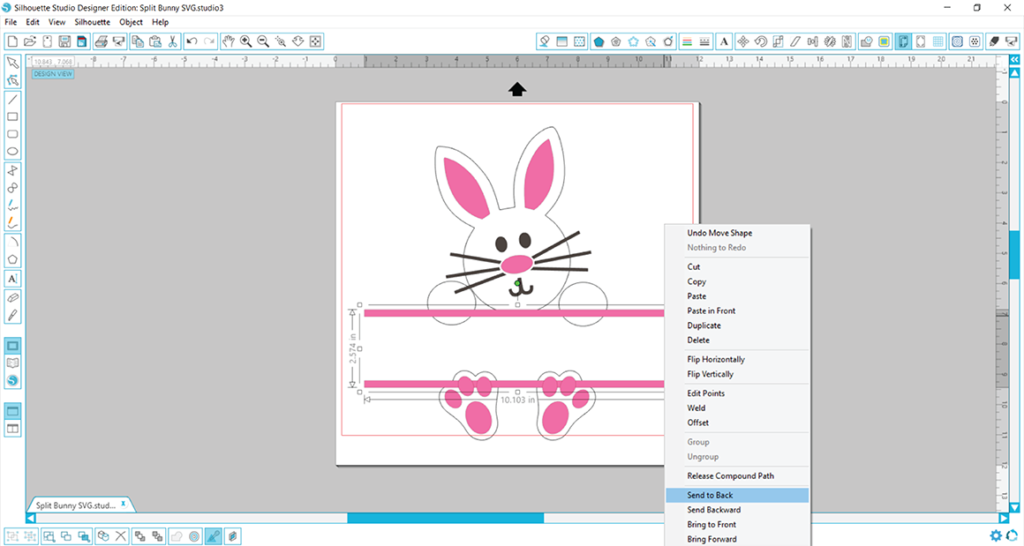
Perfect! Now the bunny is ready for a name in the middle.
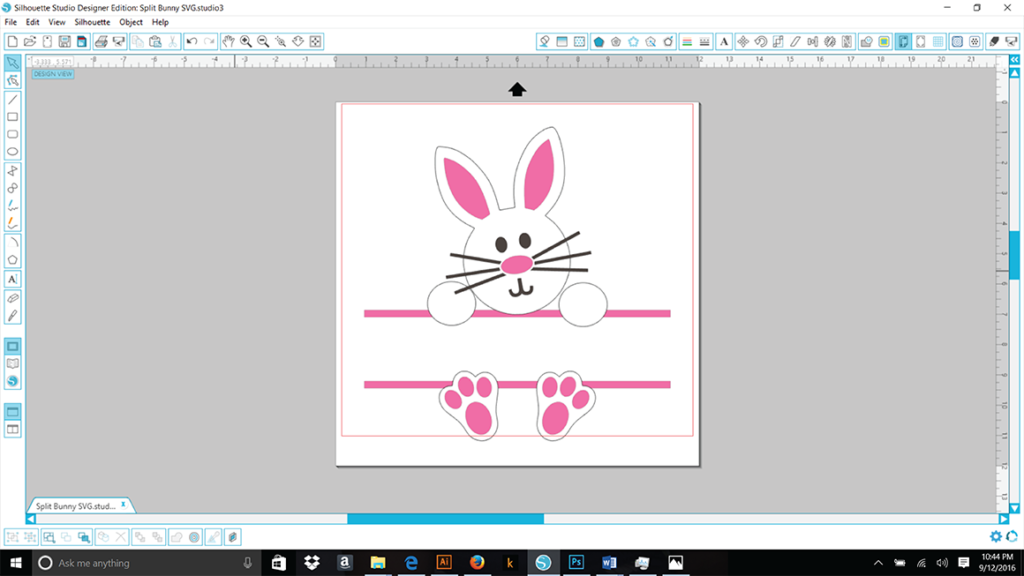
Now why exactly was this layer hidden? Because Silhouette is very powerful, upon importing the SVG file, it recognized that there were three colors in the design: white, brown, and pink. It then created three layers, each one corresponding with a color. The designer may not have grouped all of the pink pieces together, but because the same color pink was used for all of those pieces, they were grouped together by Silhouette.
In love with this cute bunny design? Grab yours here:
https://thehungryjpeg.com/product/4244-split-bunny-svg-dxf-eps-digital-cut-files/
How to use DXF files in Silhouette
DXF files are very different than what you may be used to. There will be no fill colors, no layers, and no compound paths. They import as OUTLINES only, so all you will see is an outline of your design. If you have the free basic edition of Silhouette, you must use the DXF files, as SVG files are not compatible with the free edition (upgrading to the designer edition will unlock your ability to import SVG files).
So, you just purchased a design and you have the basic edition. You have opened up the DXF file, and it opens with no colors. You try to resize it, but clicking on the design only grabs hold of one tiny piece of the design. Now what? Let’s take a look at this simple teacher design that has no overlapping but lots of lines. In this screenshot, you can see the DXF file on the mat, and to the left, the color PNG file was imported to use as a guide. This is what the PNG file is meant for! Use it as a guide to help you work with the DXF file.
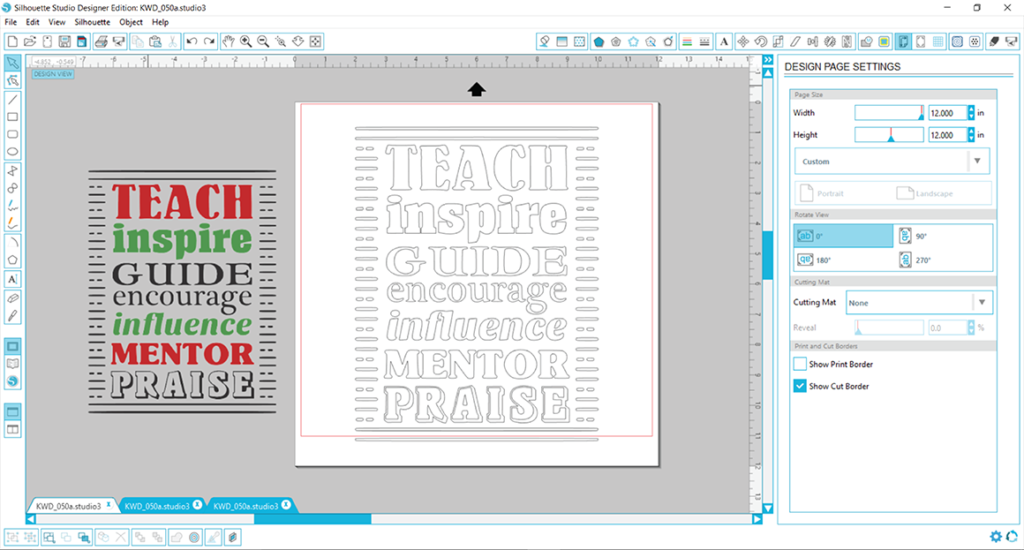
Compound paths form letters that include a ‘hole,’ such as A, B, D, P, etc. In this teacher design, since all compound paths are released, the outer part of the letter ‘A’ was pulled away from the word when moved. Notice how the inner part that forms in the inside of the ‘A’ did not move? This indicates that there are no compound paths. Since the entire design has compound paths released like this, some manipulations of the design will be necessary to prepare it for cutting.
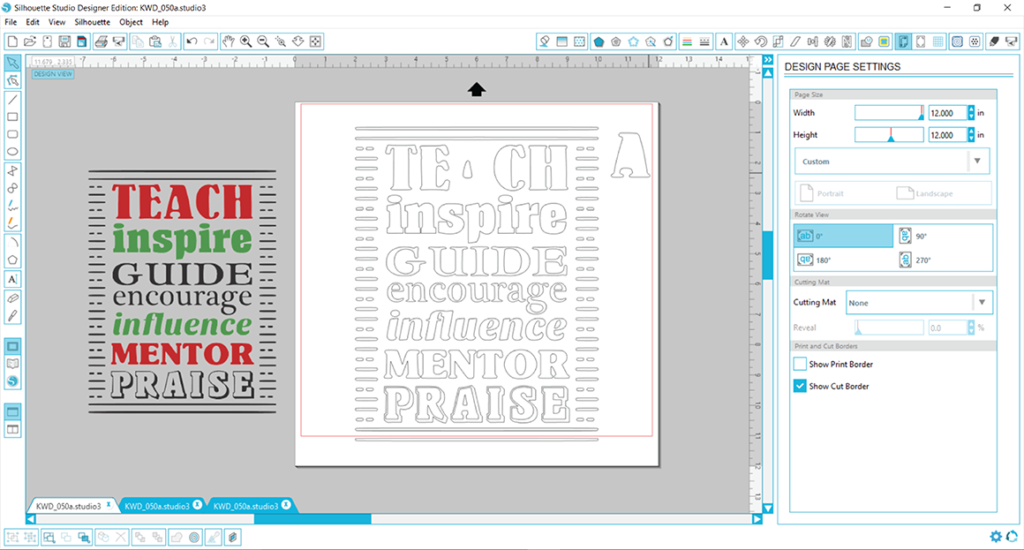
Using the PNG file on the left as a guide, the design needs to be prepped to cut in three colors, red, green, and black. You can of course change the colors and/or cut the whole design as it is in one color, but for the sake of this guide, let’s prep the cut file to be exactly the same as the PNG sample. To start, you will need to create compound paths with like colors. We will start with the words that will be cut in red vinyl, which are ‘TEACH’ and ‘MENTOR.’ First draw a bounding box around all of the pieces for the word ‘TEACH’ making sure you include all letters. If you miss a piece when you draw the box, just hold down the shift key, and select the remaining piece(s). Then, right click, and select ‘Make Compound Path.’ That word will now be grouped together and ready to cut as is.
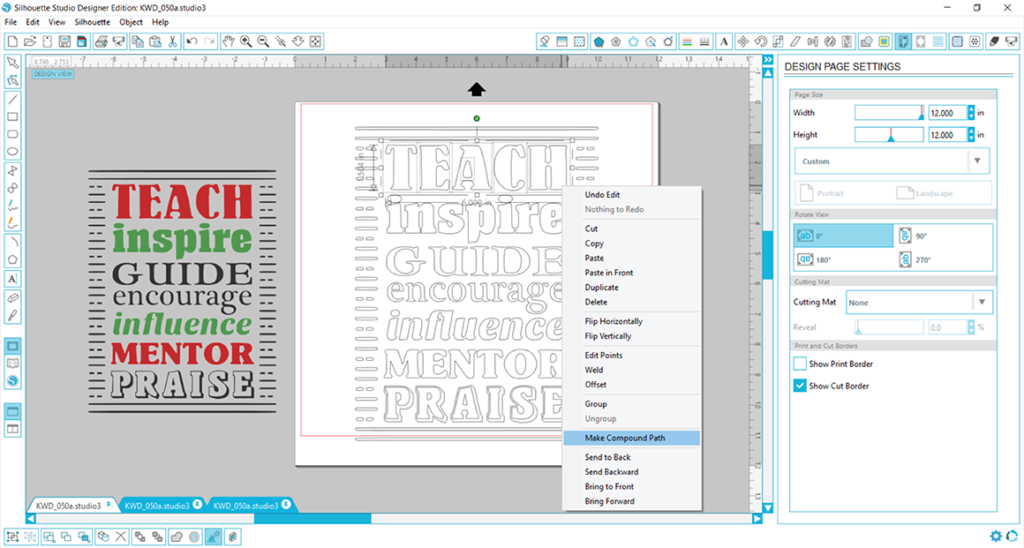
Repeat the process listed above for the remaining red word ‘MENTOR.’
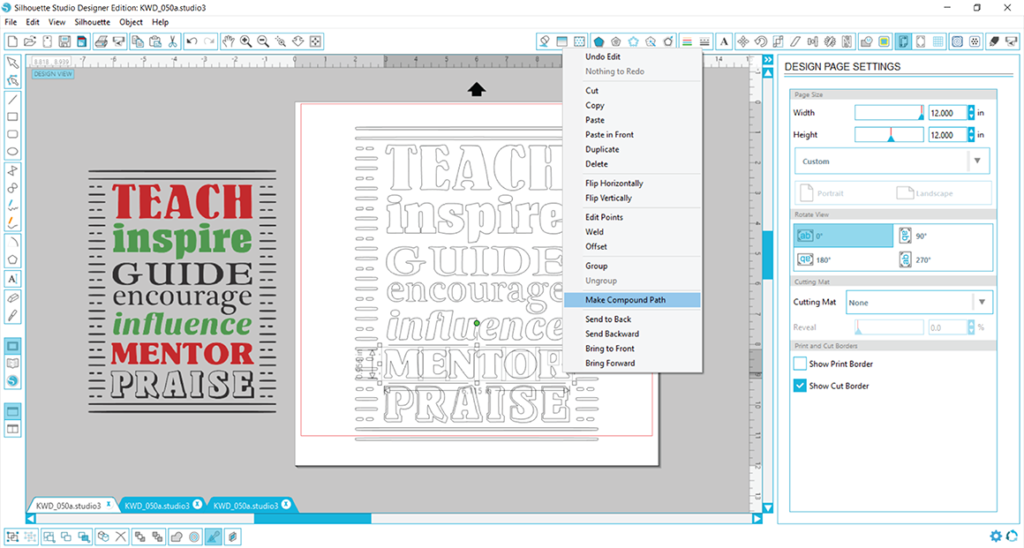
Next you will group together those two red words by selecting them both (hold down on the shift key as you select them both), right clicking, and selecting ‘Group.’
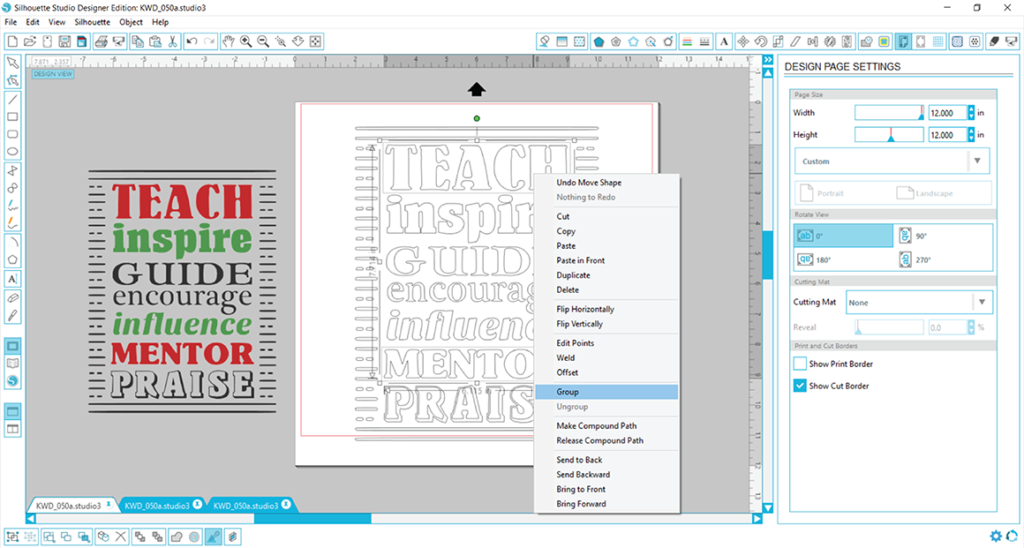
Repeat the process for the green words ‘inspire’ and ‘influence’ and group those together. Now, all that’s left is prepping the black pieces. The easiest way to select all of those pieces is to work backwards in a way. Basically, you will draw a bounding box around the ENTIRE design. Everything will be selected, and you can see the boxes around all pieces.
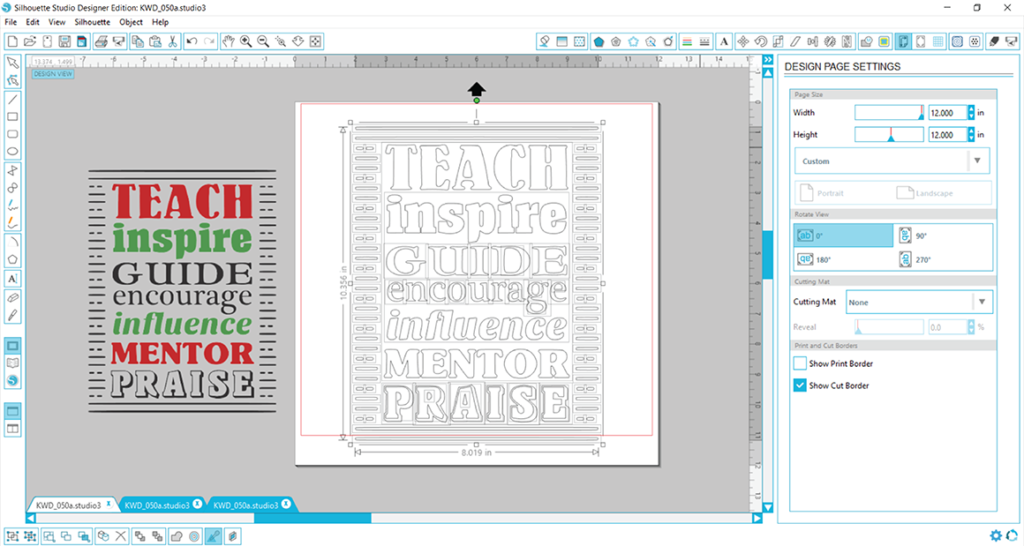
Now you will need to deselect the red and green words by holding down on the shift key and simply clicking on them. You’ll notice the box disappears indicating they are no longer selected.
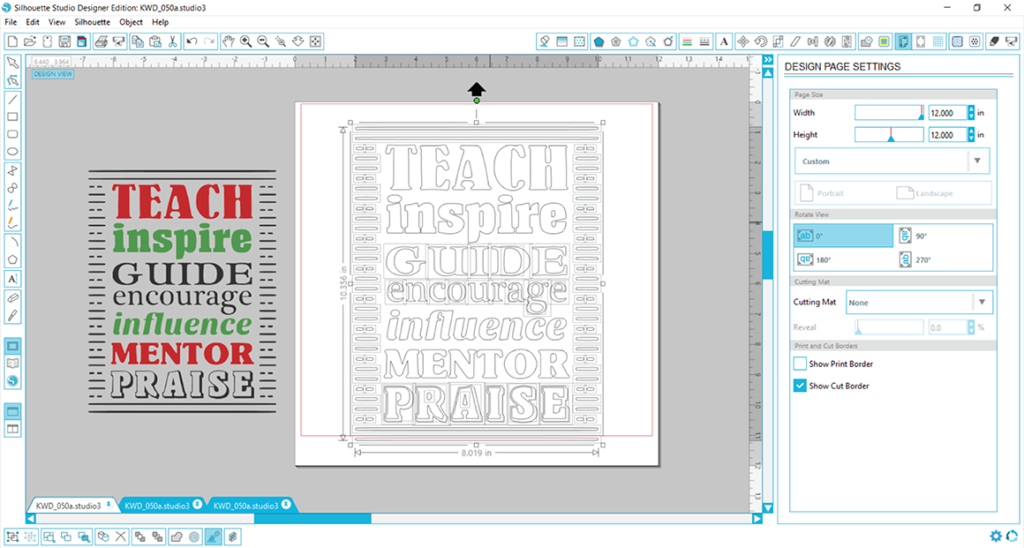
From here the process is the same as above, and all you need to do is right click, select ‘Make Compound Path,’ and now your black pieces are prepped for cutting!
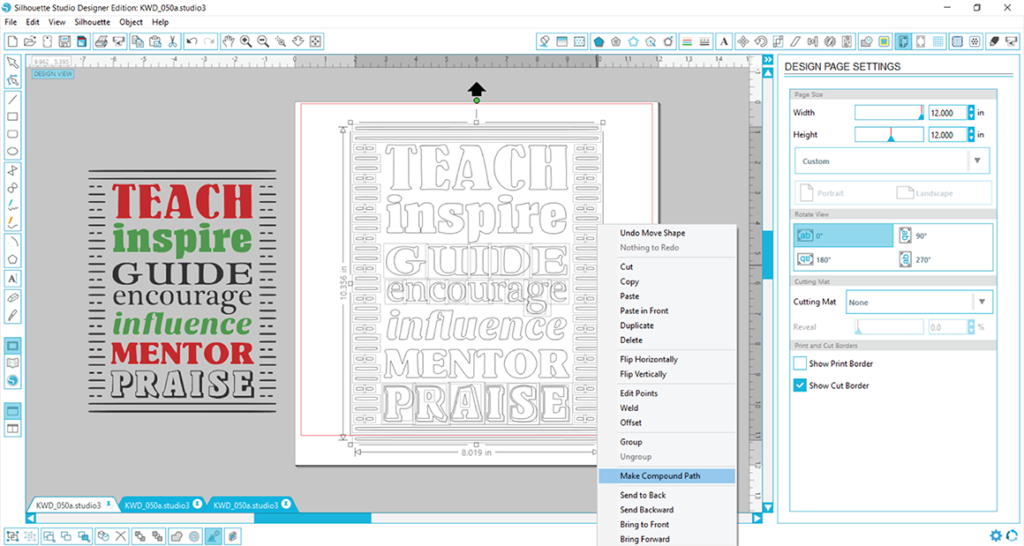
You are now free to move those three grouped pieces around on your mat if you need to, or you can opt to play with colors in your color palette if you are not sold on the red/green/black color combination. I like to work with everything in color as it helps me visualize my project, so I always add colors to my DXF files after they are prepped for cutting. So we will add color to this design by clicking on the first piece and then opening the fill color window. If I wanted to keep my color the same as the sample, I can use the swatch grabber tool and then click on the red part of the sample PNG. Repeat this to select a color for all three pieces.
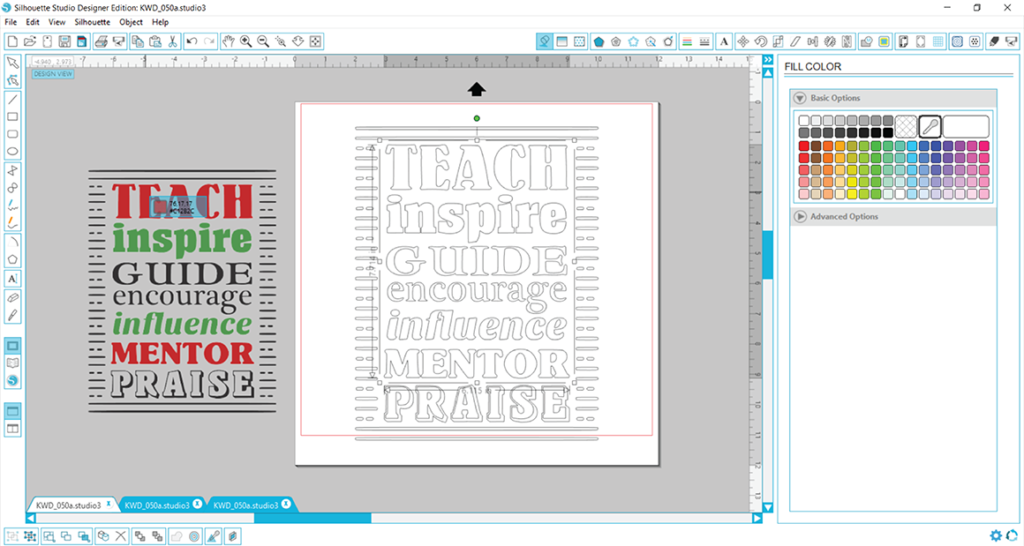
Now you have three grouped pieces ready to cut. You can move them off the mat while another color cuts or you can use the cut by color option in your Cut Settings.
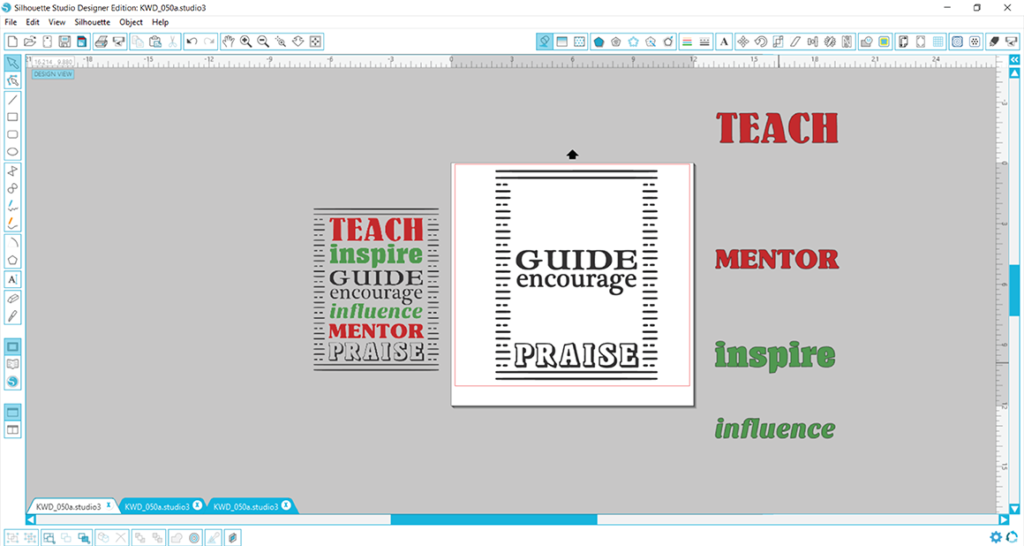
Looking for some great school and teacher designs? You can purchase this design and more in a bundle deal here.
SVG files won’t cut in Silhouette Studio
After you download your purchase from the Craft Bundles website, the first thing you will need to do is unzip your files for use. Zipped folders look like a folder with a little zipper on it. When you hover your cursor over it, you will also see the words “Compressed (zipped) folder.”
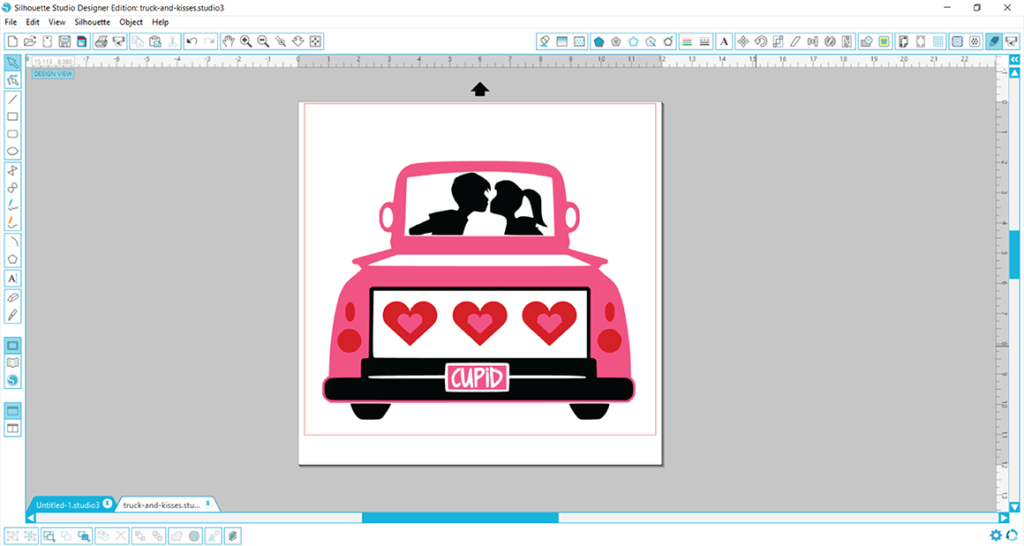
You load your vinyl into your cutter, click on the ‘Send to Silhouette’ icon, and wait for the magic to happen, only your cutter does nothing. Frustrating right? More than likely, you have just skipped over one important step…turning cut lines ON! SVG files are neat in that cut lines are embedded in the file, but by default, your cut lines are off in Silhouette. In order to check your Cut Settings, select your design, then just click on the Cut Settings icon in the upper right-hand corner. It will look like the tip of a Silhouette blade.
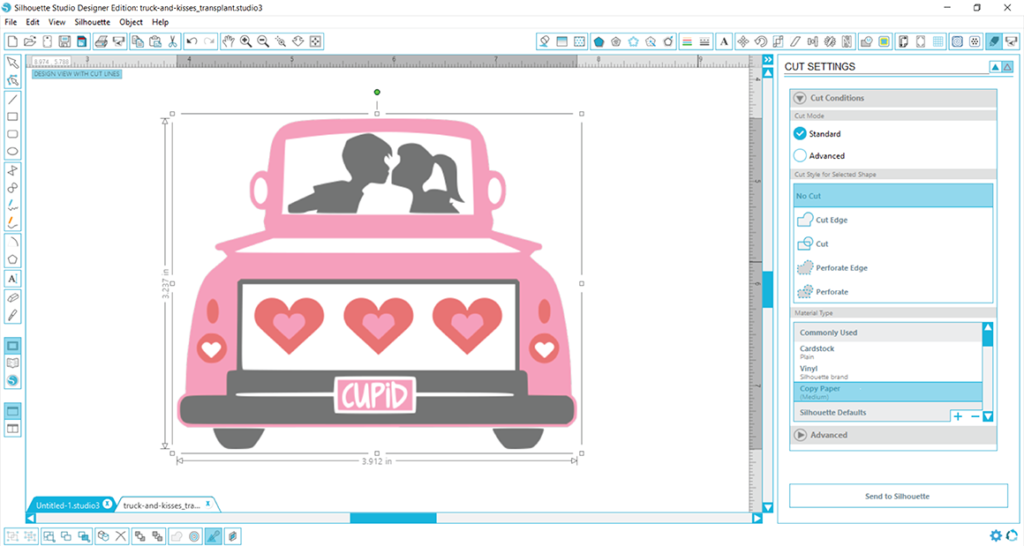
In the Cut Settings, you will see a section called ‘Cut Style for Selected Shape.’ If cut lines are off, the ‘No Cut’ option will be highlighted. Of course, this is not what we want! Now, if you select the ‘Cut Edge’ option for this particular design, you will see a red box form around just the outer edge of the design. If that is what you want your machine to cut, then perfect, just send to your cutter, and it will cut those lines that are highlighted red.
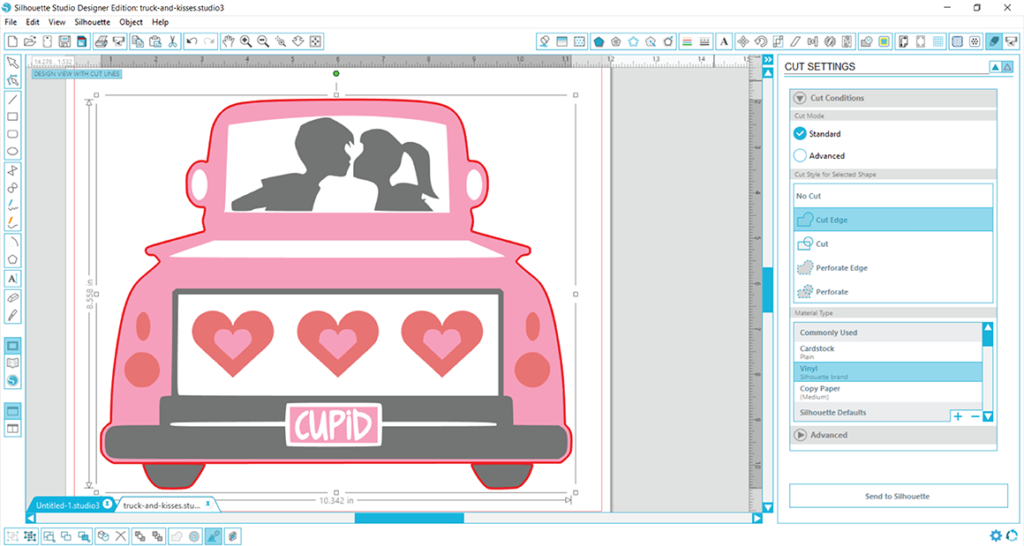
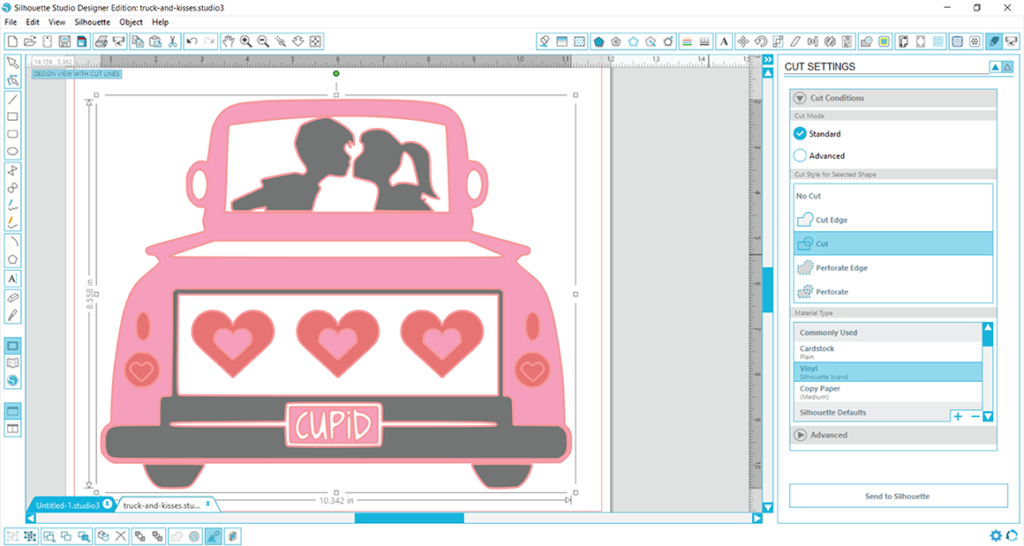
But, if you want your cut lines to include all the little pieces inside the truck, then just change your selection to ‘Cut,’ and all those pieces will show with a faint red line as the cut lines. You can then send the design to your cutter.
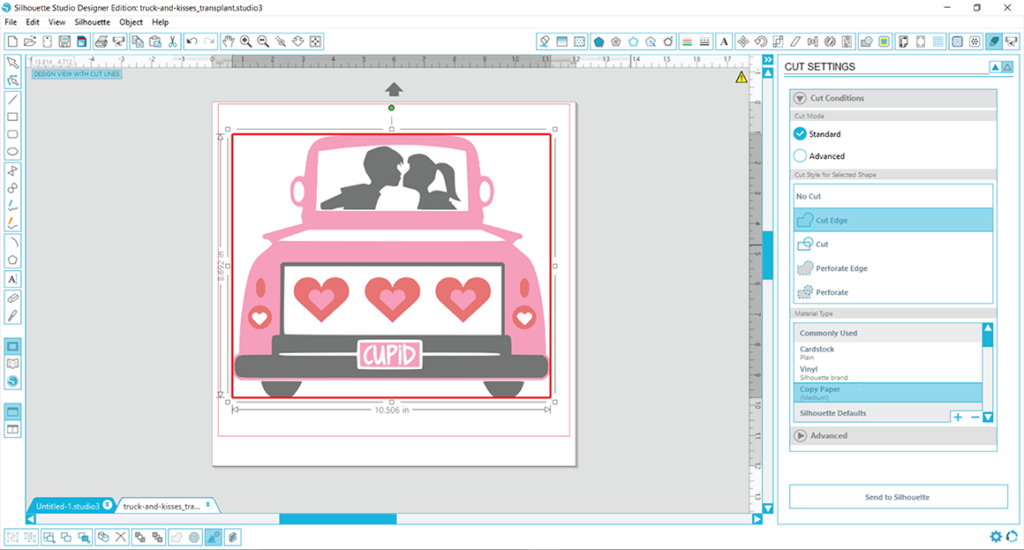
There is one other possibility you may see when you click the ‘Cut Edge’ or ‘Cut’ options. If you see a red box around the outside of your design, then you have not opened the SVG file and have opened the PNG or JPG file in error. These files will not show any cut lines since there are not any embedded in the file. Just close out of that file and reopen, double-checking that you have clicked on the SVG file.
Have you fallen in love with this Cupid’s Truck design? You can pick up your own copy here.
Fix cut files open in a web browser error
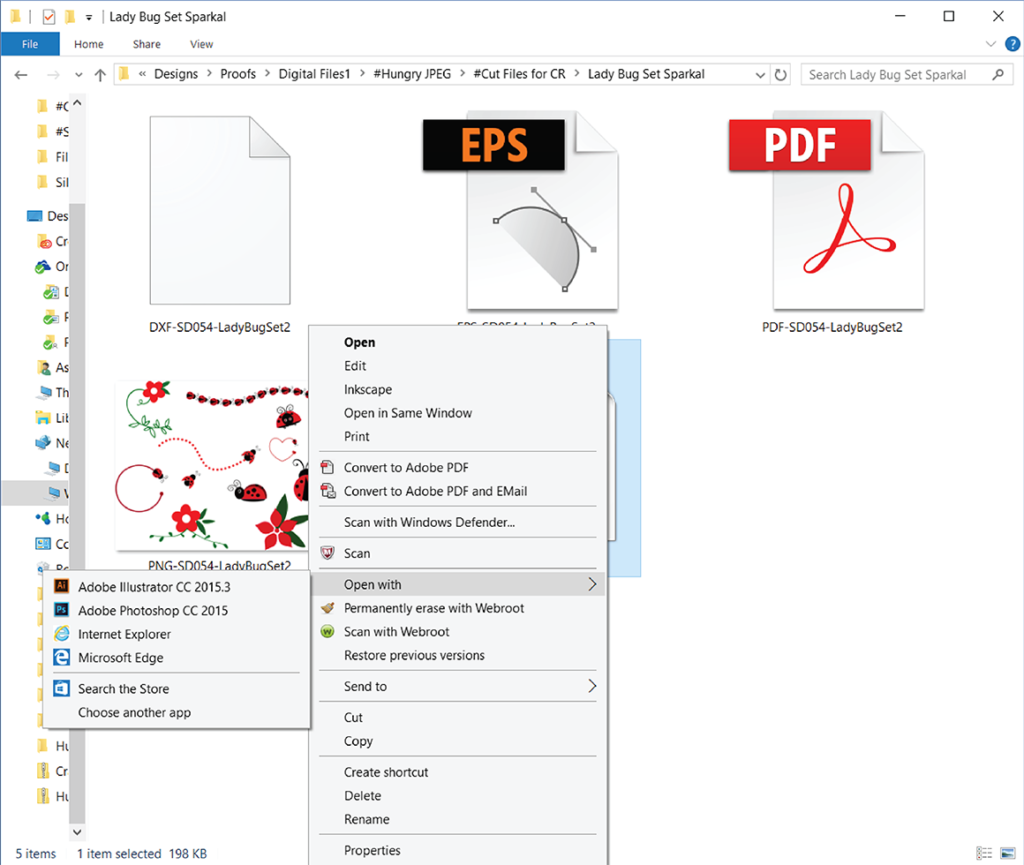
Your computer is a smart machine, but sometimes it needs to be told what to do. When you try to open a file type that your computer doesn’t use often, it needs to be told which program to use to open it with. For example, you just purchased this adorable Lady Bug set from Sparkal Designs, and you unzipped the folder and see that there are 5 file types available in your download. The SVG file is highlighted in the photo below.
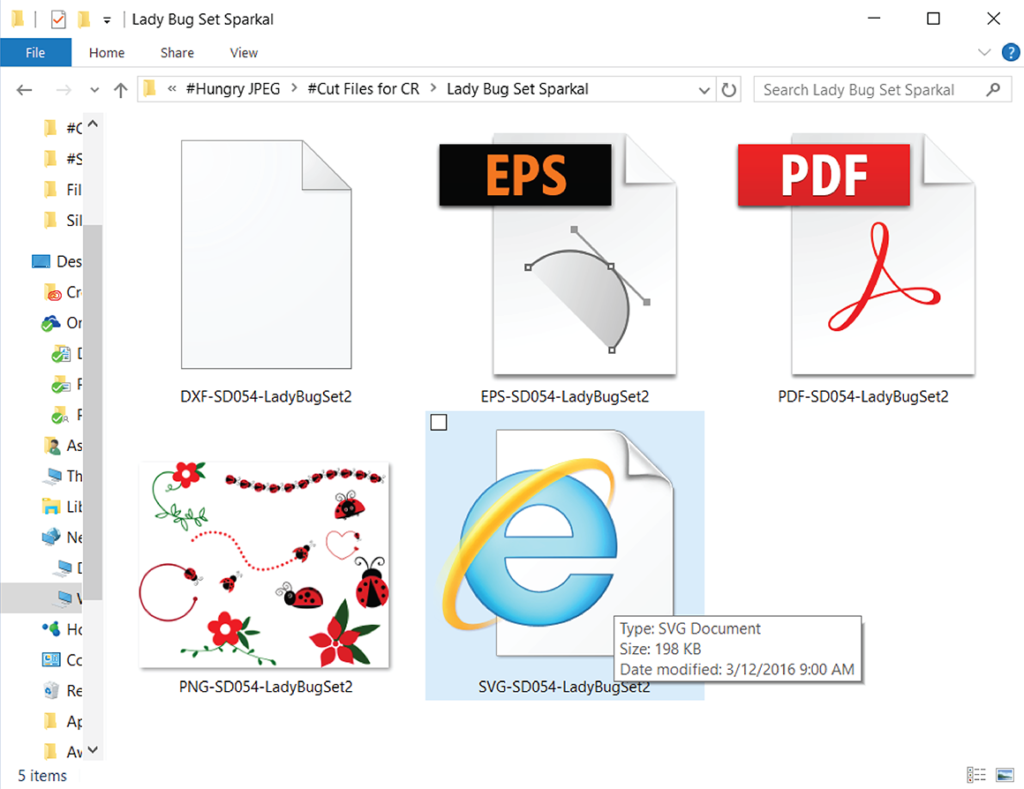
You are so excited to use the files that you doubled clicked the SVG file to open it, just like you would do for a Microsoft Word document for example, and the file then opens up in your Web Browser.
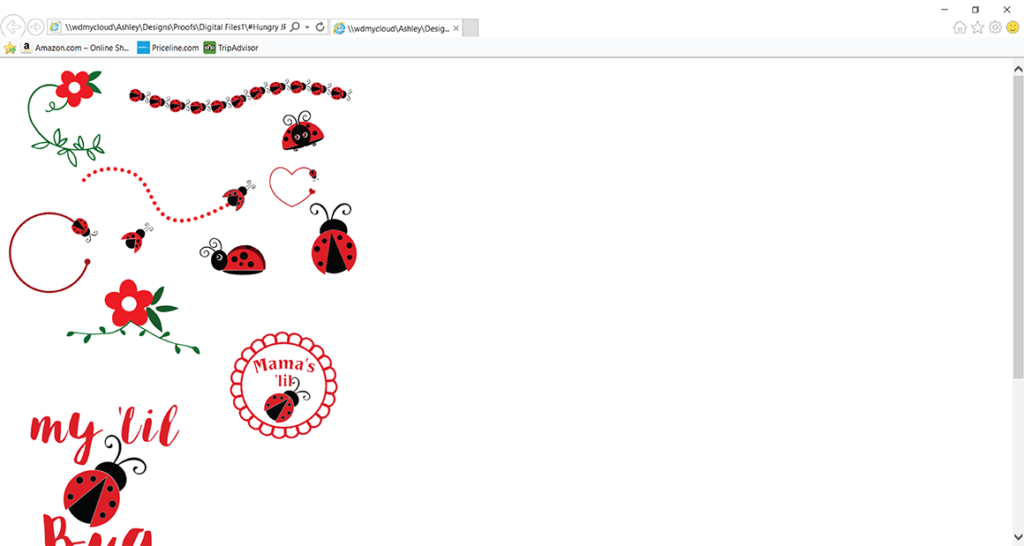
Why did your SVG file open using your internet browser rather than in Silhouette? The basic explanation for this is that SVG files are not a common file type your computer uses, and your computer does not know which program to use to open it. A computer will typically default to a web browser for SVG files, so it may appear the file is an “internet” file, which causes some confusion for someone unfamiliar with SVG files. It is also true that most computers will not even list Silhouette as a possible program it can use to open Silhouette files, as shown in the next photo. When you right click and select “Open with,” you will see that Silhouette is not an available option.
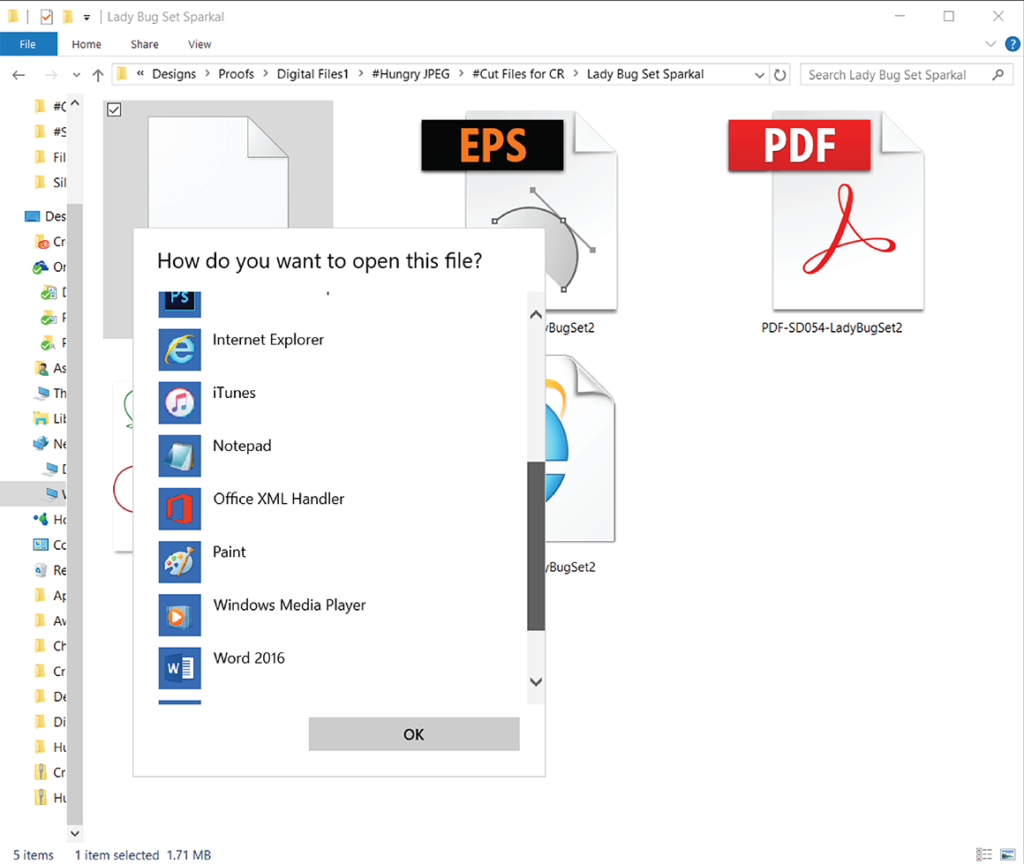
Double clicking on the DXF file will also yield similar results. Since the DXF file extension is even less common than the SVG file, your computer will likely be unable to open this file type in your internet browser and will ask you which program you would like to use to open it with. You’ll see lots of different options you can use to open the DXF file, but notice that Silhouette is NOT an option. Unfortunately, not all computers will realize that Silhouette can open this file type, so it will not list it as an option.
So, instead of opening your designs from the folders they are saved in on your computer, simply open up your Silhouette Studio software and use the File>Open method.
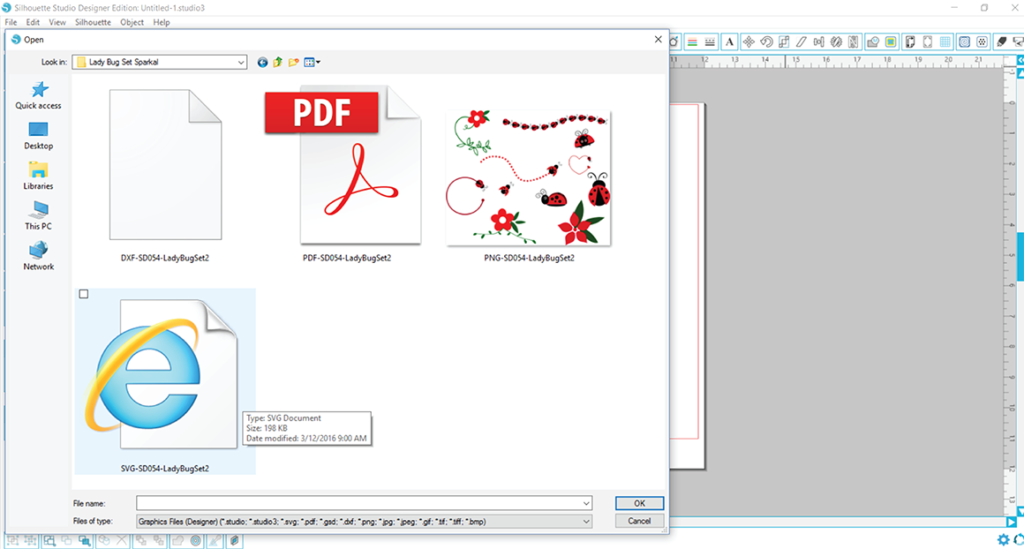
Your design will then open in Silhouette with no problems!
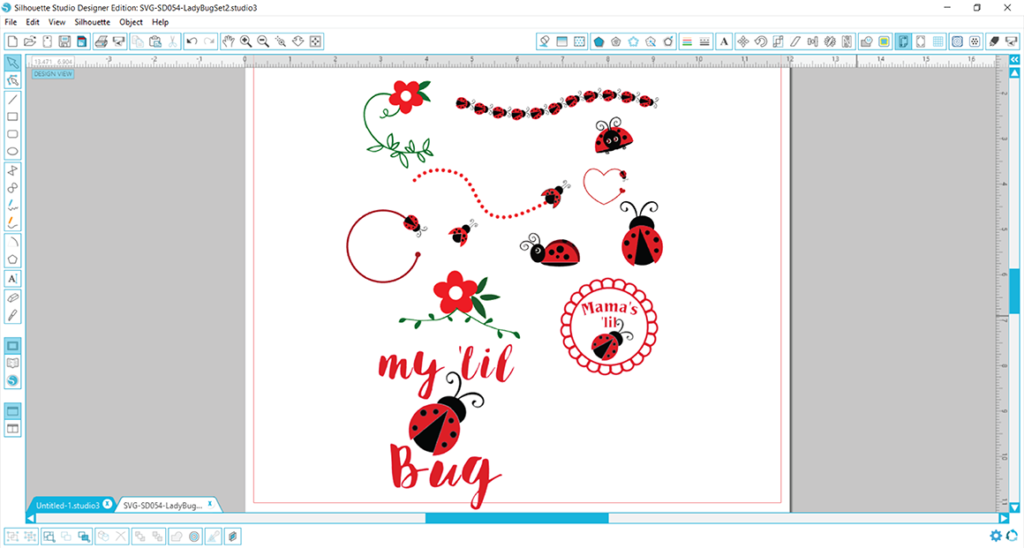
Fancy this adorable Lady Bug set? You can pick up yours here.
Fix ‘file not supported’ error in Silhouette
When opening files in Silhouette Studio, it is important to remember that only certain file types can be opened. Craft Bundles provides four main file types in all of our downloads, SVG, DXF, EPS, and a photo file like PNG, JPG, or PDF. The most likely reason for being unable to open a certain file is because you are trying to open an incorrect file type for your software. Remember, SVG files cannot be opened in the free basic edition of Studio, which is why we provide the DXF for basic edition users.
In this example, you can see the Silhouette Studio workspace along with a folder that has 4 files, each of which is a different file type.
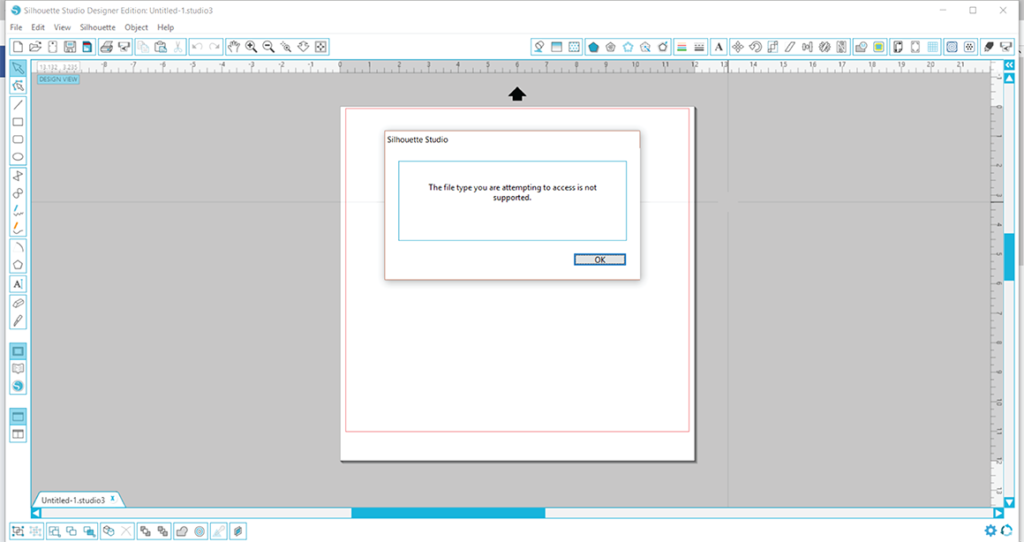
Because I personally have the Designer Edition upgrade, the SVG, DXF, and PNG files are all capable of being opened in Silhouette. The EPS file, however, will not open. To demonstrate this, the EPS file was selected, then dragged and dropped into the Silhouette work area.
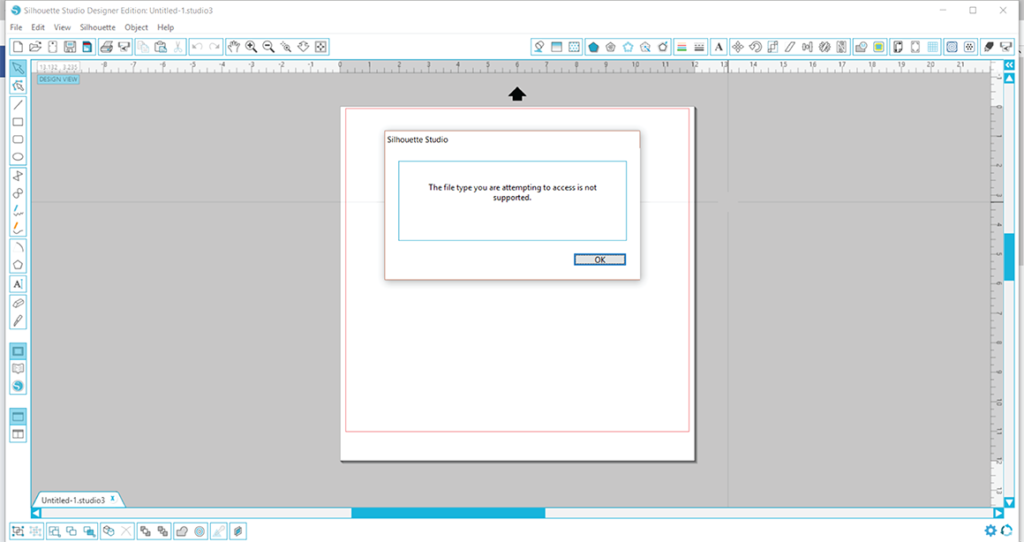
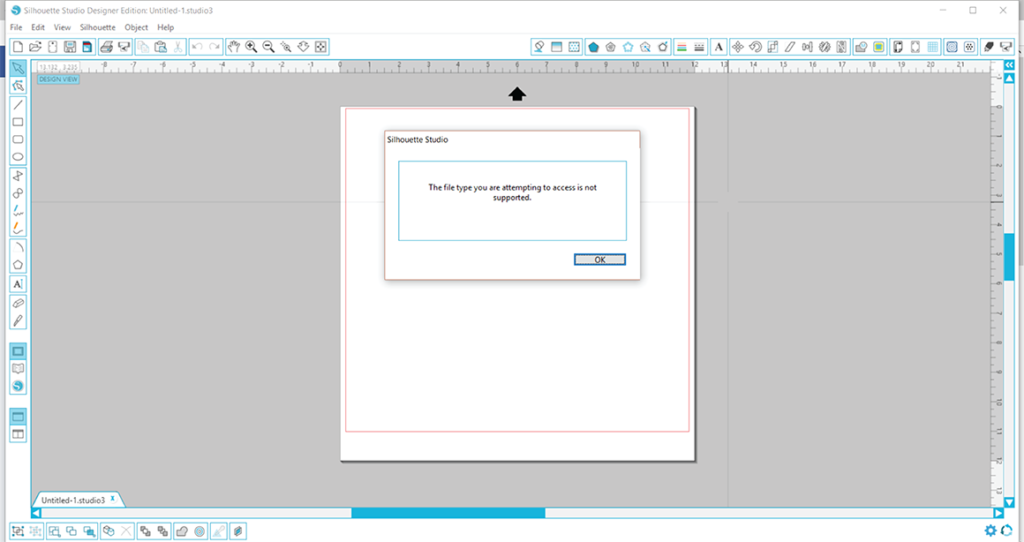
Silhouette will then respond with an error message stating “The file type you are attempting to access is not supported.” This file type is incapable of being opened in this version of Silhouette. The same thing would happen should you attempt to open an SVG file from within the basic edition of Studio.
If you are 100% positive you have the Designer Edition and you still are getting this error when opening SVG files, double-check that your license is still activated. Open up Silhouette Studio, and in the upper left-hand corner, it will say “Silhouette Studio Designer Edition: [Insert File Name].” Sometimes your Designer Edition will deactivate. It has happened to me on three occasions!
How to open SVG and DXF files in Silhouette
Silhouette Studio is capable of opening a number of different file types. Craft Bundles offers several Silhouette-compatible options, and your edition will determine which of these you are able to use in Silhouette. In addition, to cut files with embedded cut lines, which we will focus on shortly, Silhouette also opens raster photo files. These include PNG, JPG, and PDF files, in addition to several other less common ones. These raster files are NOT cutting files. They can be used for print and cut projects, mock-ups, to use as a reference when piecing a design back together, or even as a pattern fill.
The two main cutting file options that Craft Bundles offers for Silhouette users are SVG and DXF files. If you utilize the free basic edition of Silhouette, you will only be able to open the DXF files. If you have upgraded to the Designer Edition (highly recommended by the way!), you can use both the DXF and SVG options for design. As you follow the steps below, please double-check that you are opening the correct file type for your edition.
There are three methods you can use to open your files. All of these methods require you to open up your Silhouette Studio software FIRST. Your files will not properly open unless you open from WITHIN Silhouette.
Method 1 :
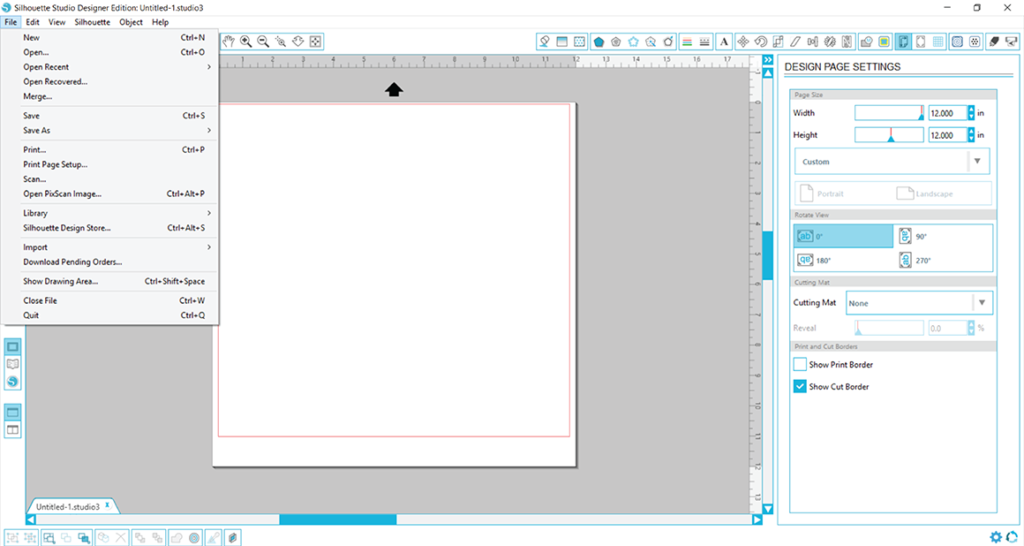
This is the File>Open method. Open up Silhouette, and in the upper left-hand corner, click on the “File” icon. Then scroll down and click on “Open.”
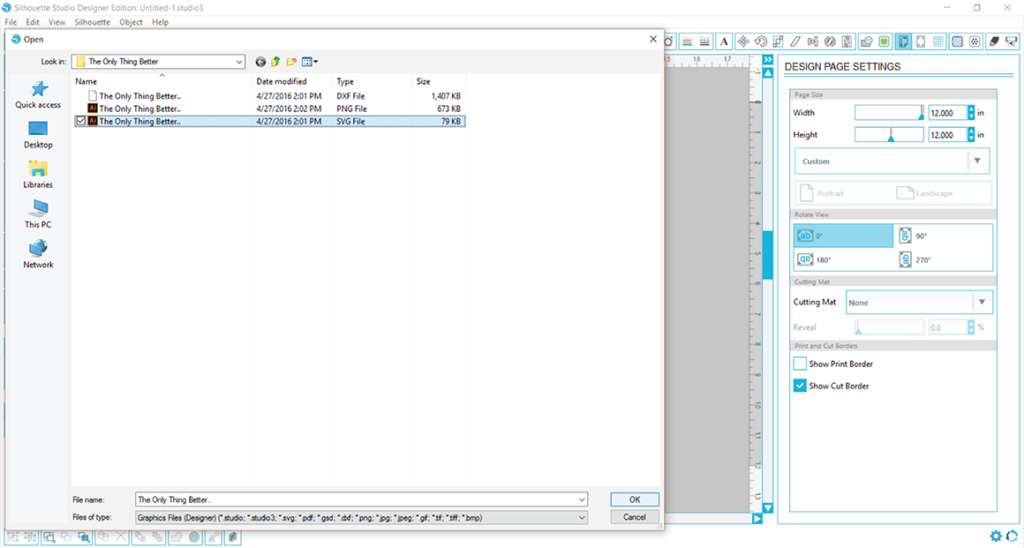
You will then navigate to the folder your file is located in, click the file name, and select OK to open. In this example, I chose to open up a design named “The Only Thing Better.” You can see there are three files and three different file types (DXF, SVG, PNG) for me to choose from. Because I have Designer Edition of Silhouette, I was able to open the SVG file, so that is the one I would like to choose. So I selected it, and then pressed the OK button.
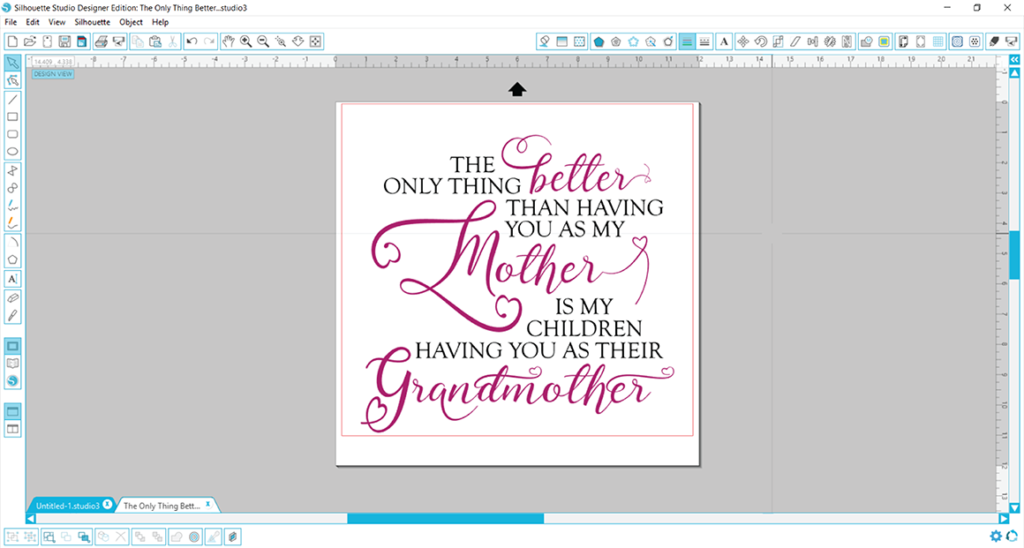
That’s it! My design is waiting for me to begin working with it.
Method 2 :
This method is simply a Drag and Drop technique. It is very quick and efficient when you already have a folder open on your desktop with your file inside. In this example, you can see the folder with the 4 file types that are available for this particular design. I would like to open the DXF file, so I will simply click on the file and hold down on the mouse, and drag the file over into my Silhouette workspace. Silhouette will respond by showing you a status bar as the file is copied from its folder to Silhouette.
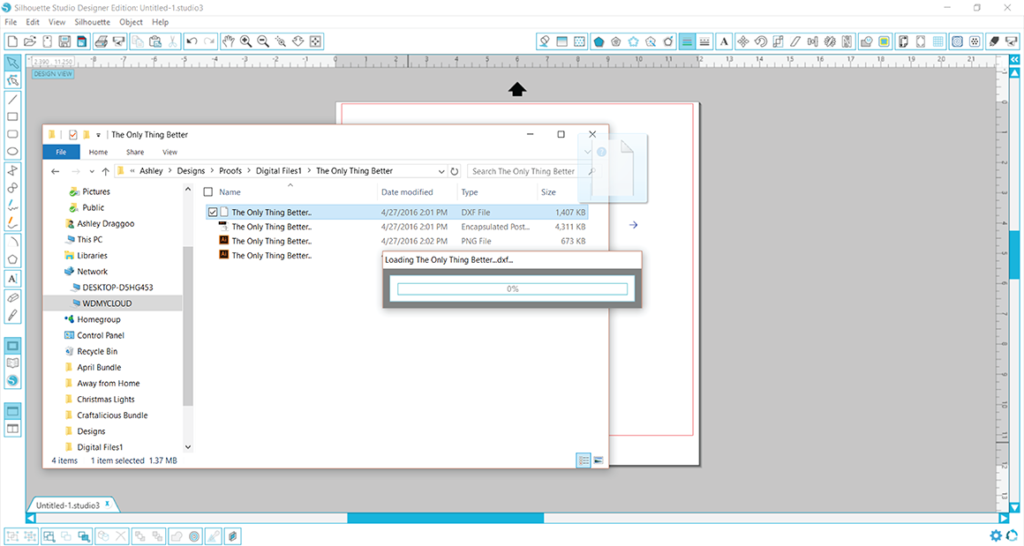
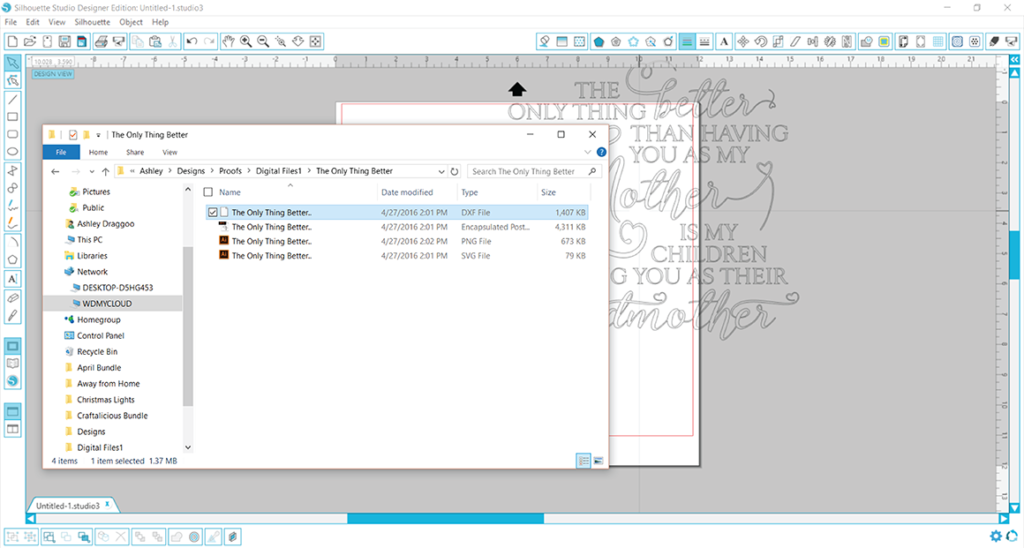
Once the file has finished copying to Silhouette, it will appear in your Silhouette work area and is ready for use.
Method 3 :
This technique utilizes the Silhouette Library. The Library allows to store your designs right in Silhouette for easy access whenever you need them. You can create folders and store your designs by theme or holiday. This feature does require a little work to upkeep your library, especially if you purchase large bundles. You will need to import and categorize all your designs, so expect that it will take some time to complete the task.
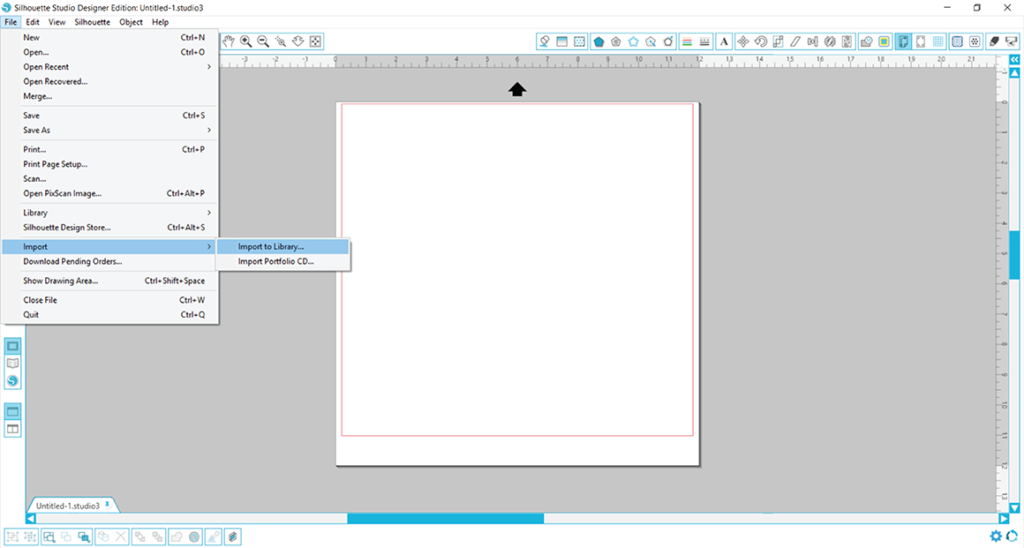
To import a design to your library, open up Silhouette, and click on File>Import>Import to Library.
You will then be able to search for the file you would like to add to your library. In this case I wanted to add the SVG design called “The Only Thing Better” to my library, so I located those files for the design.
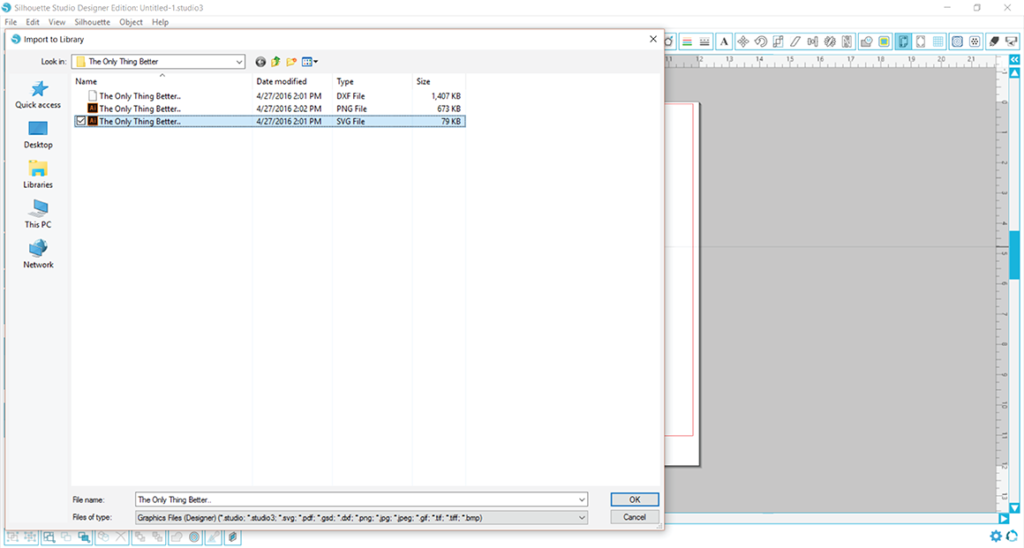
You will also notice that at the bottom will be a drop down called “Files of Type,” and if you cannot locate a certain file type in the folder you expected it to be, double check that that file type is being searched for. Then once you have located the file you would like to add to your library, click OK.
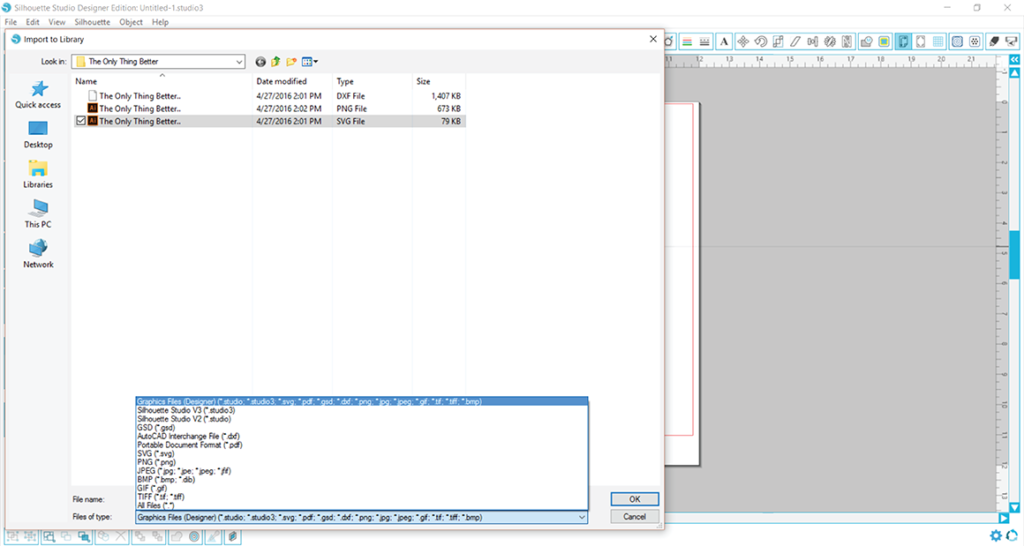
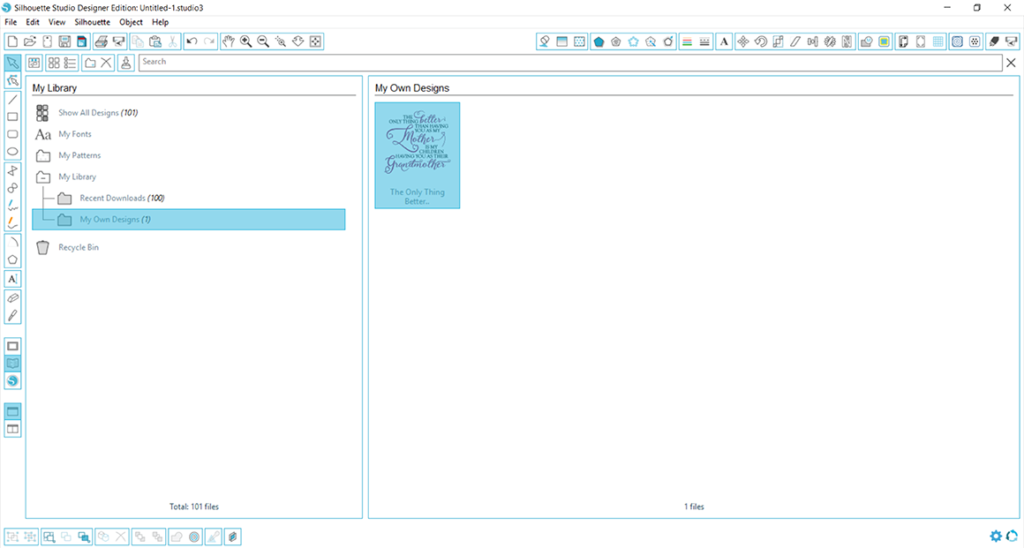
Your design is now available for use in your Library. To open any design available in your Library, just double click it, and it will be added to your work space.
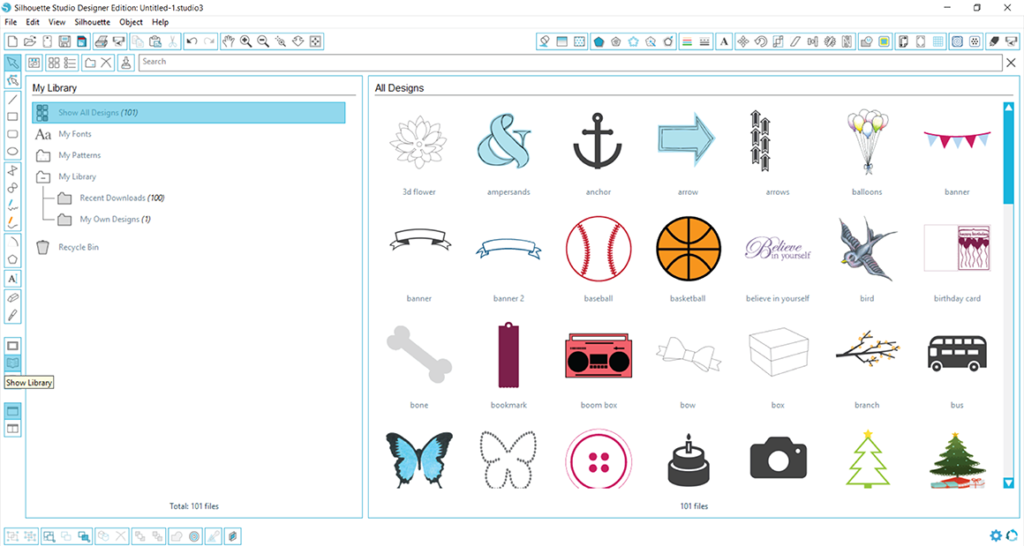
If you are wanting to open a design that you know if already in your Library, you can utilize the “Show Library” icon in the lower left hand corner of Studio, and click it to open it up (it is highlighted in blue in the photo). Then locate your design and double click it to open.
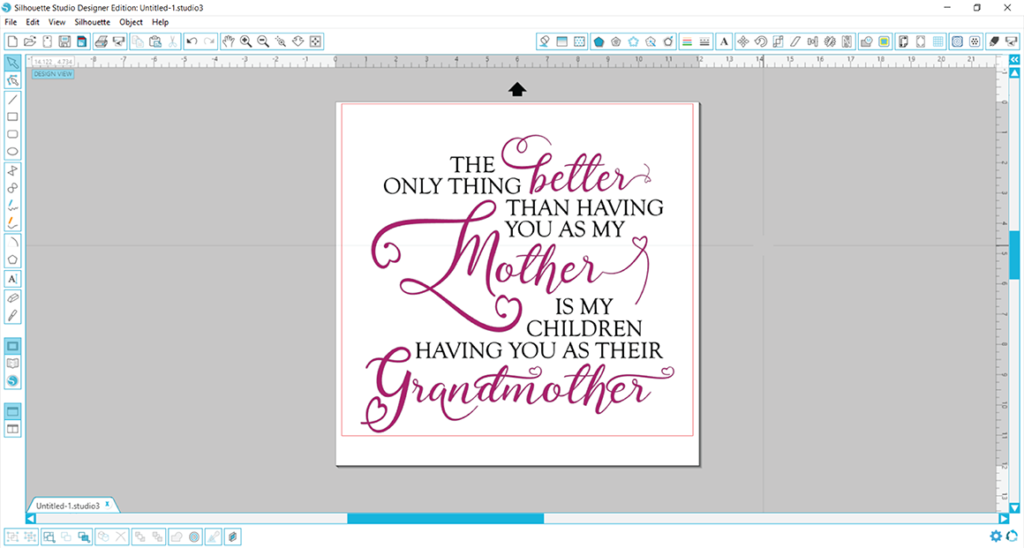
And there is your beautiful design!
Love this design as much as I do?! You can purchase it from the designer here, with commercial use.
Crazy about that swirly heart font? I know I am! You can support the font creator and add this beauty to your collection here.

