How to bulk import in Silhouette Studio
Bulk importing your bundle can be an incredibly easy task. In just a few minutes, hundreds of designs can be added to your library for easy access. First, open up your Silhouette library using the icon on the lower left-hand side of Silhouette Studio.
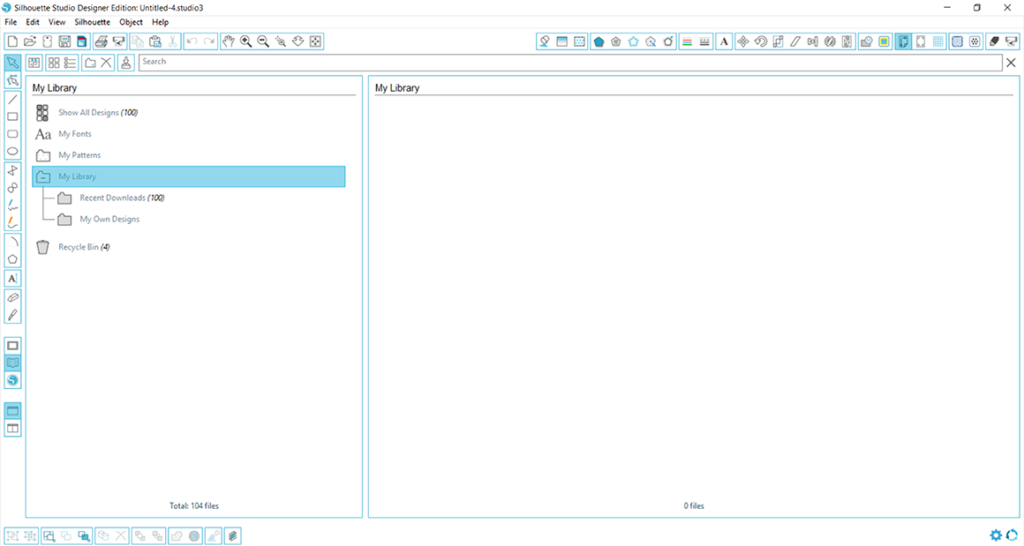
Next you will need to open the folder on your computer where you have your files saved. If you purchased a bundle from Craft Bundles, we have made it incredibly easy for you to bulk import your purchase. The first step would be to locate the Cut Files folder.
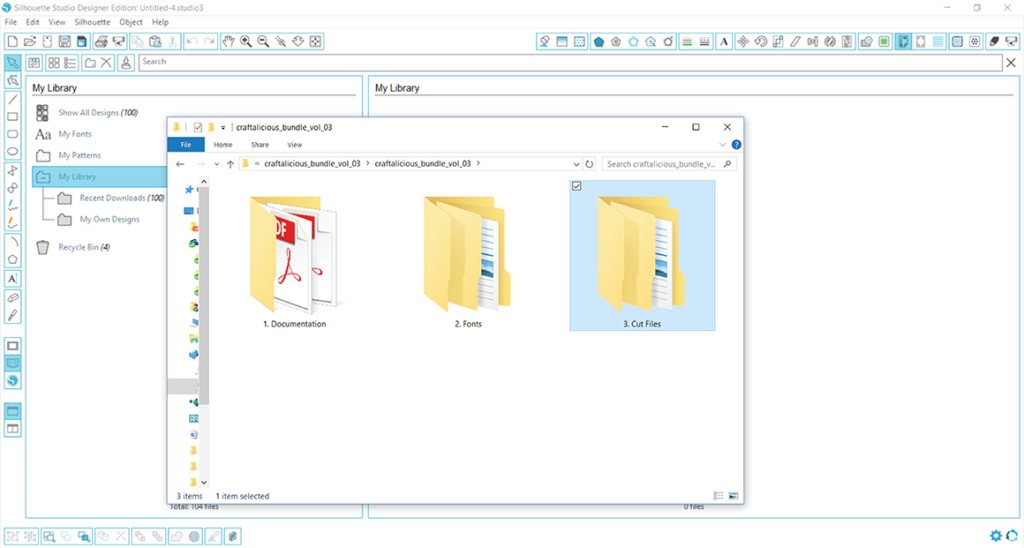
Next, click on the Compiled Graphics folder.
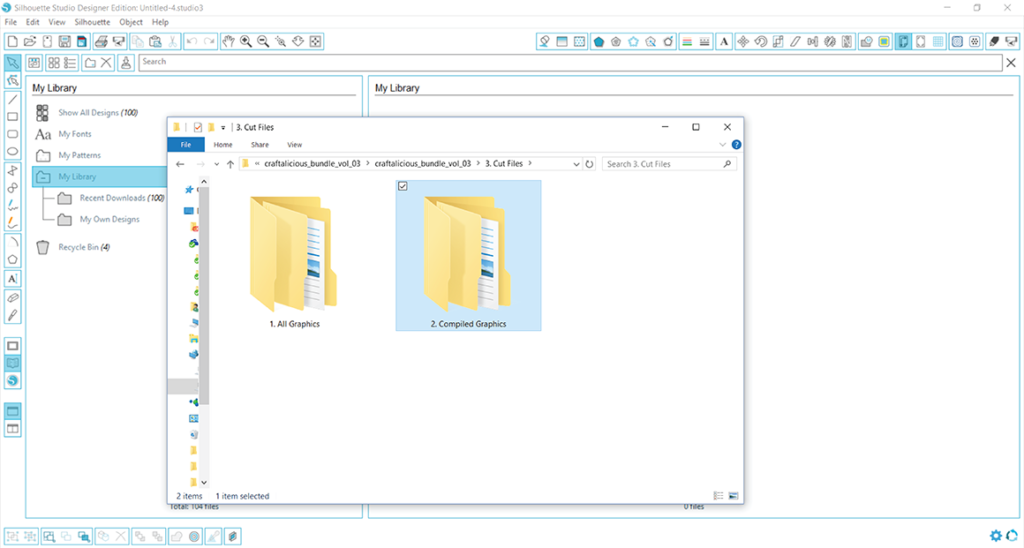
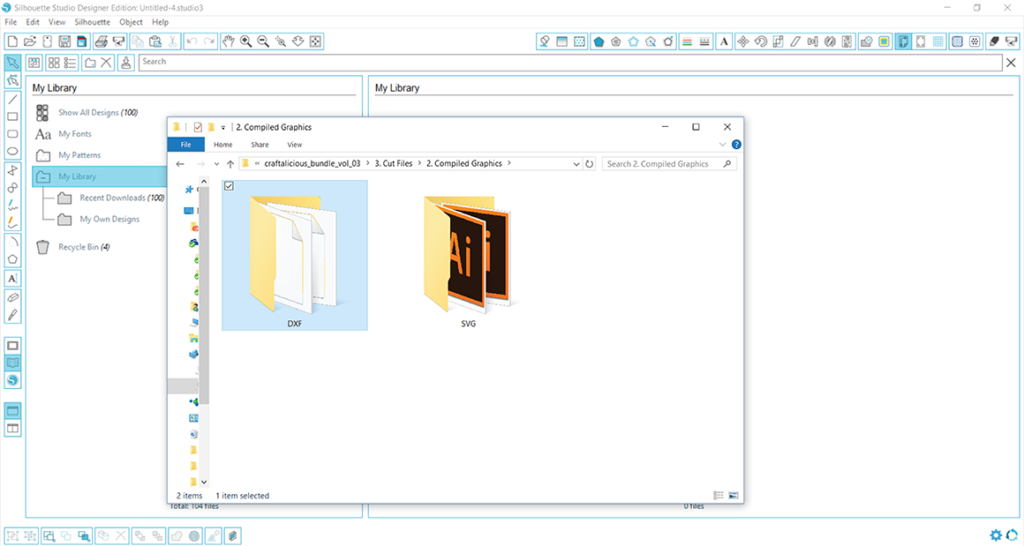
Finally choose either the DXF or SVG option based on the edition of Silhouette you have. Remember, DXF files can be opened in the basic edition, while both DXF and SVG files can be used in the Designer Edition upgrade.
Choosing the DXF folder for this particular bundle, you would find 307 DXF files that are available for import. If you would like all of them to be added to your library, simply select them all, and drag and drop them into your library.
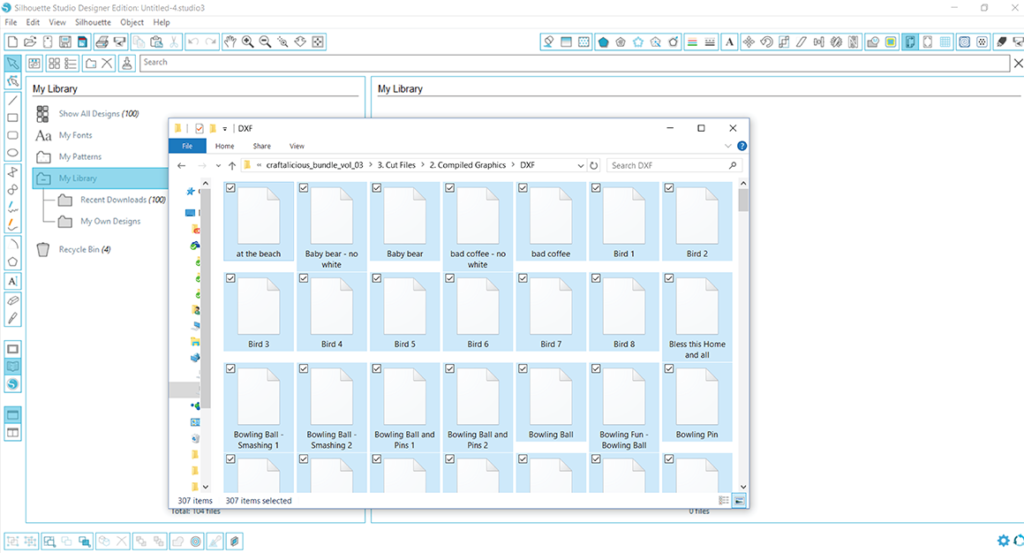
All 307 files will now import. This process may take some time depending on the number of files, so be patient. A status bar will show your progress.
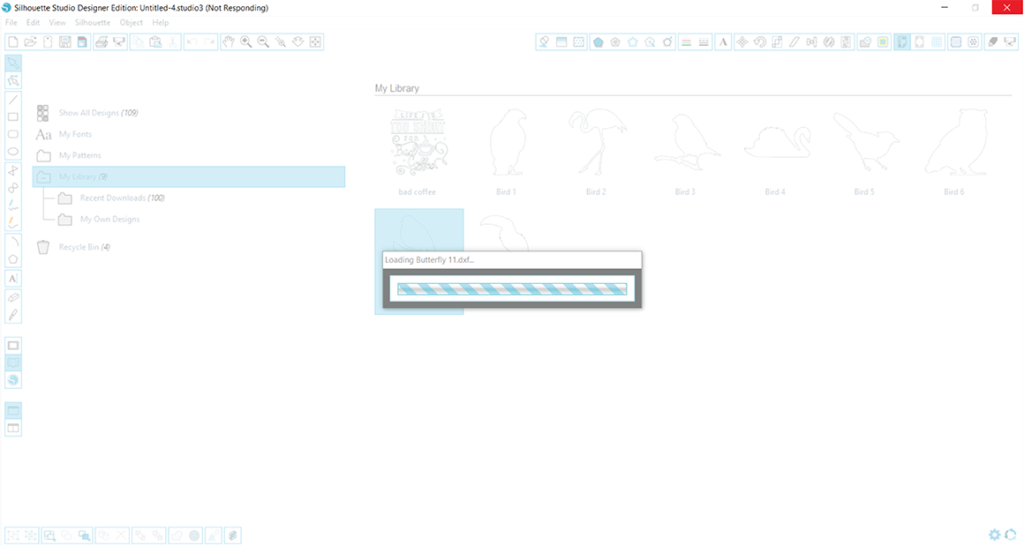
After the importing process has completed, you are free to use any of those designs in Studio!
Can’t ‘Ungroup’ in Silhouette Studio
After opening up an SVG file in the Silhouette software, you decide you would like to manipulate it slightly and change some colors, so you need the pieces ungrouped.
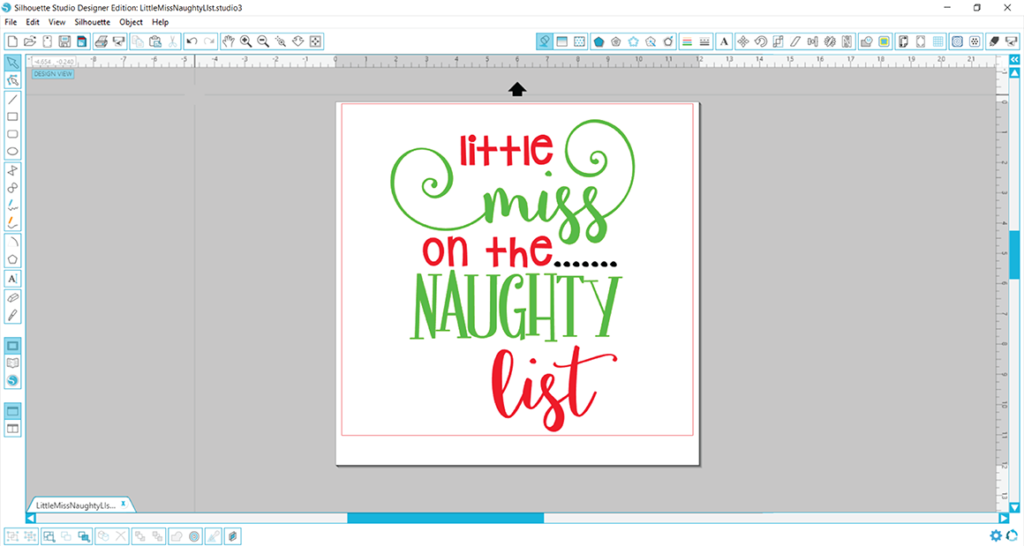
Unfortunately, when you select the piece you want to ungroup and right-click, then ‘Ungroup’ option is shaded out so it cannot be selected. What now?
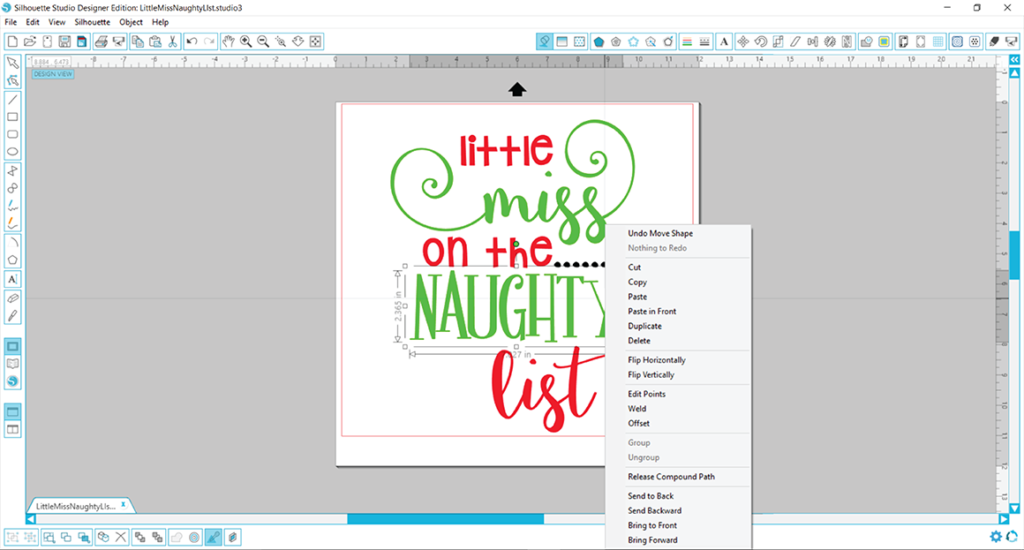
Using the Release Compound Path option instead will yield similar results, though a slight modification will be required afterwards.
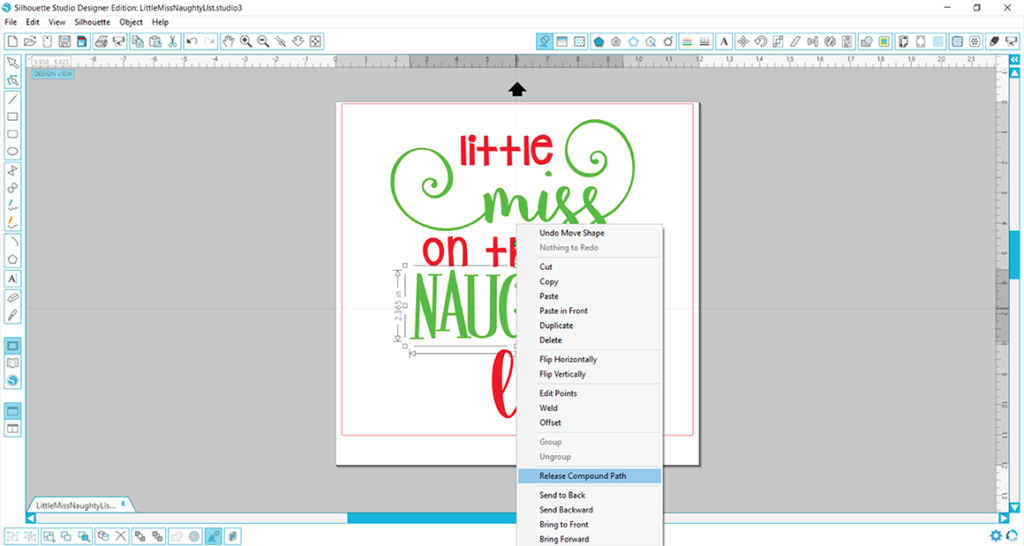
Notice the letter ‘A’ when zoomed in after compound paths are released. It appears as though the center hole that helps form the ‘A’ is missing.
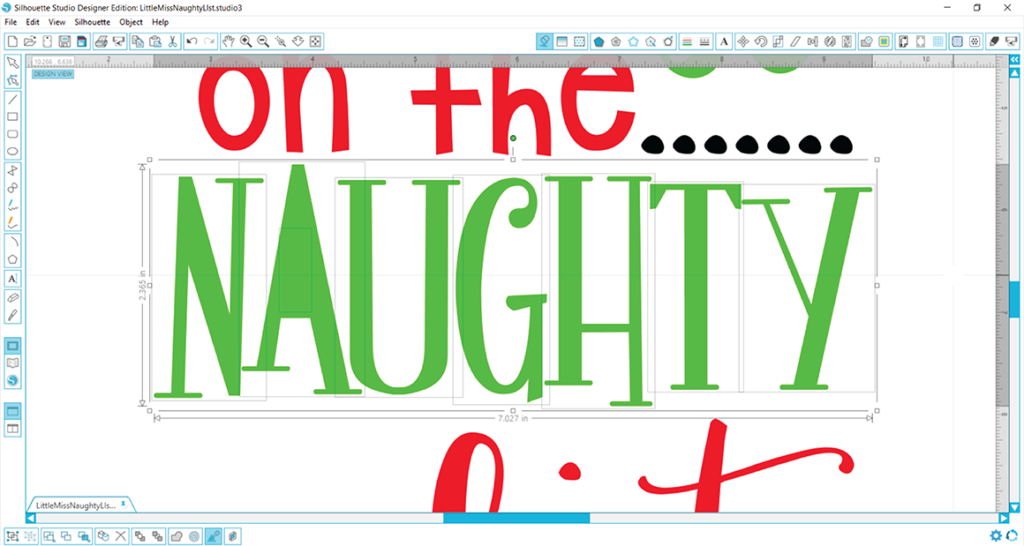
But, when you draw a bounding box around the letter, right click, and select ‘Make Compound Path,’ you will see that missing piece reappear. It never went anywhere, but since the paths were all released in order to ungroup the word, those paths now need to be created again. It is not necessary to do the other letters because there are no holes like there is in the letter ‘A.’
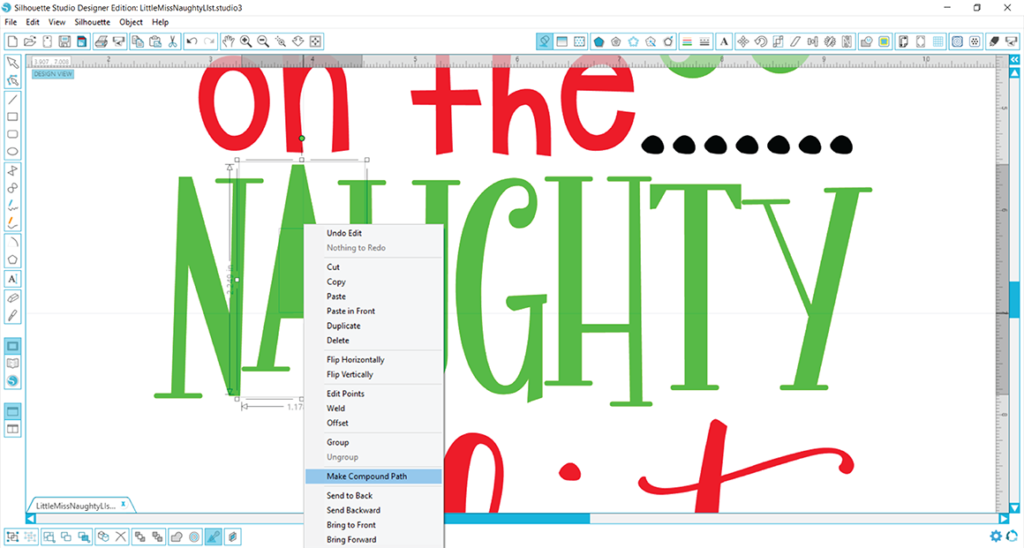
You have decided you would like the word ‘NAUGHTY’ to alternate colors with each letter (red and green alternating). Those letters can now be selected (in this case the A, G, and T) because we would like to change those to red. Using the fill color window, we would then select the eye dropper to grab the red color from another piece of the design so it matches.
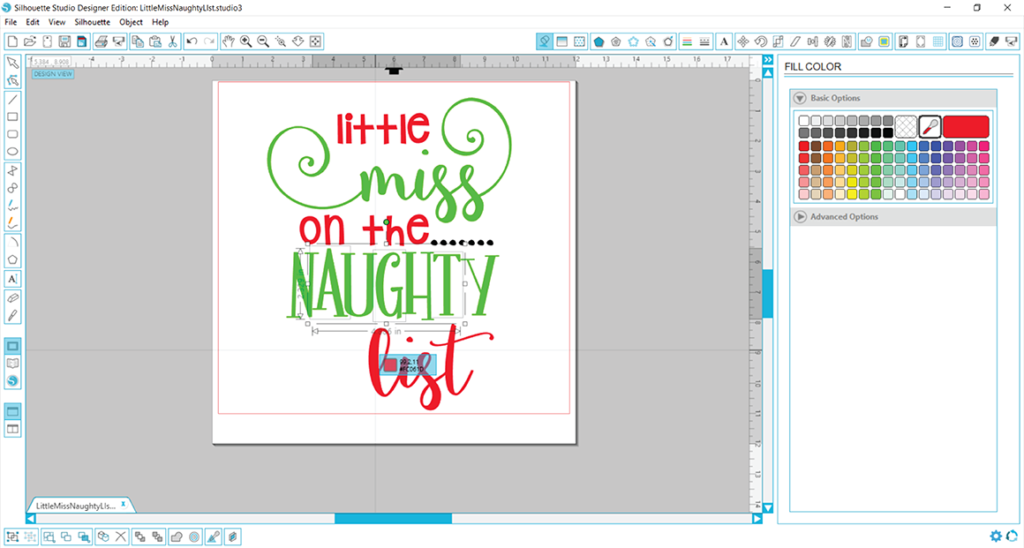
Our design is now altered and we can group like colors together to ready each layer for cutting.
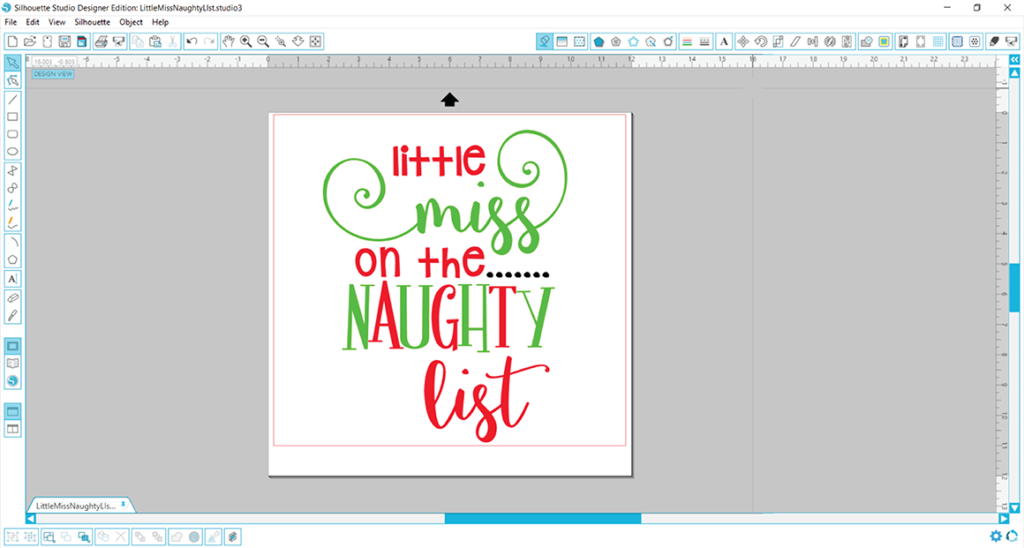
What if your design has the ‘Ungroup’ option shaded and there isn’t an option to make or release compound paths? This will never happen for a vector file like SVG or DXF, but it will be an option for raster files like PNG or JPG because raster files do not have cut lines; they are simply a photo of a design and no pieces can be manipulated in a photo. So just try closing out of the file and reopening the SVG file, and that should do that trick!
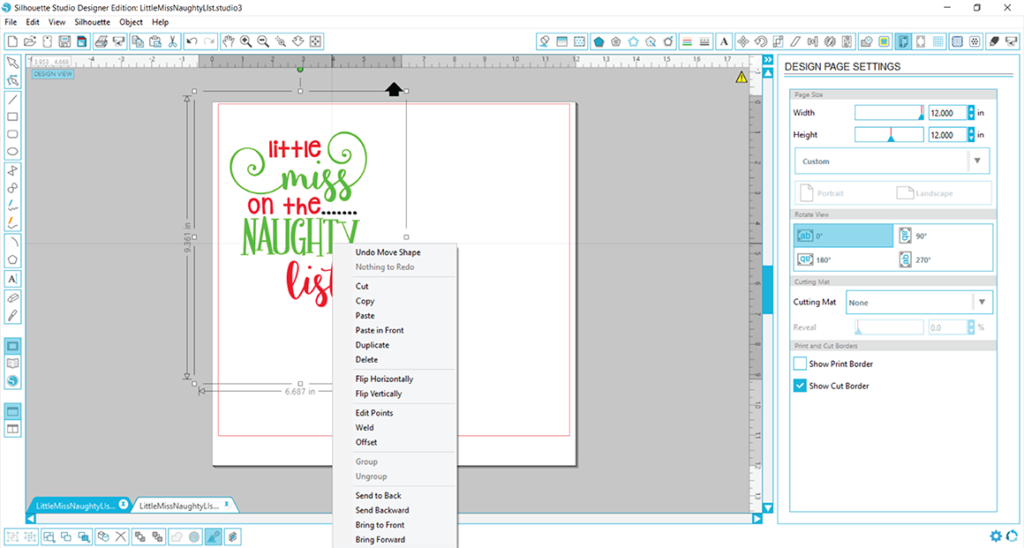
In love with this design? You can grab it here.
How to locate missing pieces in Silhouette
Upon opening your SVG design, you may notice that the design does not look like the sample photos. It is missing some pieces or you see a large black box. Sound familiar? This can be a common occurrence for Silhouette users, but it is not necessarily the fault of the designer. Follow along in the example below to see why this happens and for some easy fixes.
This split bunny is a very popular design in the springtime. It is simply adorable and can be used across many different projects. But upon opening it, you notice the nose is missing, along with the centerpieces of the ears and feet.
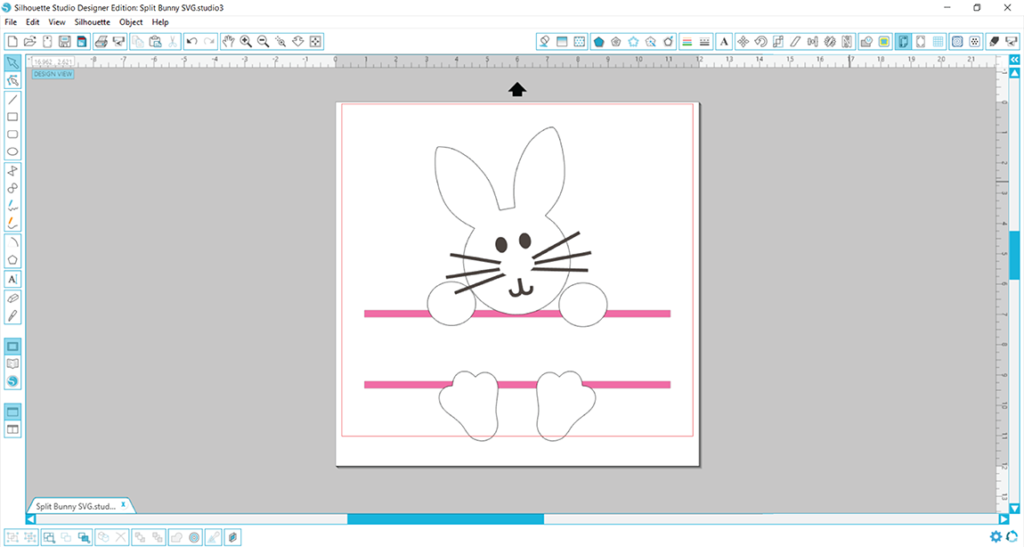
But let’s investigate the design further. When the pink layer that forms the split is selected, you can see the bounding box goes almost all the way to both the top and bottom of the design, rather than just surrounding the split in the center. This indicates there are some hidden pieces. Let’s find them! First, click the pink layer, right click, and select ungroup.
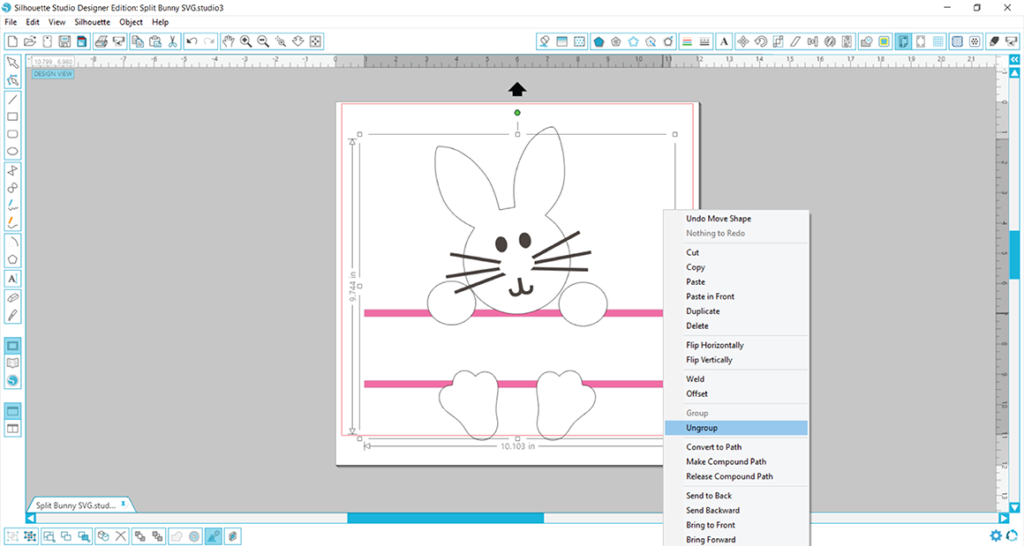
Upon ungrouping the pink layer, you will notice that one bounding box has now become two. Yes, there is definitely a layer hidden behind the body of the bunny. Let’s send the white layer of the bunny’s body to the back so we can reveal the hidden pink layer. To do that, just click the bunny’s body, right click, and select ‘Send to Back.’
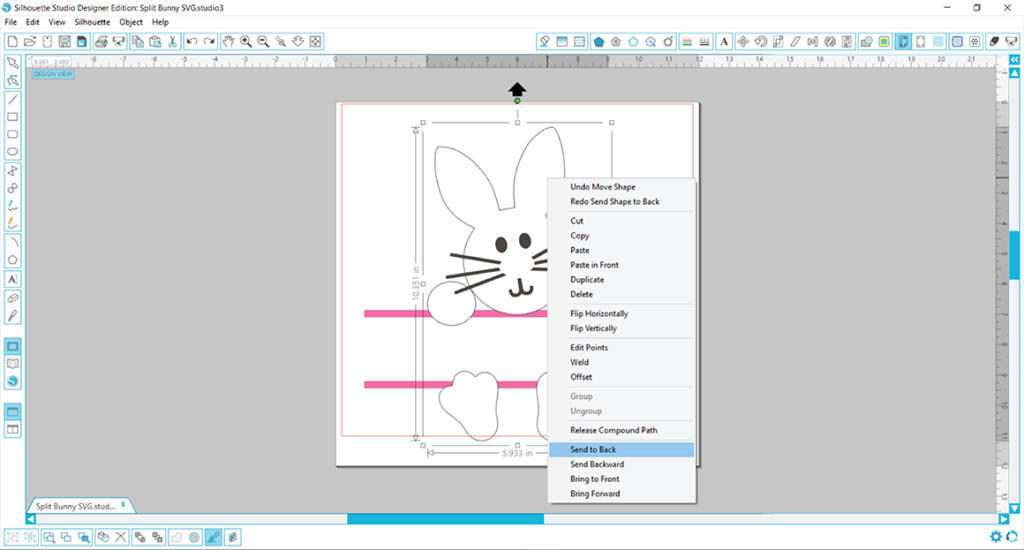
There it is!! The missing pieces have been found. But if you look closely again, something look’s off. The two pink lines that form the split are in front of the bunny.
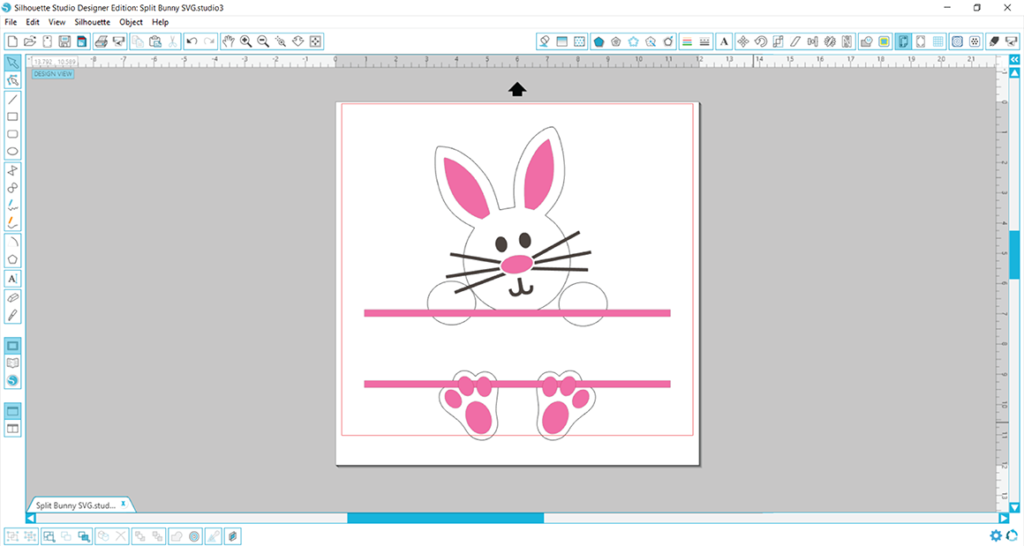
Those lines definitely need to be sent to the back, so select them, right click, and select “Send to back.”
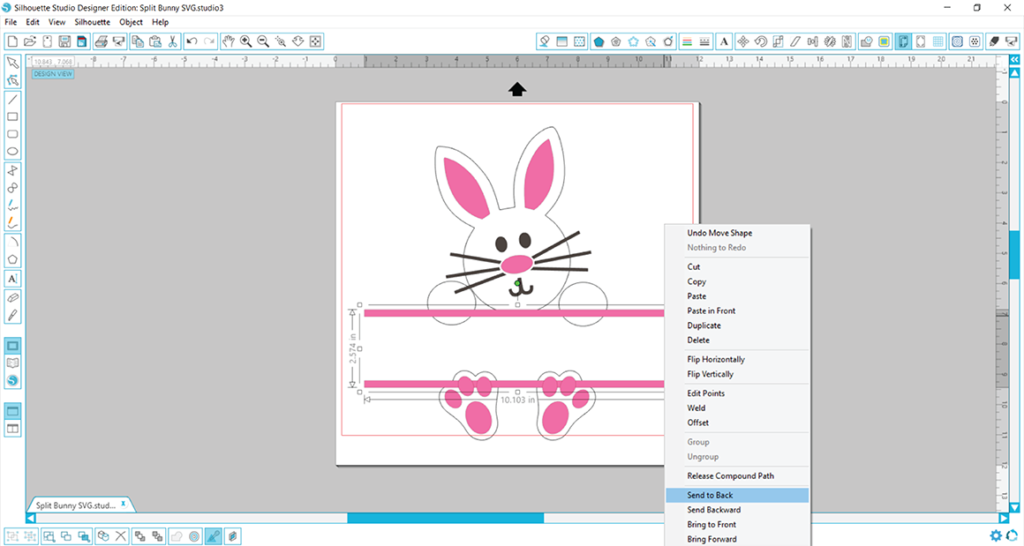
Perfect! Now the bunny is ready for a name in the middle.
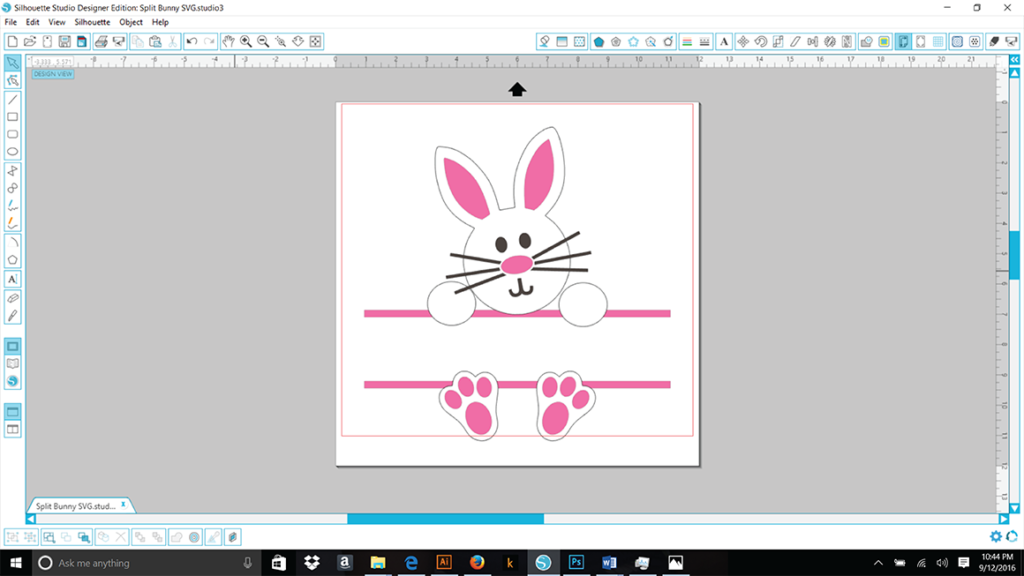
Now why exactly was this layer hidden? Because Silhouette is very powerful, upon importing the SVG file, it recognized that there were three colors in the design: white, brown, and pink. It then created three layers, each one corresponding with a color. The designer may not have grouped all of the pink pieces together, but because the same color pink was used for all of those pieces, they were grouped together by Silhouette.
In love with this cute bunny design? Grab yours here:
https://thehungryjpeg.com/product/4244-split-bunny-svg-dxf-eps-digital-cut-files/
How to use DXF files in Silhouette
DXF files are very different than what you may be used to. There will be no fill colors, no layers, and no compound paths. They import as OUTLINES only, so all you will see is an outline of your design. If you have the free basic edition of Silhouette, you must use the DXF files, as SVG files are not compatible with the free edition (upgrading to the designer edition will unlock your ability to import SVG files).
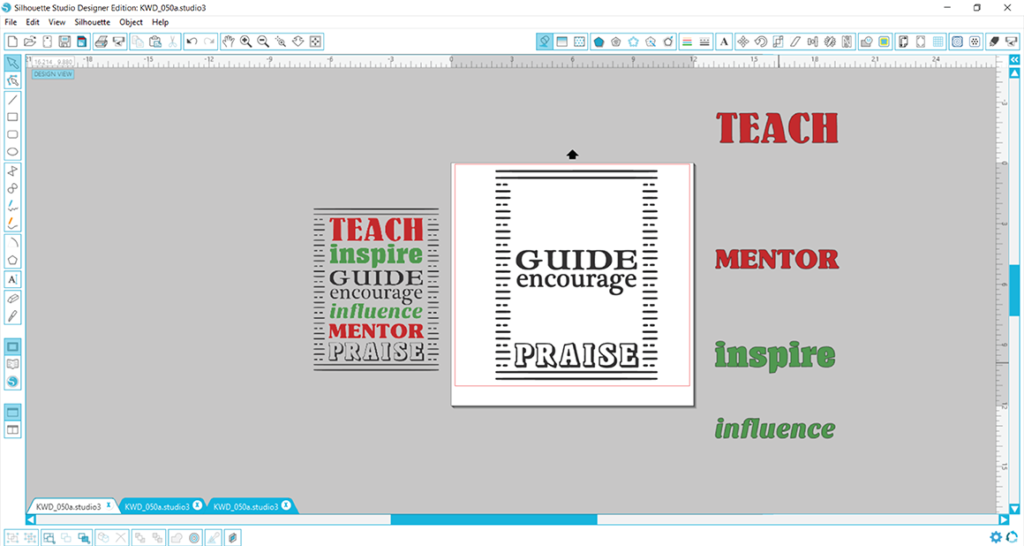
So, you just purchased a design and you have the basic edition. You have opened up the DXF file, and it opens with no colors. You try to resize it, but clicking on the design only grabs hold of one tiny piece of the design. Now what? Let’s take a look at this simple teacher design that has no overlapping but lots of lines. In this screenshot, you can see the DXF file on the mat, and to the left, the color PNG file was imported to use as a guide. This is what the PNG file is meant for! Use it as a guide to help you work with the DXF file.
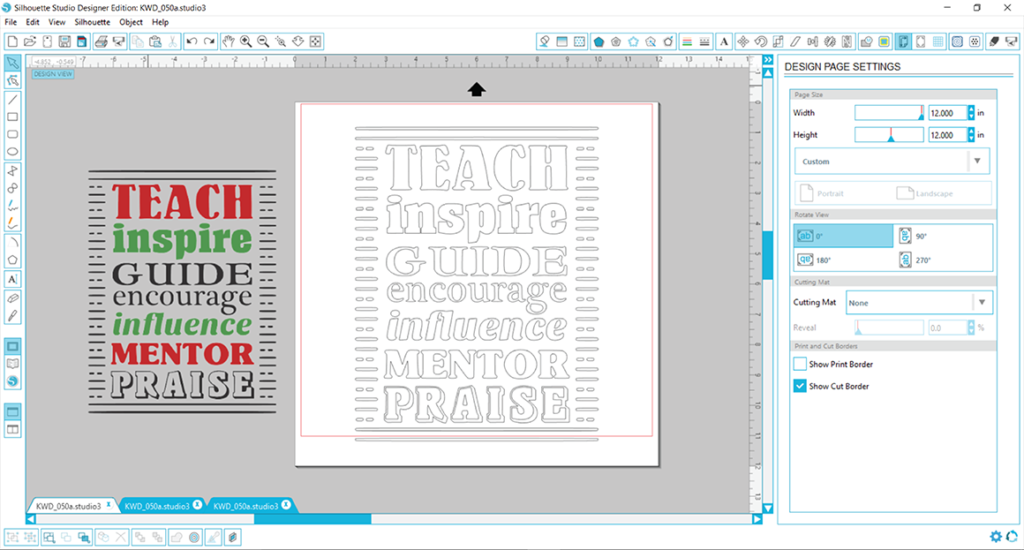
Compound paths form letters that include a ‘hole,’ such as A, B, D, P, etc. In this teacher design, since all compound paths are released, the outer part of the letter ‘A’ was pulled away from the word when moved. Notice how the inner part that forms in the inside of the ‘A’ did not move? This indicates that there are no compound paths. Since the entire design has compound paths released like this, some manipulations of the design will be necessary to prepare it for cutting.
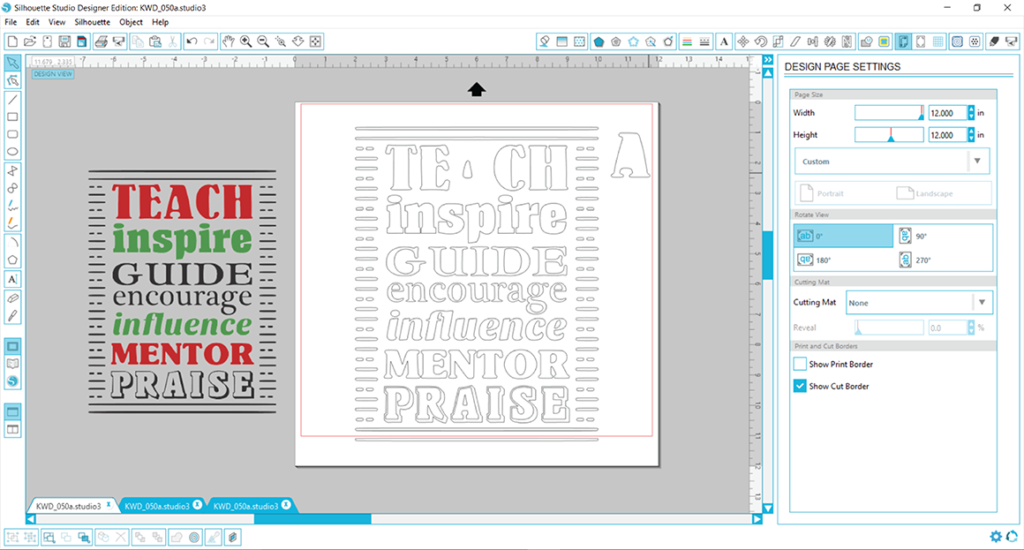
Using the PNG file on the left as a guide, the design needs to be prepped to cut in three colors, red, green, and black. You can of course change the colors and/or cut the whole design as it is in one color, but for the sake of this guide, let’s prep the cut file to be exactly the same as the PNG sample. To start, you will need to create compound paths with like colors. We will start with the words that will be cut in red vinyl, which are ‘TEACH’ and ‘MENTOR.’ First draw a bounding box around all of the pieces for the word ‘TEACH’ making sure you include all letters. If you miss a piece when you draw the box, just hold down the shift key, and select the remaining piece(s). Then, right click, and select ‘Make Compound Path.’ That word will now be grouped together and ready to cut as is.
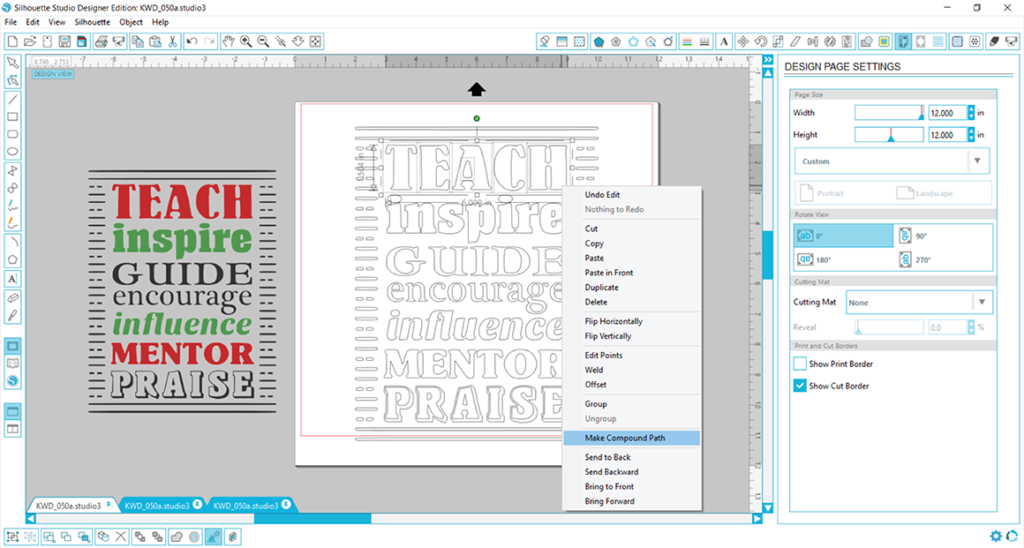
Repeat the process listed above for the remaining red word ‘MENTOR.’
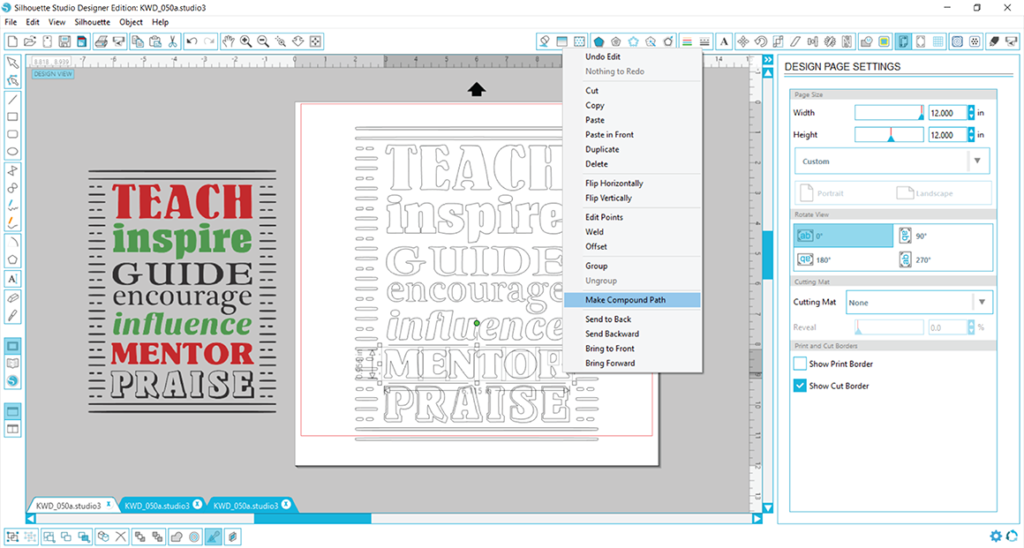
Next you will group together those two red words by selecting them both (hold down on the shift key as you select them both), right clicking, and selecting ‘Group.’
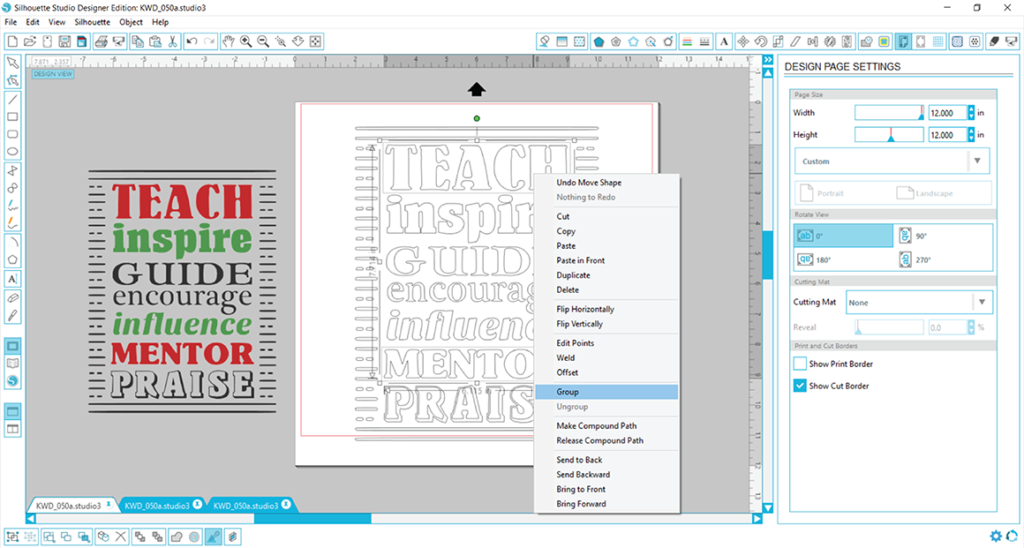
Repeat the process for the green words ‘inspire’ and ‘influence’ and group those together. Now, all that’s left is prepping the black pieces. The easiest way to select all of those pieces is to work backwards in a way. Basically, you will draw a bounding box around the ENTIRE design. Everything will be selected, and you can see the boxes around all pieces.
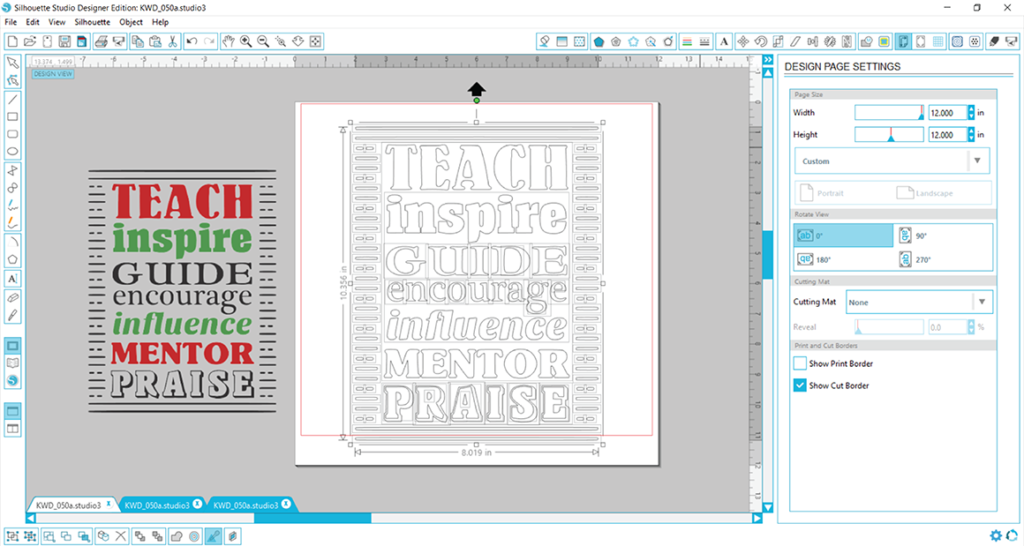
Now you will need to deselect the red and green words by holding down on the shift key and simply clicking on them. You’ll notice the box disappears indicating they are no longer selected.
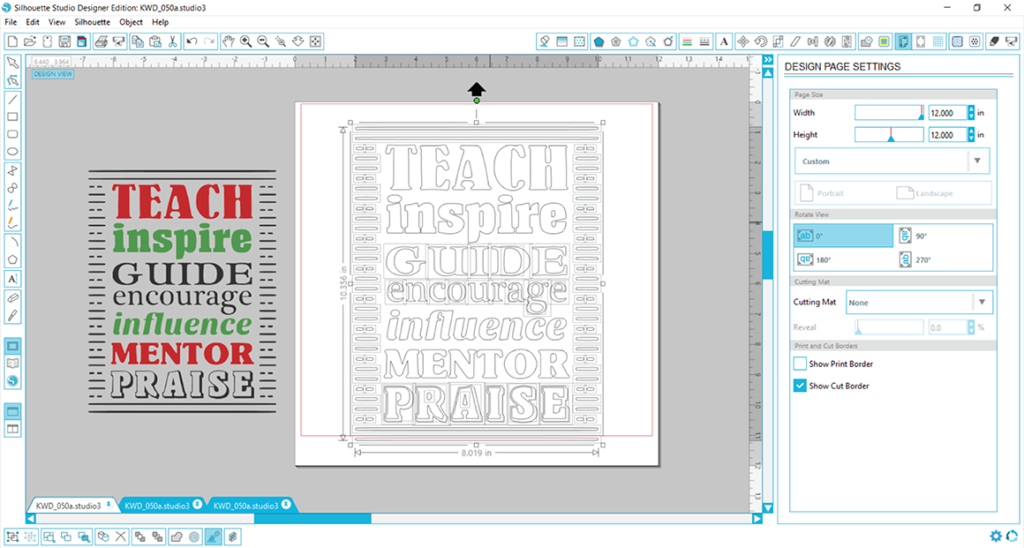
From here the process is the same as above, and all you need to do is right click, select ‘Make Compound Path,’ and now your black pieces are prepped for cutting!
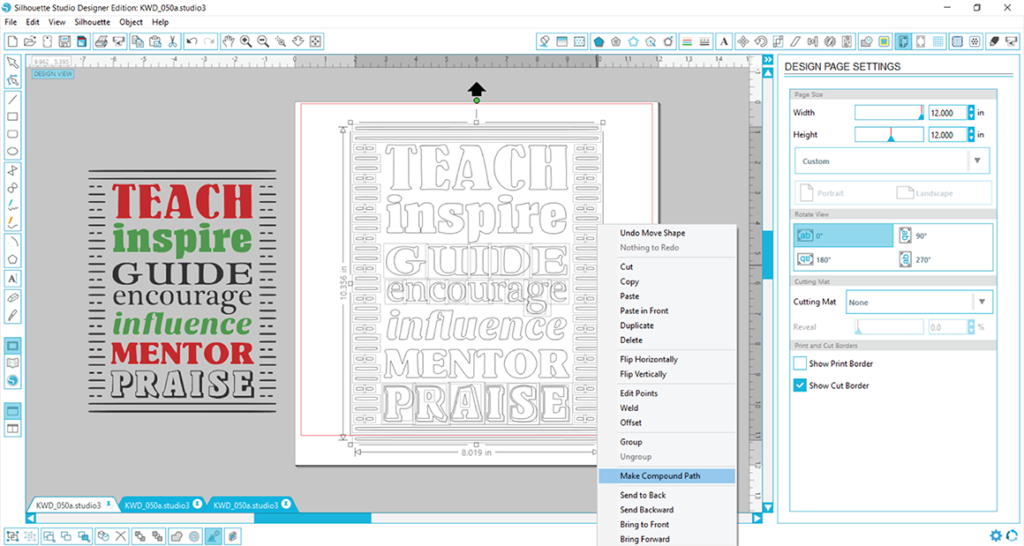
You are now free to move those three grouped pieces around on your mat if you need to, or you can opt to play with colors in your color palette if you are not sold on the red/green/black color combination. I like to work with everything in color as it helps me visualize my project, so I always add colors to my DXF files after they are prepped for cutting. So we will add color to this design by clicking on the first piece and then opening the fill color window. If I wanted to keep my color the same as the sample, I can use the swatch grabber tool and then click on the red part of the sample PNG. Repeat this to select a color for all three pieces.
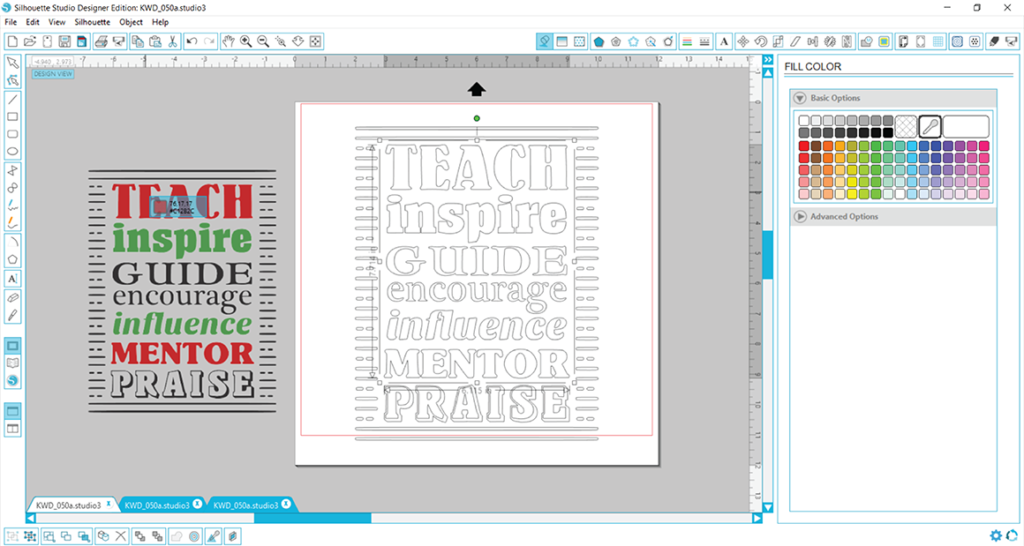
Now you have three grouped pieces ready to cut. You can move them off the mat while another color cuts or you can use the cut by color option in your Cut Settings.
Looking for some great school and teacher designs? You can purchase this design and more in a bundle deal here.
SVG files won’t cut in Silhouette Studio
After you download your purchase from the Craft Bundles website, the first thing you will need to do is unzip your files for use. Zipped folders look like a folder with a little zipper on it. When you hover your cursor over it, you will also see the words “Compressed (zipped) folder.”
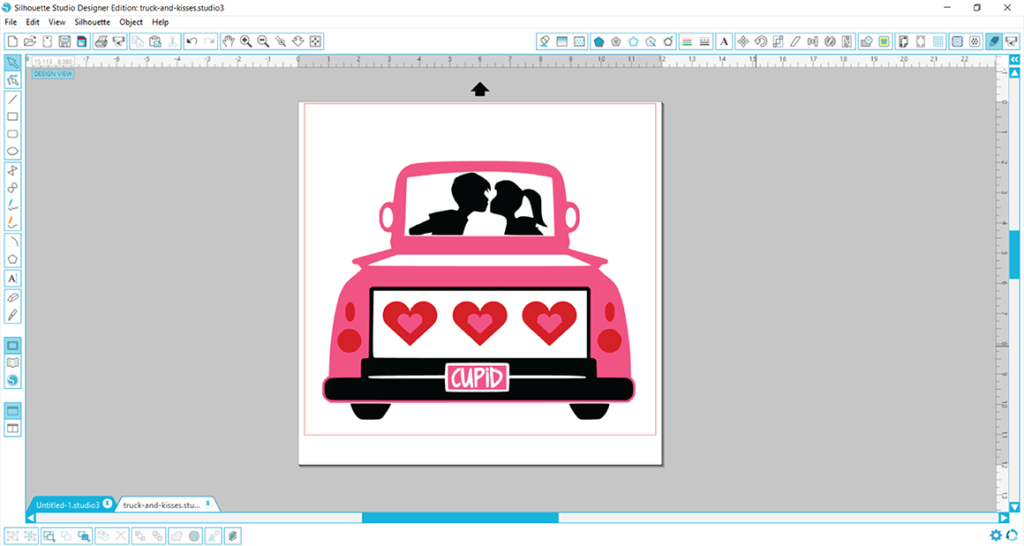
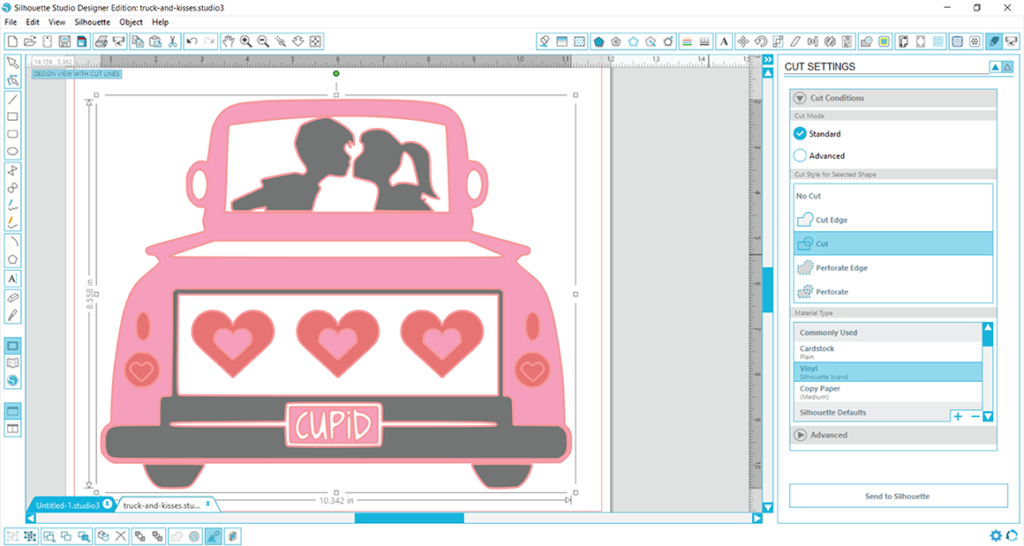
You load your vinyl into your cutter, click on the ‘Send to Silhouette’ icon, and wait for the magic to happen, only your cutter does nothing. Frustrating right? More than likely, you have just skipped over one important step…turning cut lines ON! SVG files are neat in that cut lines are embedded in the file, but by default, your cut lines are off in Silhouette. In order to check your Cut Settings, select your design, then just click on the Cut Settings icon in the upper right-hand corner. It will look like the tip of a Silhouette blade.
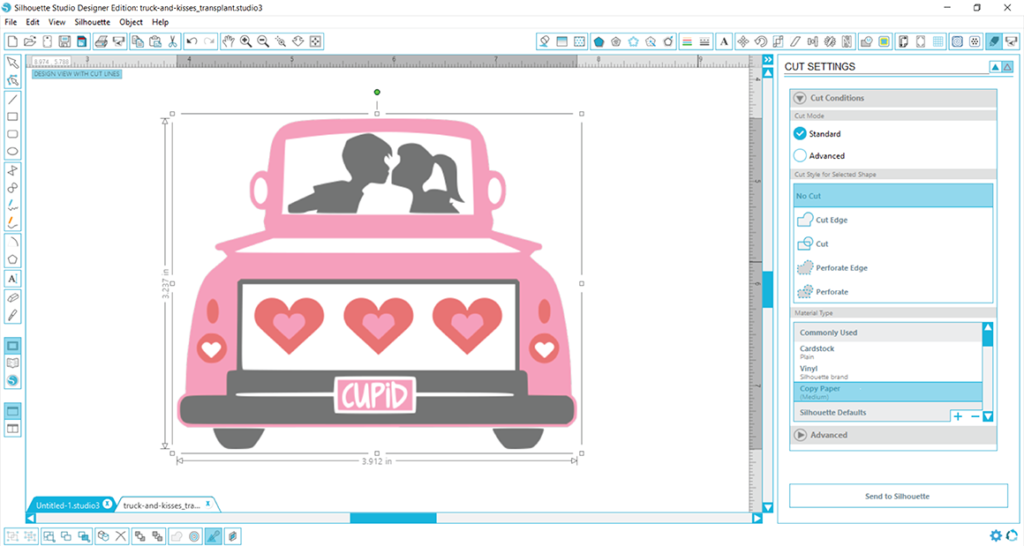
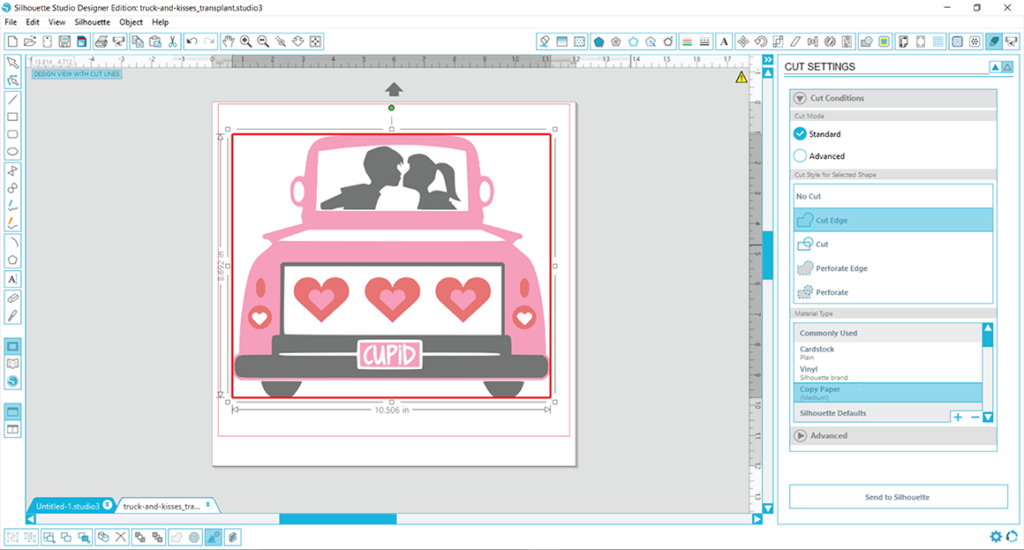
In the Cut Settings, you will see a section called ‘Cut Style for Selected Shape.’ If cut lines are off, the ‘No Cut’ option will be highlighted. Of course, this is not what we want! Now, if you select the ‘Cut Edge’ option for this particular design, you will see a red box form around just the outer edge of the design. If that is what you want your machine to cut, then perfect, just send to your cutter, and it will cut those lines that are highlighted red.
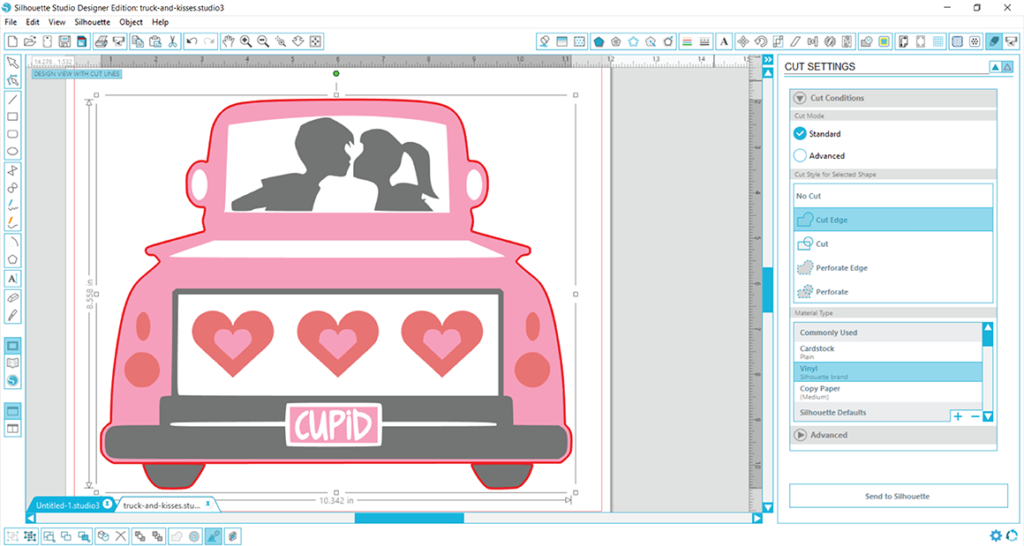
But, if you want your cut lines to include all the little pieces inside the truck, then just change your selection to ‘Cut,’ and all those pieces will show with a faint red line as the cut lines. You can then send the design to your cutter.
There is one other possibility you may see when you click the ‘Cut Edge’ or ‘Cut’ options. If you see a red box around the outside of your design, then you have not opened the SVG file and have opened the PNG or JPG file in error. These files will not show any cut lines since there are not any embedded in the file. Just close out of that file and reopen, double-checking that you have clicked on the SVG file.
Have you fallen in love with this Cupid’s Truck design? You can pick up your own copy here.
Fix cut files open in a web browser error
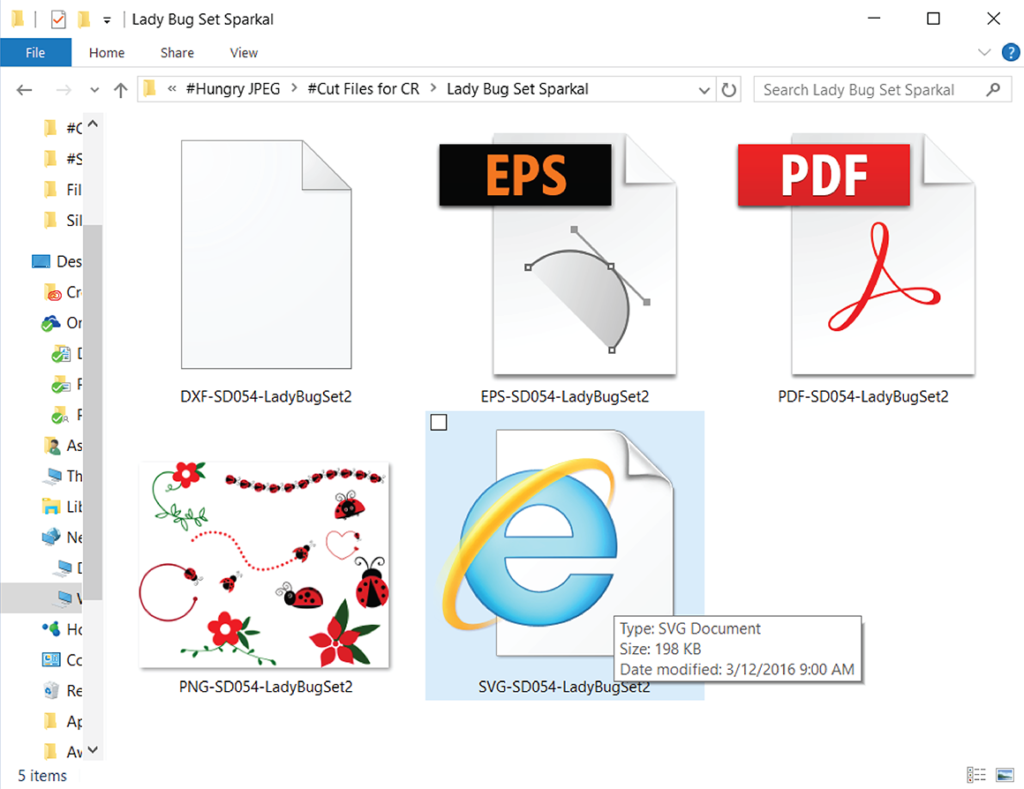
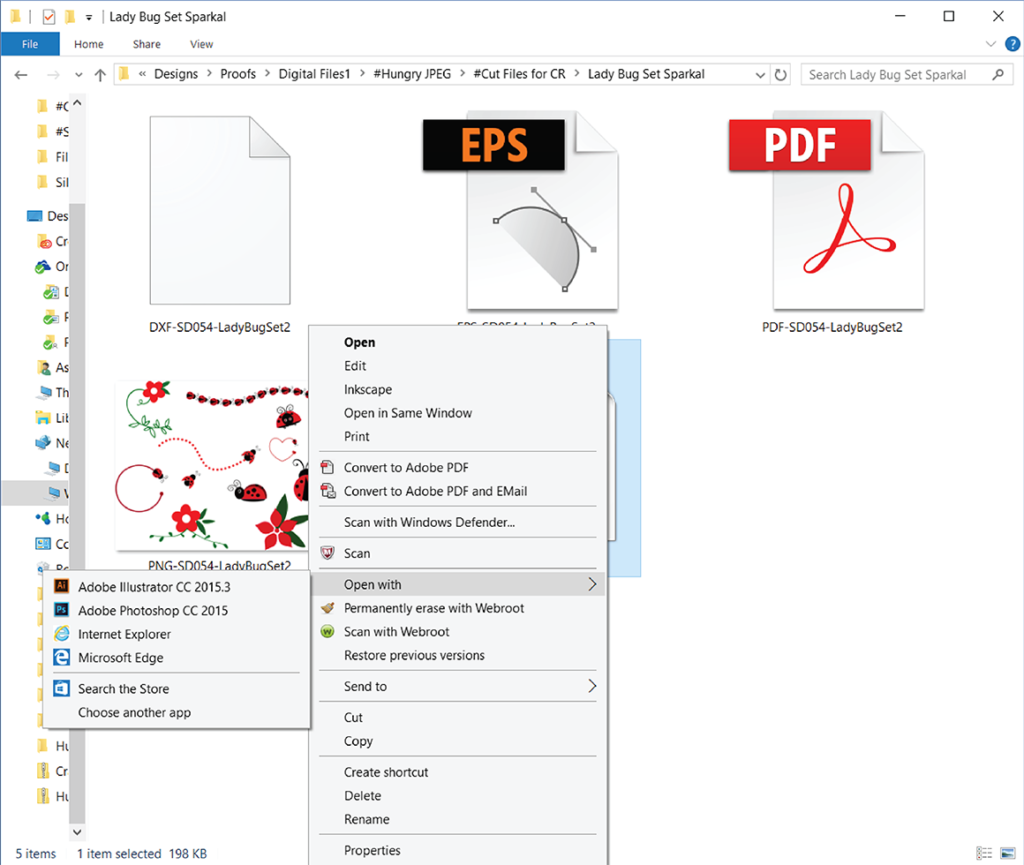
Your computer is a smart machine, but sometimes it needs to be told what to do. When you try to open a file type that your computer doesn’t use often, it needs to be told which program to use to open it with. For example, you just purchased this adorable Lady Bug set from Sparkal Designs, and you unzipped the folder and see that there are 5 file types available in your download. The SVG file is highlighted in the photo below.
You are so excited to use the files that you doubled clicked the SVG file to open it, just like you would do for a Microsoft Word document for example, and the file then opens up in your Web Browser.
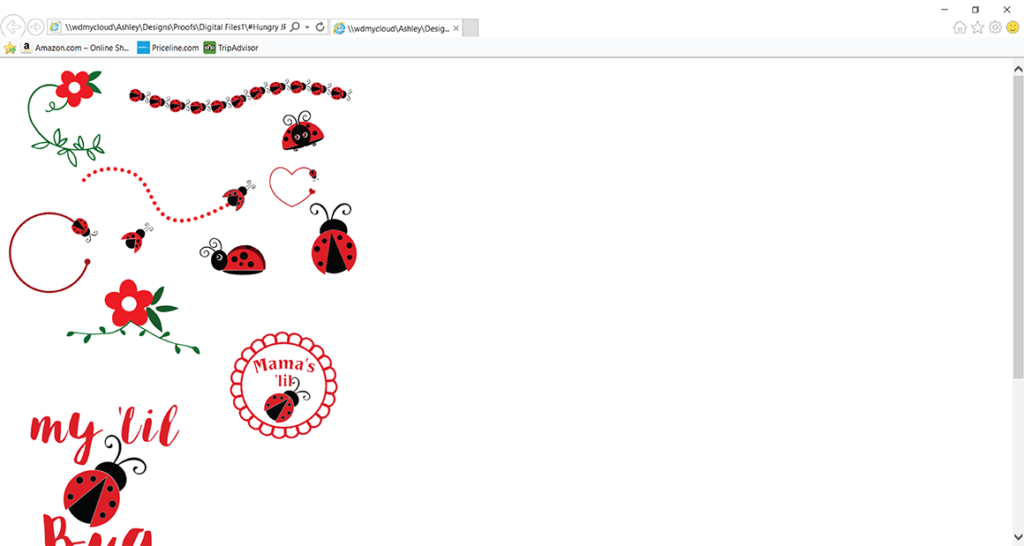
Why did your SVG file open using your internet browser rather than in Silhouette? The basic explanation for this is that SVG files are not a common file type your computer uses, and your computer does not know which program to use to open it. A computer will typically default to a web browser for SVG files, so it may appear the file is an “internet” file, which causes some confusion for someone unfamiliar with SVG files. It is also true that most computers will not even list Silhouette as a possible program it can use to open Silhouette files, as shown in the next photo. When you right click and select “Open with,” you will see that Silhouette is not an available option.
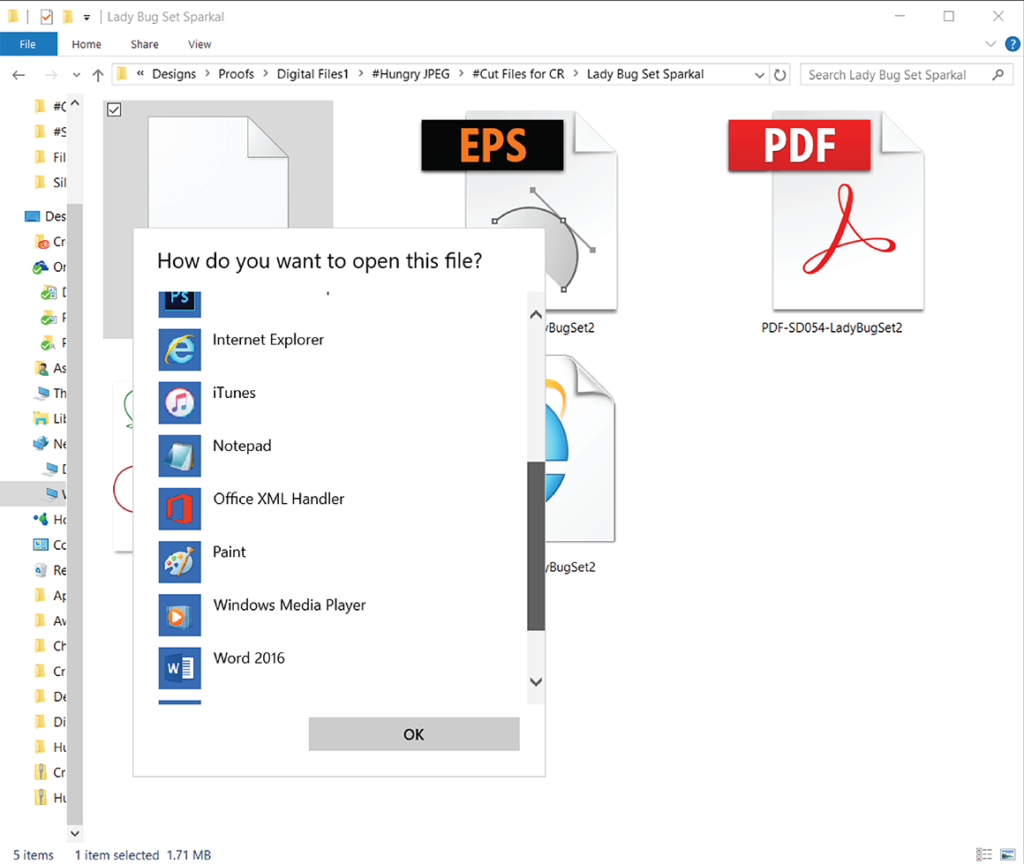
Double clicking on the DXF file will also yield similar results. Since the DXF file extension is even less common than the SVG file, your computer will likely be unable to open this file type in your internet browser and will ask you which program you would like to use to open it with. You’ll see lots of different options you can use to open the DXF file, but notice that Silhouette is NOT an option. Unfortunately, not all computers will realize that Silhouette can open this file type, so it will not list it as an option.
So, instead of opening your designs from the folders they are saved in on your computer, simply open up your Silhouette Studio software and use the File>Open method.
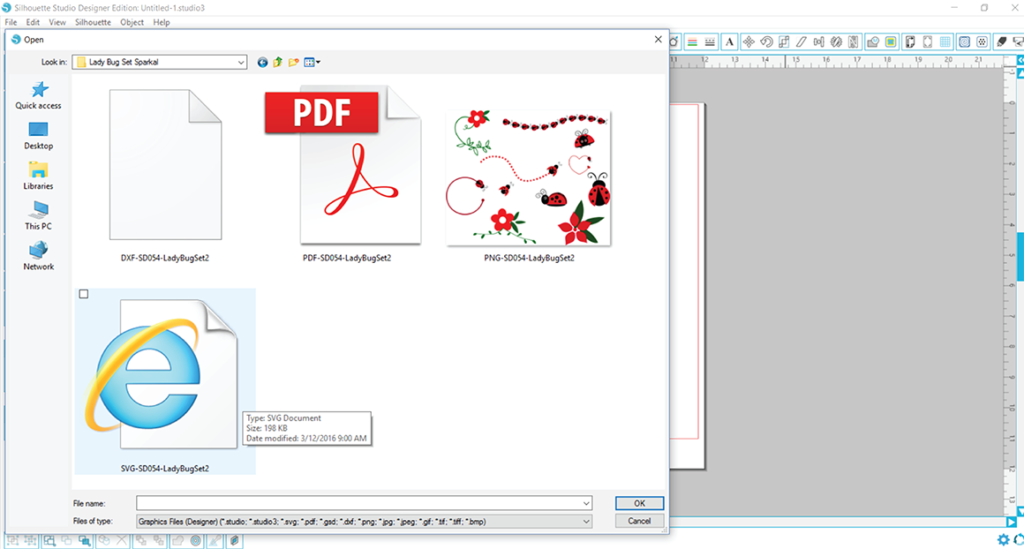
Your design will then open in Silhouette with no problems!
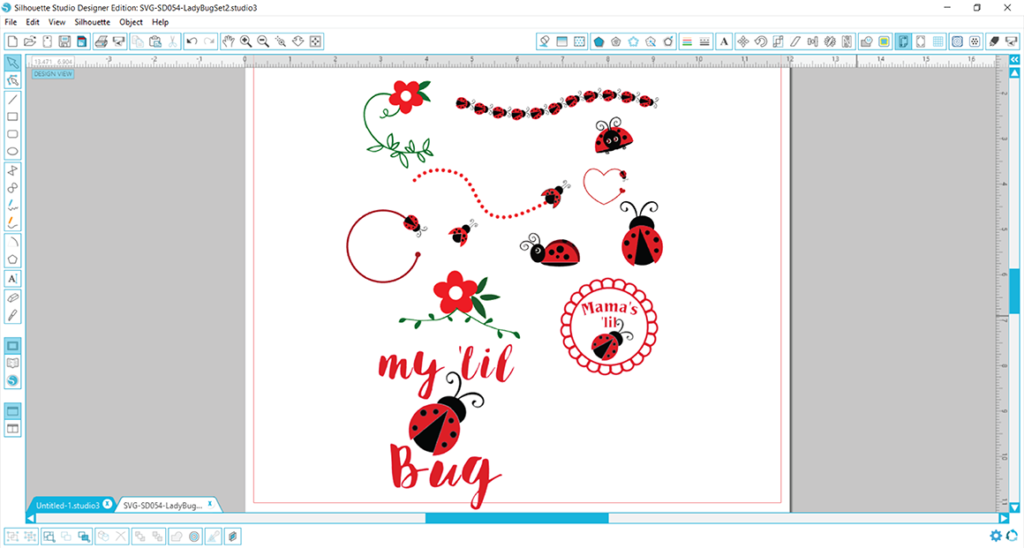
Fancy this adorable Lady Bug set? You can pick up yours here.
Fix ‘file not supported’ error in Silhouette
When opening files in Silhouette Studio, it is important to remember that only certain file types can be opened. Craft Bundles provides four main file types in all of our downloads, SVG, DXF, EPS, and a photo file like PNG, JPG, or PDF. The most likely reason for being unable to open a certain file is because you are trying to open an incorrect file type for your software. Remember, SVG files cannot be opened in the free basic edition of Studio, which is why we provide the DXF for basic edition users.
In this example, you can see the Silhouette Studio workspace along with a folder that has 4 files, each of which is a different file type.
Because I personally have the Designer Edition upgrade, the SVG, DXF, and PNG files are all capable of being opened in Silhouette. The EPS file, however, will not open. To demonstrate this, the EPS file was selected, then dragged and dropped into the Silhouette work area.
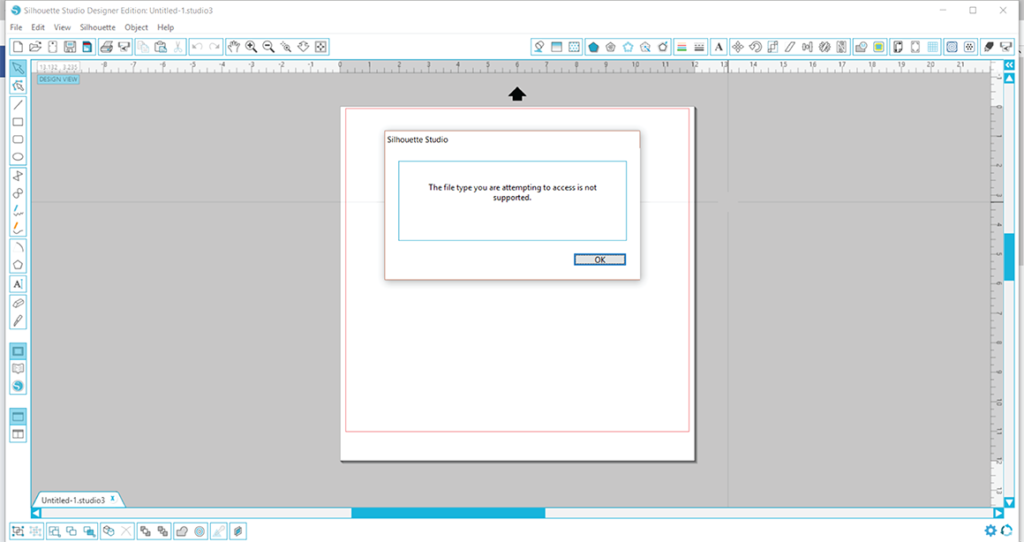
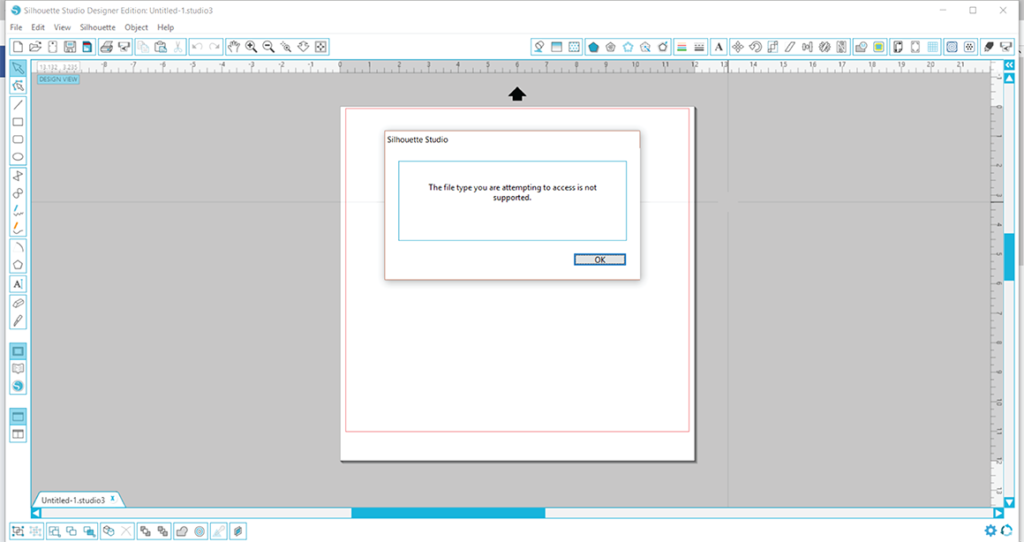
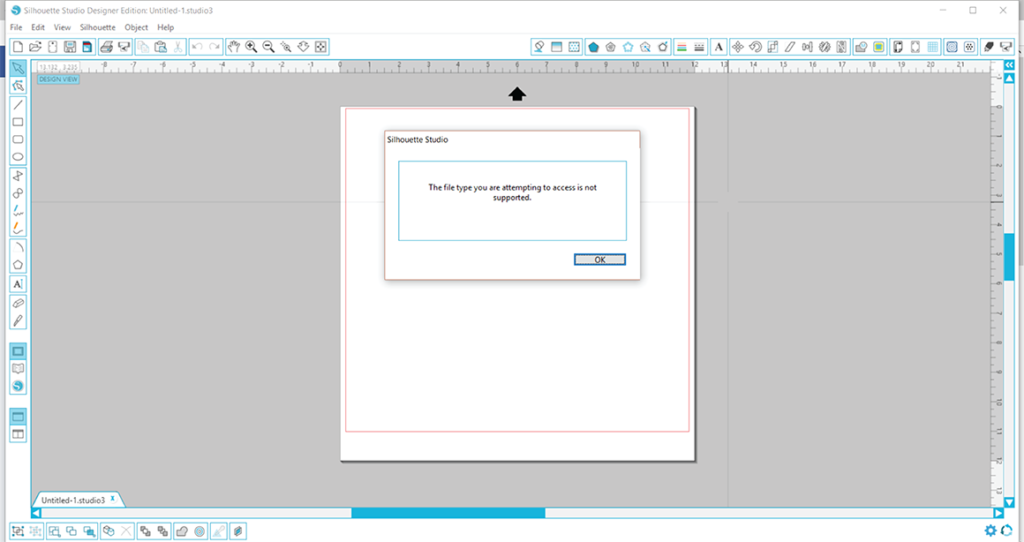
Silhouette will then respond with an error message stating “The file type you are attempting to access is not supported.” This file type is incapable of being opened in this version of Silhouette. The same thing would happen should you attempt to open an SVG file from within the basic edition of Studio.
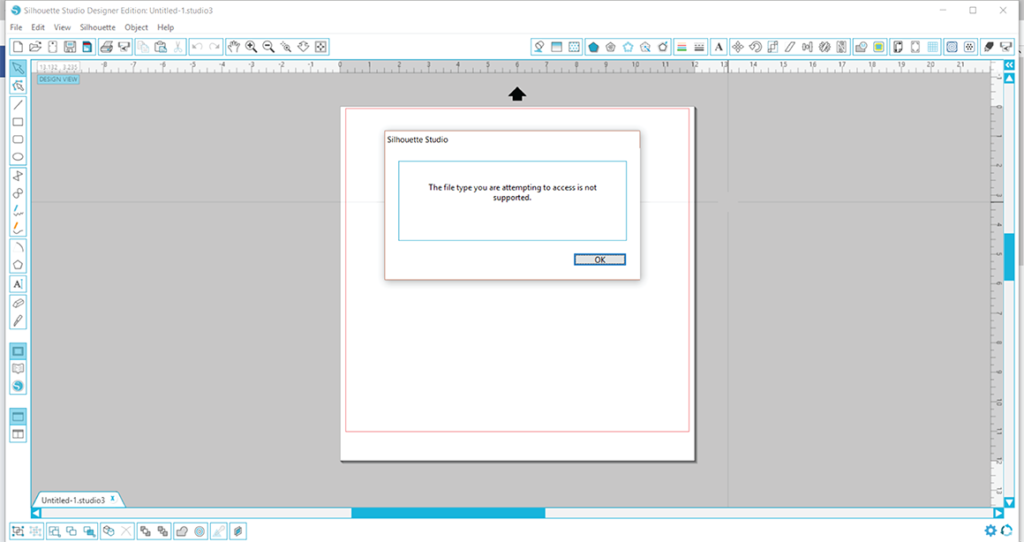
If you are 100% positive you have the Designer Edition and you still are getting this error when opening SVG files, double-check that your license is still activated. Open up Silhouette Studio, and in the upper left-hand corner, it will say “Silhouette Studio Designer Edition: [Insert File Name].” Sometimes your Designer Edition will deactivate. It has happened to me on three occasions!
How to open SVG and DXF files in Silhouette
Silhouette Studio is capable of opening a number of different file types. Craft Bundles offers several Silhouette-compatible options, and your edition will determine which of these you are able to use in Silhouette. In addition, to cut files with embedded cut lines, which we will focus on shortly, Silhouette also opens raster photo files. These include PNG, JPG, and PDF files, in addition to several other less common ones. These raster files are NOT cutting files. They can be used for print and cut projects, mock-ups, to use as a reference when piecing a design back together, or even as a pattern fill.
The two main cutting file options that Craft Bundles offers for Silhouette users are SVG and DXF files. If you utilize the free basic edition of Silhouette, you will only be able to open the DXF files. If you have upgraded to the Designer Edition (highly recommended by the way!), you can use both the DXF and SVG options for design. As you follow the steps below, please double-check that you are opening the correct file type for your edition.
There are three methods you can use to open your files. All of these methods require you to open up your Silhouette Studio software FIRST. Your files will not properly open unless you open from WITHIN Silhouette.
Method 1 :
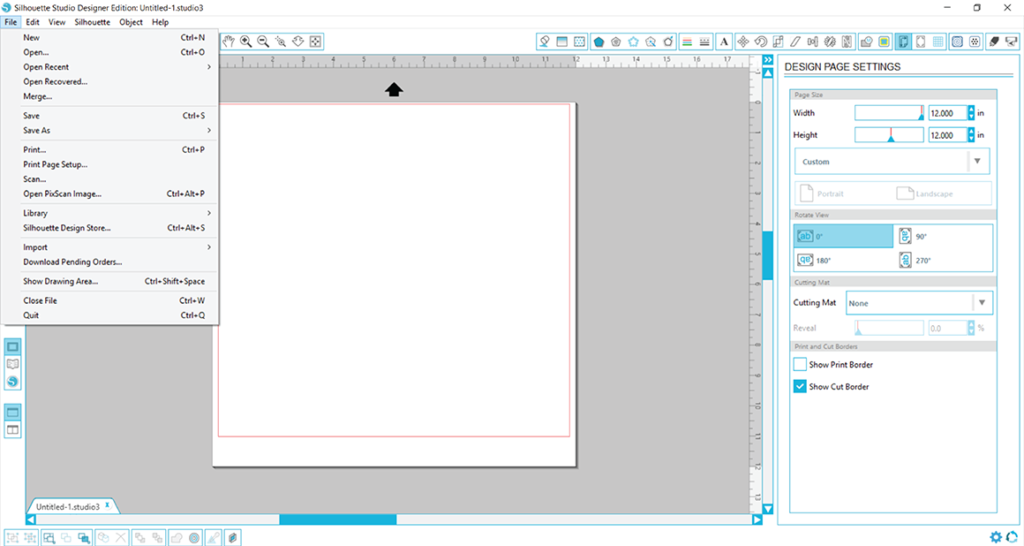
This is the File>Open method. Open up Silhouette, and in the upper left-hand corner, click on the “File” icon. Then scroll down and click on “Open.”
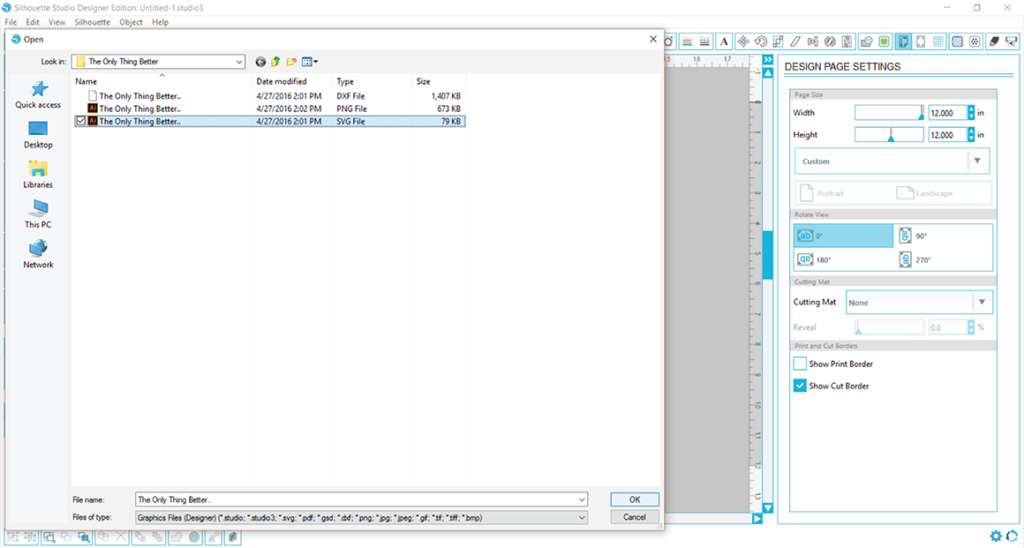
You will then navigate to the folder your file is located in, click the file name, and select OK to open. In this example, I chose to open up a design named “The Only Thing Better.” You can see there are three files and three different file types (DXF, SVG, PNG) for me to choose from. Because I have Designer Edition of Silhouette, I was able to open the SVG file, so that is the one I would like to choose. So I selected it, and then pressed the OK button.
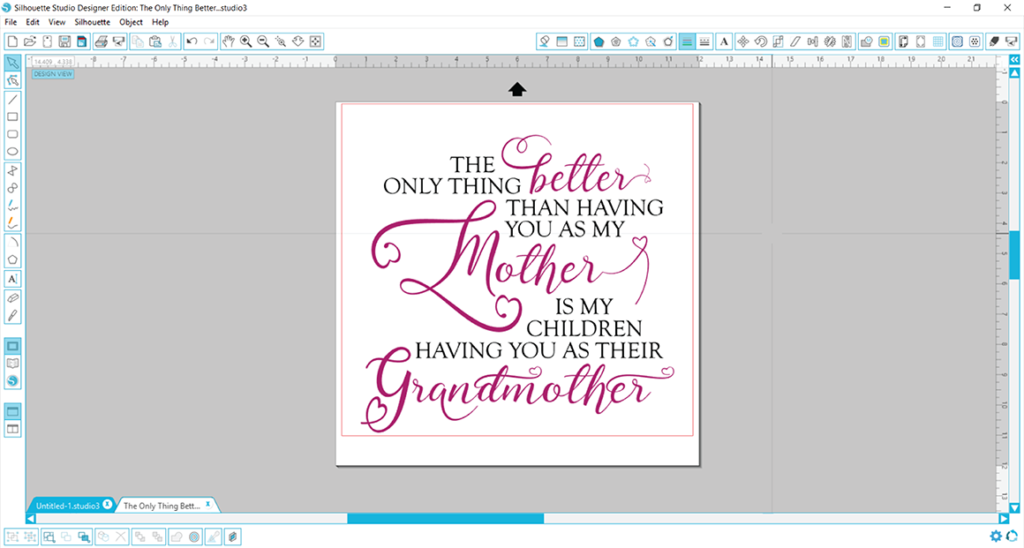
That’s it! My design is waiting for me to begin working with it.
Method 2 :
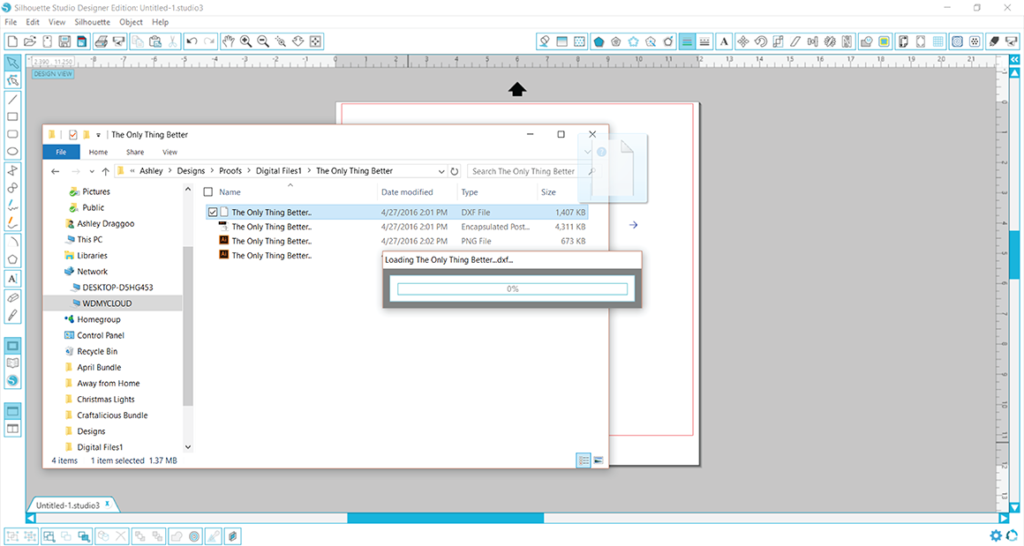
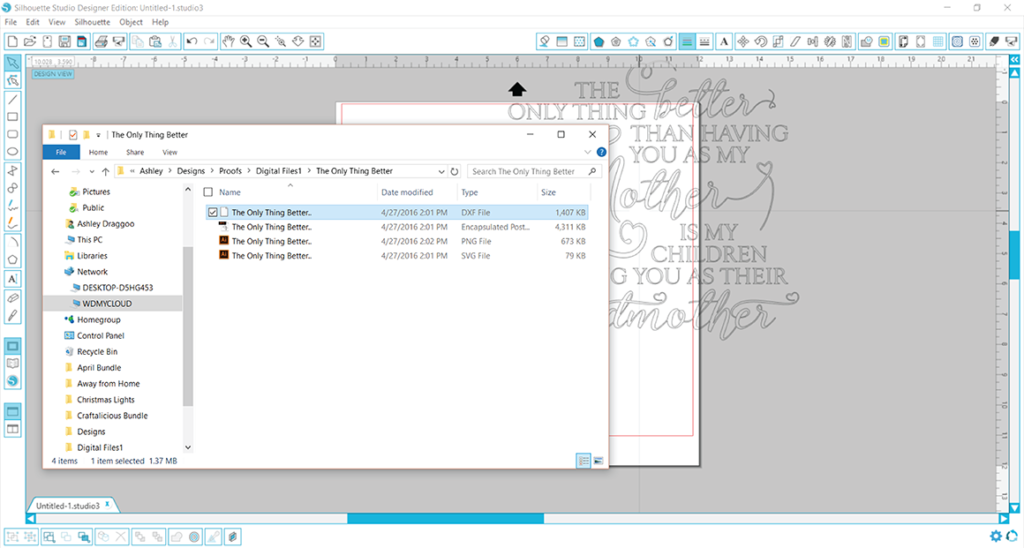
This method is simply a Drag and Drop technique. It is very quick and efficient when you already have a folder open on your desktop with your file inside. In this example, you can see the folder with the 4 file types that are available for this particular design. I would like to open the DXF file, so I will simply click on the file and hold down on the mouse, and drag the file over into my Silhouette workspace. Silhouette will respond by showing you a status bar as the file is copied from its folder to Silhouette.
Once the file has finished copying to Silhouette, it will appear in your Silhouette work area and is ready for use.
Method 3 :
This technique utilizes the Silhouette Library. The Library allows to store your designs right in Silhouette for easy access whenever you need them. You can create folders and store your designs by theme or holiday. This feature does require a little work to upkeep your library, especially if you purchase large bundles. You will need to import and categorize all your designs, so expect that it will take some time to complete the task.
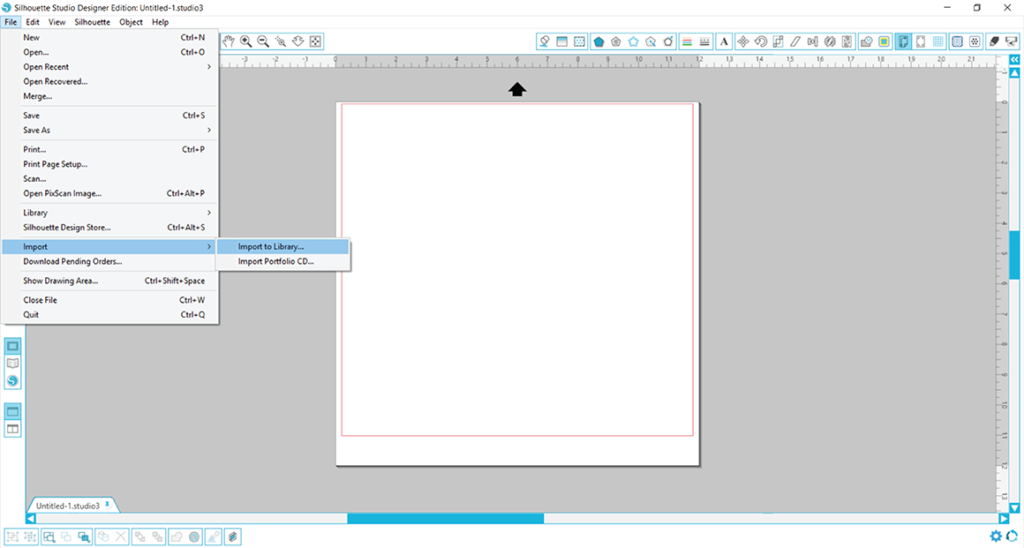
To import a design to your library, open up Silhouette, and click on File>Import>Import to Library.
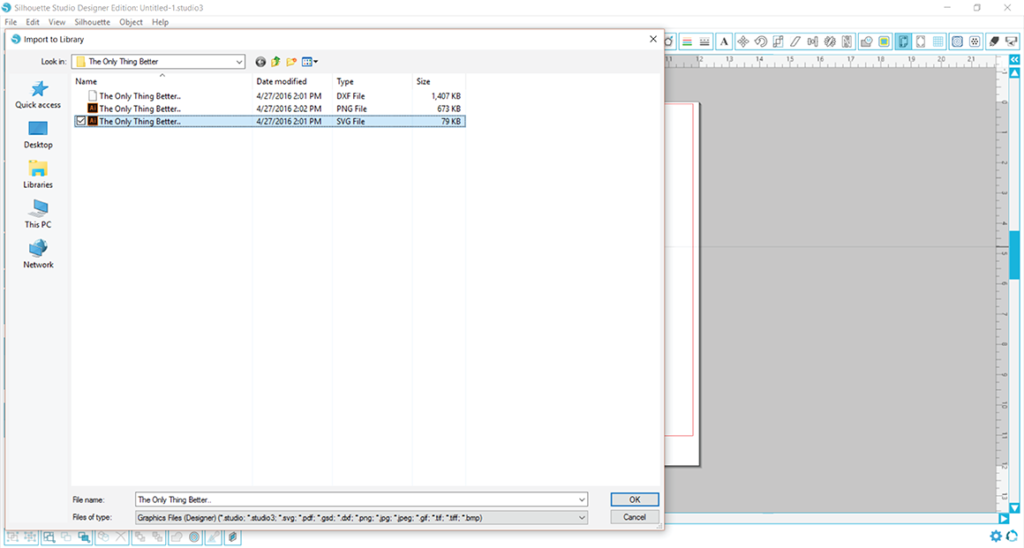
You will then be able to search for the file you would like to add to your library. In this case I wanted to add the SVG design called “The Only Thing Better” to my library, so I located those files for the design.
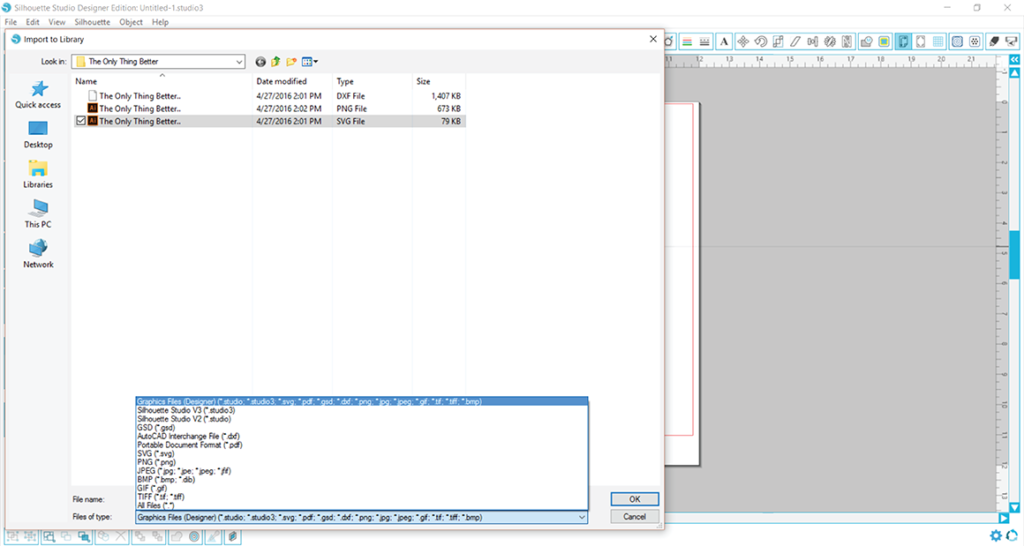
You will also notice that at the bottom will be a drop down called “Files of Type,” and if you cannot locate a certain file type in the folder you expected it to be, double check that that file type is being searched for. Then once you have located the file you would like to add to your library, click OK.
Your design is now available for use in your Library. To open any design available in your Library, just double click it, and it will be added to your work space.
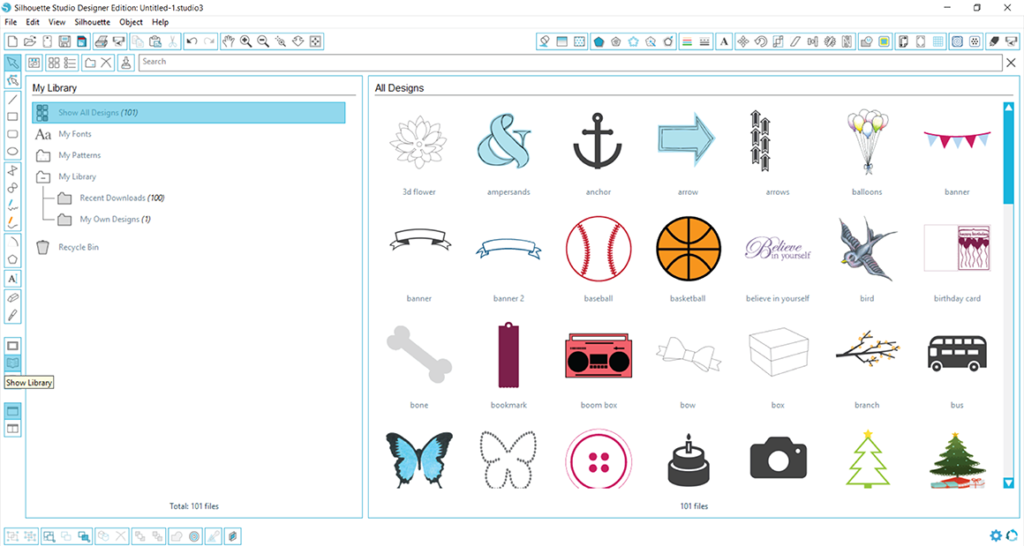
If you are wanting to open a design that you know if already in your Library, you can utilize the “Show Library” icon in the lower left hand corner of Studio, and click it to open it up (it is highlighted in blue in the photo). Then locate your design and double click it to open.
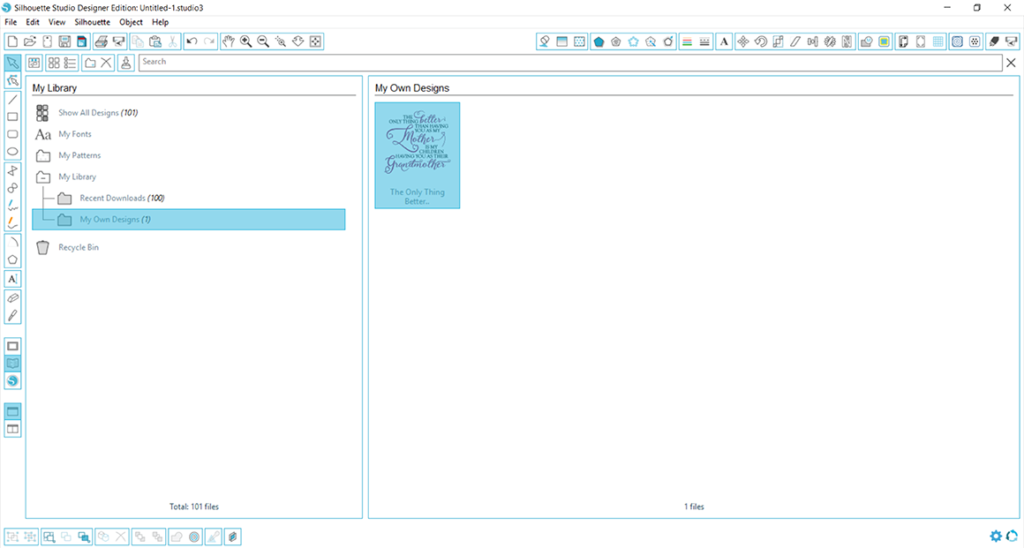
And there is your beautiful design!
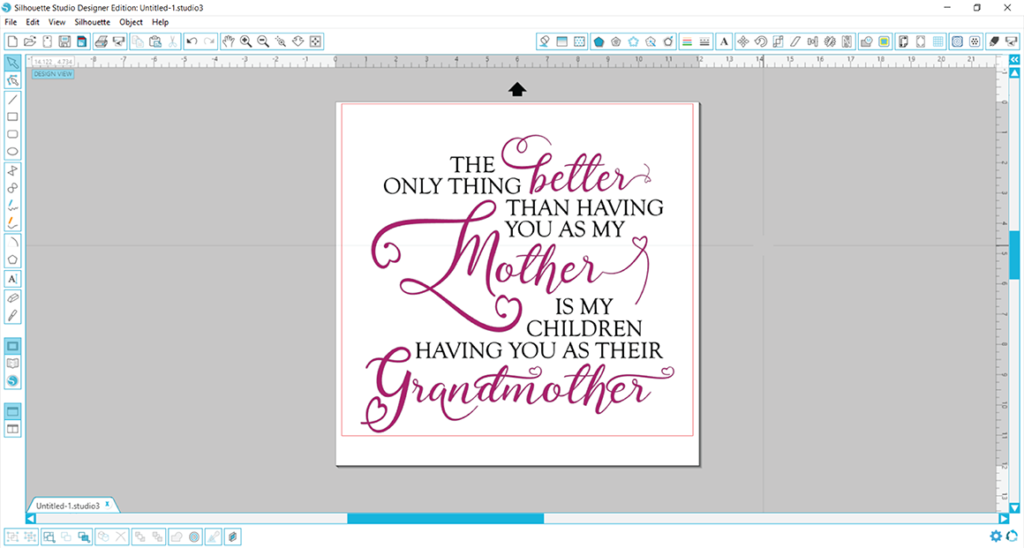
Love this design as much as I do?! You can purchase it from the designer here, with commercial use.
Crazy about that swirly heart font? I know I am! You can support the font creator and add this beauty to your collection here.
Silhouette Help & FAQ
Whether you’ve had your Silhouette machine for years, or you’re a complete beginner, our handy help area will guide you through all aspects of design, from download to cut! All questions are Silhouette specific, so you can’t go wrong!
Cut Files & Graphics
For information on Fonts, scroll further down the page.
1. Why are my files zipped and how do I unzip them?
After you download your purchase, the first thing you need to do is unzip the files. You will not be able to proceed with using your files until you unzip them. In a nutshell, zipped (or compressed) files take up less storage space and can be downloaded more quickly than unzipped (or uncompressed) files. Since your Craft Bundles purchase likely includes hundreds of files, zipping them for download is the easiest and most efficient method for you to download them. Otherwise, you would be clicking a file to download hundreds upon hundreds of times! So, immediately upon downloading your purchase, you will want to unzip the files in preparation for their use. Do you use a PC or a MAC? See below for the proper method to unzip files for each.
Instructions for PC
After you download, look at the icon for the zip folder. Zipped folders have the appearance of a folder with a little zipper on it. Right click on the folder, and you will see an option to “Extract All.” Clicking this option will begin the unzipping process. You will then see a prompt asking you where you would like to save your newly unzipped folder. If the destination is the same destination as the zipped folder, you do not need to browse, and just click Extract to begin unzipping. If you would like to place the unzipped files in a new spot on your computer, then browse to locate this Folder, and then click on Extract. After the unzipping process is complete, you will be left with TWO folders of your files. One will be the files still in the zipped folder. This folder can be deleted if you prefer, as the files are not usable in their zipped format. The other folder will be unzipped and completely ready to use files. Note: The size of the download will determine how long it takes to complete the process. Computer speeds vary.
A more in-depth look at unzipping files can be found in our Unzipping Guide
2. I can’t find my download files on my computer?
Unfortunately, this isn’t a question we can answer for you easily. If you have downloaded your files, you will need to remember where your computer downloaded them to. Everyone’s computer settings are different. You could set it up so your files are downloaded to your computer’s ‘Downloads’ folder, or you can opt for your computer to ask you where you would like your files to be downloaded before downloading. Every internet browser has a default for downloaded files, so if you don’t like the default option, you should edit it so you can find your files when needed.
3. What formats are included in my downloads?
At a minimum, you will receive SVG, DXF, and EPS cut files, as well as raster photo files (PNG and/or JPEG) for all designs in each bundle. The photo files are not cut files, but mainly used for reference, mock-ups, or Print and Cut projects with a quick trace. These 4 file types are the most common types for crafters with cutters and plotters. Note that not all of these file types will be usable in your software, however, and you should verify your software accepts at least one of these file types before purchasing. Silhouette Basic Edition users can use DXF files, and Silhouette Designer Edition users can utilize either SVG or DXF files. If you use Cricut Design Space, you will want to use the SVG files. EPS files are typically reserved for more advanced software, so this file type will not be usable by most. Also, some designers will include additional formats, such as AI or PSD, but this is not common and completely dependent on each designer.
4. What electronic cutting machines are your files compatible with?
Too many to list them all! The most popular though are cutters that utilize the Silhouette Studio or Cricut Design Space software. Others include (but of course not limited to) Sure Cuts a Lot, Brother Scan n Cut, and Make the Cut.
5. Can I import all the designs from a bundle to my library at once?
Most definitely! The process is fairly simple. Open up your Silhouette Library and then open up the folder your files are saved in. Select them all, and drag and drop into your library. That’s it! The importing process can take a little extra time if importing a large number of files, so be patient.
If you need more guidance, check out our guide here
6. How do I open my files in Silhouette Studio?
After your files are unzipped, you are ready to begin using your files in Silhouette. Remember, Silhouette Basic Edition users will want to use the DXF files, and Silhouette Designer Edition users can use either the SVG or DXF files. There are three methods you can use to open your files. All of these methods require you to open up your Silhouette Studio software FIRST. Your files will not properly open unless you open from WITHIN Silhouette.
Method 1 :
This is the File>Open method. Open up Silhouette, and in the upper left-hand corner click on the ‘File’ icon. Then scroll down and click on ‘Open.’ You will then navigate to the folder your file is located in, click the file, and select OK to open.
Method 2 :
This is the Drag and Drop method. It is very simple and all you need to do is Drag the file you would like to open into your Silhouette work area. If the file type is compatible with your edition, it will be placed in your work area where you dropped it.
Method 3 :
This is the Silhouette Library method. You can add any compatible file to your Silhouette Library so that you can place it in your work area without searching for it on your computer. To add a file to your library, open up Silhouette and click File>Import>Import to Library. You will then be able to search for the file you would like to add to your library. Click OK and your file will now be available to you to use at any time while working in Silhouette. Now, if the file you would like to use is already in your library, you can start a new project by opening up Silhouette and then clicking on the ‘Show Library’ icon located on the left-hand side. Locate the design you would like to use, and double click it. The design will now be added to your work area.
Need a visual? Check out our Silhouette Guide for opening files here
7. Why can’t I get files to install on my computer?
These are files, not fonts. Fonts get installed onto a computer, while files do not. Instead of trying to install, you will want to open the file from within your program. File>Open is the method you should use for Silhouette (or you can also drag and drop). See our Guide to opening files in Silhouette for more detailed information.
8. Why do I get an error that my program does not support the file when I try to open a file in Silhouette Studio?
Most likely you are trying to open an incorrect file type for your software. Remember, SVG files cannot be opened in the free basic edition of the studio, so try the DXF file instead. If you have Designer Edition and you still are getting this error, double-check that your license is still activated. Open up Silhouette Studio, and in the upper left-hand corner, it will say “Silhouette Studio Designer Edition: [Insert File Name].” Sometimes your Designer Edition will deactivate. It has happened to me on three occasions!
For more information our guide on Error Support Guide for Silhouette Studio here
9. When I try to open a file, Silhouette is telling me the file is corrupt.
This can occur periodically when downloading and unzipping files. Try downloading the files again and reopening, and checking that you are using the latest version of Silhouette Studio (there was a known problem with file corruption in older versions). If you are still getting this ‘corrupt’ message, contact us on info@craftbundles.com
10. How come when I click on the file, it either doesn’t open or it opens up in a web browser?
When attempting to open a file from within the folder it is saved in, your computer needs to be told which program to use to open that file. SVG files often default to a web browser. Silhouette will typically not be an option to open your files in this way. To avoid this, open up the file from WITHIN your software, by clicking on File>Open in Silhouette.
For more information, view our guide on this topic here
11. I know exactly where I saved my files, but when I go to open them, the files and/or folders are missing. Where did they go?
Don’t worry, they didn’t go anywhere. I assure you they are still in the folder you placed them in. But it does sound like they need to be extracted/unzipped. Your files will appear ‘missing’ when they need to be extracted.
For more information, view our Unzipping Guide
12. My design will not cut in Silhouette. I thought SVG Files were supposed to be cut files.
SVG files definitely are cut files, but it just sounds like cut lines are not turned on in your software. Select your design, then click on the icon in the upper right that is called Cut Settings. It will look like the tip of a Silhouette blade. The cut style is likely to set to ‘No Cut,’ which means your design will not cut no matter what you do. Just change that to ‘Cut’ or ‘Cut Edge,’ whichever is appropriate for your project, and you should have no problems now. If you have turned your cut lines on and you see a red box around your design, you have opened the PNG file and not the SVG file. Closeout of the PNG file, and reopen the file, double-checking that you are selecting the SVG file to open.
Need a visual? Check out our guide here
13. I am having difficulties tracing the PNG. Where am I going wrong?
Closeout of the PNG file and don’t worry about tracing. Cut lines are already embedded in the other three files, so you are adding a lot of extra work for yourself. Open up either the DXF (basic edition) or the SVG (designer edition), turn cut lines on, and work with those files instead.
14. I am working with the DXF file in Silhouette Basic Edition, but it looks completely different to how I expected. When I try to move or resize the design, it leaves pieces behind. I don’t know where to begin!
DXF files import as outlines only with no colors and no layers. So, when using a DXF file, you need to be extra careful, especially if there are lots of little pieces in your design. You may need to group together and/or make a compound path like pieces/colors/layers to cut. Use the PNG photo as a guide if needed. I personally highly recommend upgrading to the Designer Edition as soon as you are able, as SVG files import differently with colors and layers, so they are typically easier to work with. Need a hand with DXF files?
Our Guide to Demystifying DXF Files can be viewed here:
15. I opened the SVG, but it doesn’t look like the whole design is there. There are pieces missing or it looks like a black box.
Unless the designer made a mistake (which does happen!), the pieces are most likely there, just either hidden, transparent, or every layer imported as the same color. First, select the whole design by hitting Control plus ‘A’ on your keyboard. Then make everything transparent using the fill color. Also, check that the line color is any other color besides transparent so you can see the outlines of the design. You will likely now be able to see the layers you couldn’t see before.
Our guide is also available showing an alternative method for finding these missing pieces. Check it out here
16. I opened my file in Silhouette, but nothing is there. It looks blank
The design might have imported either very small or somewhere off the mat. Use the zoom out icon and zoom out as far as it will go. Then use your keyboard and hit Ctrl plus the letter A to select everything (Command plus ‘A’ on a MAC). If there still appears to be nothing in the file, contact the designer for guidance. If you were able to locate the design off the mat and want to avoid this in the future, go into your import settings (Edit> Preferences> Import Options) and check the following for both the SVG and DXF option: Fit to Page, Make White Lines Black, and Join Lines Into Polylines. Need more?
17. I would like to ungroup the design in Silhouette, but ungroup is not an option. It is shaded out so I cannot select it
If you run into this problem in Silhouette, the easy fix is to use the release compound path option instead. Then group all the pieces you need together, and make sure you make those pieces a compound path again so you don’t lose out on pieces that may be hidden. It helps to make the fill color transparent when doing this so you can see all the pieces. If a compound path is also not an option, double-check that you have opened the correct file type.
We have created a quick guide for you on this topic available here
Fonts & Typefaces
This area specifically relates to questions about using fonts in Silhouette Studio. For information on how to use cut files, please scroll up.
1. How do I get fonts to work on my Silhouette Studio?
A common misconception is that fonts open directly in your Silhouette Studio. This is not the case. Because of the way fonts interact with your computer’s keyboard, they must be installed.
This installation is only needed once per font. It is not program-specific, meaning a single installation will grant you access to use that font across all your font based programs (Powerpoint, etc).
If you are a Windows or a Mac user, please click here.
2. How do I access a font’s alternate characters?
All PUA encoded fonts are 100% accessible in Silhouette Studio. To read how to access the alternate (non-standard) characters, have a read of our guide here
3. Do I need an alternate software to access your fonts?
Absolutely not. CraftBundles.com was set up to offer products specifically for crafters. No design software is required.
If you have any further questions, we haven’t answered above please feel free to email us on info@craftbundles.com

